Your property has ways of telling you when something is wrong, and spalling concrete is one of its loudest alarms. Those flaky, pockmarked surfaces are a symptom of a deeper issue, usually involving water getting into the concrete, freezing, and expanding with incredible force. This relentless cycle slowly breaks the surface apart from the inside out. A simple patch might cover the problem for a little while, but a true, lasting fix requires getting to the root cause. Before you can choose the right spalling concrete repair method, you need to understand what’s happening beneath the surface. This article will help you diagnose the problem and explore effective solutions.
Key Takeaways
- Identify the root cause of spalling: Flaking and chipping concrete is a symptom, not the core problem. A lasting repair depends on addressing the underlying issue, whether it’s moisture getting in, rebar corrosion, or a poor installation job.
- Prevention is simpler than repair: A simple maintenance routine can save you from costly fixes. Focus on sealing your concrete to block moisture, managing drainage to keep water away, and regularly inspecting surfaces to catch damage before it spreads.
- Evaluate the damage to choose the right fix: For small, superficial spots, a DIY repair might work. However, if the spalling is deep, widespread, or affects structural areas like foundation walls, a professional assessment is essential to protect your property’s integrity.
What is Concrete Spalling?
Have you ever noticed patches on your driveway or garage floor where the concrete surface is flaking, chipping, or peeling away? That’s a classic sign of concrete spalling. Think of it as the concrete’s top layer breaking off, exposing the rougher, weaker material underneath. While it might start as a small cosmetic issue, spalling is often a warning sign of a deeper problem. When left unaddressed, it can compromise the strength of your concrete, leading to more significant structural issues down the road. It’s your property’s way of telling you that something is wrong, either from environmental stress or issues within the concrete itself.
What Does Spalling Look Like?
Spotting spalling is fairly straightforward once you know what to look for. The surface will often appear pitted and patchy, almost like it has craters or potholes. You might see thin flakes of concrete breaking away or find larger chunks that have completely detached. This flaking exposes the coarse aggregate (the small stones and sand) within the concrete mix, giving it a rough and unfinished look. In more severe cases, especially in reinforced concrete structures like balconies or columns, you might even see the steel rebar peeking through. This is a serious issue that requires immediate attention, as exposed rebar can lead to corrosion and further damage.
How Spalling Affects Your Property’s Value
Spalling is more than just an eyesore; it can directly impact your property’s value and structural integrity. For potential buyers, visible concrete damage is a major red flag that suggests underlying problems and future expenses. Over time, the damage will only get worse. As the protective surface layer erodes, water and chemicals can penetrate deeper, weakening the entire structure. This can lead to the corrosion of reinforcing steel and a shorter lifespan for your concrete. Addressing spalling early is a smart move to protect your investment and prevent minor issues from turning into a major foundation repair project.
Where Does Spalling Usually Happen?
You’ll typically find spalling in areas that are frequently exposed to harsh conditions. Driveways, garage floors, patios, and outdoor steps are prime candidates, especially in climates with freeze-thaw cycles. When water seeps into the concrete, freezes, and expands, it puts immense pressure on the surface, causing it to pop and flake. Areas exposed to de-icing salts are also highly susceptible. Indoors, you might see spalling on basement walls or floors where moisture is a persistent problem. Proper waterproofing is one of the best ways to protect these vulnerable areas from the moisture that often kicks off the spalling process.
What Causes Concrete to Spall?
Spalling concrete doesn’t just happen overnight. It’s usually the result of a few key culprits working together over time. Understanding what causes this flaking and pitting is the first step toward a lasting fix. Think of it like being a detective for your property—by identifying the root cause, you can find the right solution and prevent it from happening again. Most spalling issues trace back to moisture, chemicals, a poor installation job, or problems lurking within the concrete itself. Let’s look at each of these causes more closely.
The Role of Water and Weather
Concrete might seem solid, but it’s actually porous, meaning it can absorb water. This becomes a problem during cold weather. When the water inside the concrete freezes, it expands with incredible force, pushing on the concrete from within and causing small pieces of the surface to pop off. This freeze-thaw cycle, repeated season after season, gradually breaks down the surface, leading to widespread spalling. Effective waterproofing is one of the best ways to protect your concrete from this relentless cycle by stopping moisture from getting in in the first place.
Chemicals, Salt, and Corrosion
If you live in an area with cold winters, you’re familiar with de-icing salts. While they’re great for keeping sidewalks and driveways safe, they can be tough on concrete. Saltwater not only accelerates the damaging freeze-thaw cycle but also chemically attacks the concrete itself. Over time, this can weaken the surface and lead to spalling. Even worse, if that salty water seeps into the concrete and reaches the steel rebar inside, it can trigger a corrosive reaction. This is why you often see more spalling on driveways, garage floors, and public walkways where salts are frequently used.
When Installation Goes Wrong
Sometimes, the problem starts the day the concrete is poured. If the initial concrete mix had too much water or not enough cement, the final product will be weak and more susceptible to damage. Likewise, improper finishing techniques can trap water at the surface or create a weak top layer that easily flakes away. While you can’t go back in time to fix a bad pour, understanding that the issue is foundational helps in planning a proper repair. This is why quality work during new construction is so critical for long-term durability.
The Problem with Corroding Rebar
Many concrete structures, like balconies, columns, and foundations, contain a grid of steel bars called rebar for added strength. If moisture penetrates the concrete and reaches the rebar, the steel begins to rust. As it rusts, it expands to many times its original size, creating immense pressure that pushes the surrounding concrete outward. This internal force causes the concrete to crack, delaminate, and spall. You might see rust stains along with the flaking, which is a clear sign of this issue. Addressing this requires specialized corrosion repair to stop the damage from spreading.
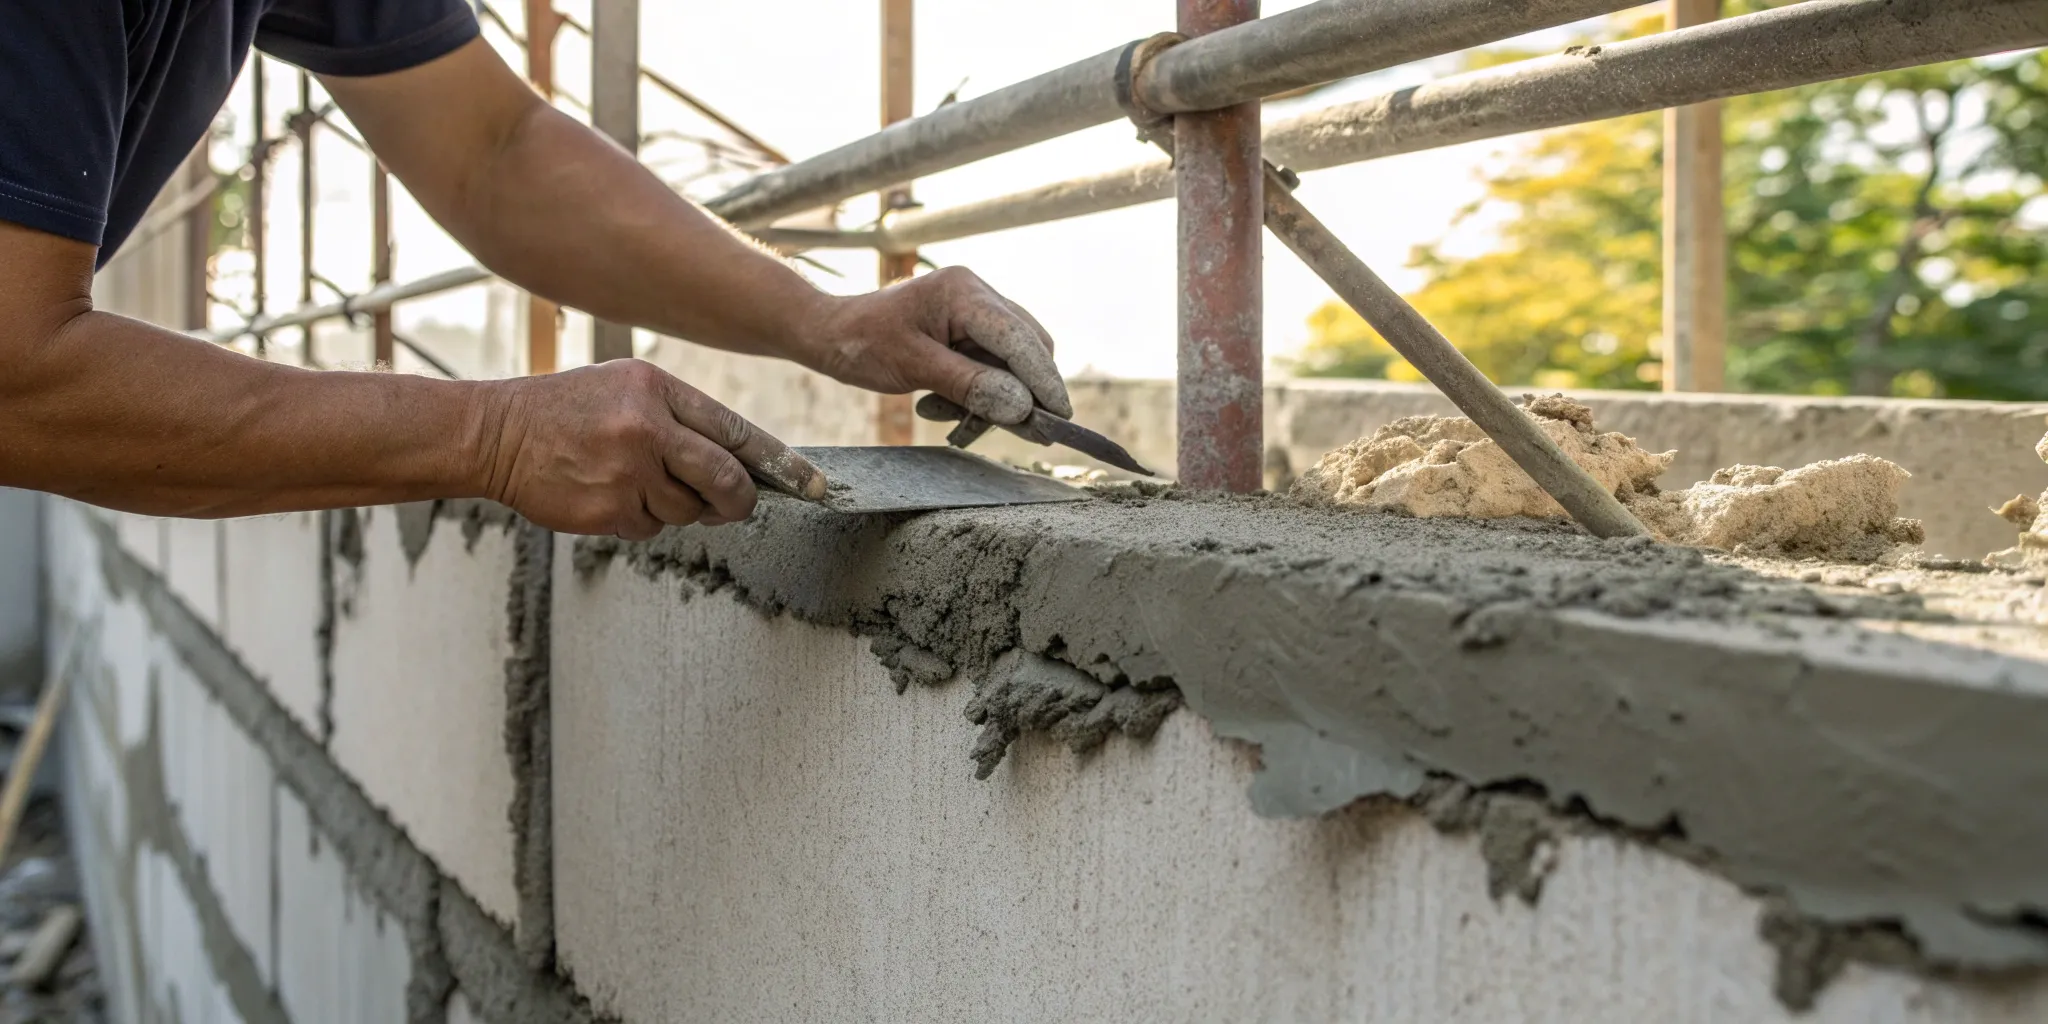
How Professionals Fix Spalling Concrete
When you hire a professional, you’re getting more than just a quick patch job. A proper spalling repair is a multi-step process designed to fix the current damage and address the underlying cause to prevent it from happening again. Experts use specialized tools, high-grade materials, and proven techniques to restore your concrete’s strength and appearance. This systematic approach ensures the repair is durable and blends seamlessly with the existing surface. For severe cases where spalling indicates deeper issues, a full foundation repair plan might be necessary to protect your property’s structural integrity.
Assessing the Damage
The first thing a professional does is figure out exactly what’s going on. This goes beyond just looking at the visible flaking. They’ll tap the surface to listen for hollow sounds, which indicate delamination below. They will also identify the root cause, whether it’s water intrusion, rebar corrosion, or a poor initial installation. Understanding the full extent of the problem is key, as spalling can expose the inner structure of the concrete and weaken it over time. This detailed assessment determines the right repair strategy and ensures the fix will actually last.
Preparing the Surface for Repair
Proper surface preparation is non-negotiable for a successful repair. A professional will start by removing all the loose, crumbling, and unsound concrete using tools like hammers, chisels, or grinders. The goal is to get down to a solid, stable base. Once the damaged material is gone, the area is thoroughly cleaned to remove any dust, oil, or debris that could prevent the new material from bonding. Sometimes, this involves pressure washing or using a wire brush. A clean, sound surface is essential for the repair mortar to adhere properly and create a strong, lasting patch.
Choosing the Right Materials
Not all concrete patch products are created equal. Professionals have access to a range of high-performance repair mortars, epoxies, and overlays, and they know which one to use for your specific situation. The choice depends on factors like the depth of the spall, the type of traffic the area receives, and the environmental conditions. For example, a driveway patch needs to withstand vehicle weight and de-icing salts, while a basement wall repair might prioritize moisture resistance. Using the right material is critical for a durable repair that can stand up to the elements and daily wear. In some cases, specialized solutions like polyurethane geotechnical foam are used to stabilize the underlying soil and support the concrete.
Applying the Repair Materials
With the area prepped and the right material selected, it’s time for application. A professional will mix the repair product according to the manufacturer’s exact specifications to achieve the perfect consistency. The material is then carefully applied with a trowel, ensuring it fills the entire cavity and makes full contact with the prepared surface. The key is to work the material in tightly to eliminate any air pockets. Finally, they will smooth and texture the surface to match the surrounding concrete, creating a repair that is both strong and visually discreet. This step requires skill and a steady hand to achieve a seamless finish.
Ensuring a Proper Cure
The job isn’t finished once the patch is in place. The final, crucial step is curing. Curing is the process of maintaining proper moisture and temperature to allow the repair material to harden and gain its full strength. If a patch dries out too quickly, it can shrink, crack, and fail. Professionals use various methods to ensure a proper cure, such as covering the repair with plastic sheeting, applying a liquid curing compound, or periodically misting it with water. This step is essential for the long-term durability of the repair and is a hallmark of a professional job. Proper curing is a key part of any concrete work, including comprehensive waterproofing projects.
Should You Repair or Replace Your Concrete?
Seeing your concrete start to flake and crumble can be unsettling. Your first thought might be, “Do I need to tear this all out and start over?” It’s a big question, and the answer isn’t always straightforward. Deciding whether to repair or replace spalling concrete comes down to a few key factors: the extent of the damage, the overall cost, and, most importantly, the structural safety of your property. A few small pits on your patio might be a simple fix, but widespread spalling on a foundation wall is a different story entirely.
Before you make a decision, it’s helpful to take a step back and look at the big picture. A repair is often faster and more budget-friendly for localized issues. However, if the spalling is a symptom of a deeper problem—like a failing foundation or widespread rebar corrosion—a patch job might just be a temporary fix. A full replacement is a much larger investment of time and money, but it can be the right choice for concrete that’s reached the end of its life, ensuring a safe and long-lasting solution. We’ll walk through how to evaluate your situation so you can make a confident choice for your home or building.
How Bad Is the Damage?
First, take a close look at the spalling. Is it a shallow issue, with just a few flakes on the surface? Or are you seeing deep pits and exposed chunks of aggregate? The depth and spread of the damage are your biggest clues. Spalling that isn’t addressed can spread quickly and weaken the entire concrete structure. If the damage is contained to a small area and is less than an inch deep, a professional repair is likely a great option. However, if you see large sections of crumbling concrete or deep craters, it’s a sign of a more serious problem that may require a more intensive solution.
Comparing the Costs
Your budget will obviously play a big role in your decision. Generally, repairing concrete is significantly less expensive than replacing it. For example, the average cost to repair a concrete driveway is around $1,250, while a full replacement can easily run into thousands of dollars. While repair is the more affordable option upfront, consider the long-term value. If the concrete is old and the damage is extensive, you might find yourself paying for frequent repairs. In that case, a one-time replacement could be more cost-effective over the life of your property. It’s all about balancing the immediate cost with the future investment.
Is Your Structure at Risk?
This is where spalling goes from a cosmetic issue to a serious concern. If the spalling is deep enough to expose the steel rebar inside the concrete, you have a structural problem. That rebar is the skeleton of your concrete, giving it strength and stability. When it’s exposed to moisture, it rusts and expands, causing even more concrete to break away. This can weaken the concrete structure and compromise its integrity. If you see spalling on critical structural elements like foundation walls, support columns, or beams, it’s essential to have a professional assess the risk right away.
Putting Safety First
Ultimately, the safety of your property is the top priority. Damaged concrete isn’t just an eyesore; it can be a hazard. Crumbling steps, uneven walkways, or a deteriorating garage floor can create dangerous trip-and-fall risks. More seriously, spalling in a foundation or support structure can have severe consequences if left unchecked. Ignoring the problem can lead to more cracks, accelerated corrosion, and a weaker structure, which shortens its lifespan. When in doubt, getting a professional foundation repair assessment is the safest move you can make. It gives you a clear picture of the problem and ensures any solution will keep your property secure for years to come.
A Guide to DIY Spalling Repair
If you’ve caught the spalling early and it’s limited to a small, superficial area, you might be able to handle the repair yourself. A DIY fix can be a great way to restore the look of your concrete and prevent minor issues from getting worse. However, it’s important to be realistic about the scope of the project. Widespread or deep spalling, especially if it involves structural elements, is a job best left to the pros. For minor cosmetic fixes on surfaces like a patio or walkway, tackling the repair can be a rewarding weekend project.
This guide will walk you through the essential steps, from gathering your supplies to applying the finishing touches. Remember, the goal is to create a durable patch that blends with the surrounding concrete and protects the surface from further damage. If at any point the damage seems more significant than you first thought—for instance, if you see signs of deep cracking or crumbling—it’s always wise to pause and consult with a professional.
Gather Your Tools and Materials
Before you start, get all your supplies in one place to make the process go smoothly. You don’t want to be running to the hardware store with a half-mixed bucket of concrete resurfacer.
Here’s what you’ll generally need:
- Safety Gear: Always start with safety. Grab some gloves, goggles, and a dust mask.
- Pressure Washer: This is the best tool for cleaning the concrete thoroughly. You can often rent one if you don’t own one.
- Mixing Supplies: You’ll need a bucket or wheelbarrow, a cordless drill, and a paddle-style mixer attachment.
- Application Tools: A long-handled squeegee helps spread the material evenly, and a hose is needed for rinsing and dampening the surface.
- Concrete Resurfacer: Choose a quality resurfacing product designed to bond with old concrete and create a new, durable surface.
Your Step-by-Step Repair Guide
With your tools ready, you can get to work. The key to a lasting repair is proper preparation, so don’t rush the cleaning step.
- Clean the Surface: Use a pressure washer to remove all dirt, grime, and loose, flaky concrete. The new material needs a clean, solid base to adhere to. For stubborn spots, you may need to use a wire brush or grinder first.
- Mix the Resurfacer: Follow the manufacturer’s instructions carefully. Add the powder to a bucket and gradually mix in water using your drill and paddle mixer. You’re aiming for a smooth, lump-free consistency, much like pancake batter.
- Apply the Material: Lightly dampen the old concrete with your hose, but don’t leave any standing water. If you have any deeper pits or cracks, fill them first. Then, pour the resurfacer onto the spalled area and use your squeegee to spread it in a thin, even layer.
Stay Safe During Your DIY Repair
Working with concrete materials requires a few safety precautions. Concrete mix contains chemicals that can irritate your skin and eyes, and the fine dust can be harmful if inhaled. Always wear your protective gear, including waterproof gloves, safety goggles, and a dust mask, especially during the cleaning and mixing stages. Good ventilation is also important if you’re working in a garage or another enclosed space. Taking these simple steps ensures your project is not only successful but also safe from start to finish. It’s a small effort that makes a big difference in protecting your health while you improve your home.
Tips for a Lasting DIY Fix
The most important tip for a successful repair is to act quickly. Spalling is a progressive issue—what starts as a small patch of flaking can spread and deepen over time, eventually compromising the concrete’s strength. Addressing it early saves you from a much bigger and more expensive problem later. If spalling is left untreated, it can expose the underlying rebar to moisture, leading to rust and significant structural damage that often requires professional foundation repair. A timely DIY patch not only restores the appearance of your concrete but also seals the surface against the elements, extending its life and protecting your investment.
How to Prevent Concrete Spalling
The best way to deal with spalling is to stop it from happening in the first place. A little proactive care can save you a lot of time, money, and stress by extending the life of your concrete surfaces. Prevention isn’t about complicated, time-consuming tasks; it’s about creating a simple maintenance habit. By keeping water out and addressing minor issues before they become major problems, you can protect your driveway, patio, foundation, and walkways for years to come. Think of it as routine care, just like you’d perform on any other major component of your property. These straightforward strategies will help you keep your concrete strong, stable, and looking its best.
Seal Your Concrete for Protection
Think of a concrete sealer as a high-performance jacket for your driveway or patio. It creates a protective barrier that stops water, chemicals, and salt from soaking into the pores of the concrete. For the best results, you should seal new concrete and reapply the sealer every few years. A good rule of thumb is to test it annually: just splash a little water on the surface. If it beads up, your sealer is still working. If it soaks in, it’s time for a new coat. Sealing is one of the most effective and affordable ways to prevent the freeze-thaw cycle that leads to spalling. For an even higher level of protection, professional waterproofing can offer a more permanent solution, especially for critical areas like foundations.
Manage Water with Proper Drainage
Since water is the primary culprit behind spalling, controlling where it goes is essential. When water pools on or near your concrete, it will eventually find its way inside. Proper drainage ensures that rainwater and meltwater are directed away from your concrete slabs and foundation walls. Start by checking your gutters and downspouts to make sure they are clear of debris and are discharging water several feet away from your home. You should also assess the grading of the soil around your property; it should gently slope away from the foundation. Avoid piling snow against concrete walls or on your driveway during the winter, as this creates a concentrated source of moisture when it melts.
Create a Simple Maintenance Routine
You don’t need to spend every weekend working on your concrete to keep it in great shape. A simple, consistent maintenance routine is all it takes. First, keep the surface clean. Regularly sweep away leaves, dirt, and other debris that can trap moisture and stain the concrete. If you spill oil, fertilizer, or other chemicals, clean them up immediately to prevent them from degrading the surface. Second, make sealing a recurring task on your calendar. As mentioned, you should reapply sealer whenever the concrete stops repelling water. Finally, keep an eye out for small cracks and fill them with a flexible sealant to stop water from getting in and making the problem worse.
Why Regular Inspections Matter
Catching spalling early is the key to a simple fix. A small, flaky patch is an easy repair, but widespread damage can compromise the structural integrity of the concrete and lead to costly replacements. If left alone, spalling can spread quickly, weaken the structure, and reduce the lifespan of your concrete. Take a walk around your property a few times a year to inspect your concrete surfaces. Look for any signs of chipping, pitting, or flaking. If you spot any issues, especially cracks that seem to be growing, it’s best to address them right away. A professional assessment can determine the cause and recommend the right crack injection or corrosion repair before the damage escalates.
Protecting Your Concrete for the Long Haul
Taking a proactive approach to concrete care is the best way to prevent spalling and other costly damage. Instead of waiting for problems to appear, you can implement a few key strategies to protect your investment and keep your concrete surfaces strong and stable for years to come. It’s all about creating a defense system against the elements that cause the most harm: water, ice, and chemicals. By thinking ahead, you can save yourself a lot of time, money, and stress down the road.
Go Beyond Sealing with Advanced Waterproofing
While a basic sealant offers a decent first line of defense, true long-term protection comes from more advanced waterproofing methods. For new projects, this starts with using the right concrete mix—one with tiny air bubbles (a process called air entrainment) that give freezing water room to expand without causing cracks. For existing concrete, professional waterproofing creates an impermeable barrier that stops moisture from ever seeping in. This goes far beyond a simple surface coat, addressing potential weak points and ensuring water is directed away from your foundation and flatwork, effectively stopping the freeze-thaw cycle before it can start.
Control Your Environment, Protect Your Concrete
The environment around your concrete plays a huge role in its health. The biggest threat is often water that gets into the concrete, freezes, and expands. This process exerts immense pressure from within, pushing the surface apart and causing it to flake and chip over time. De-icing salts, while helpful for melting ice, make this problem worse by allowing more water to penetrate the concrete. To protect your surfaces, focus on managing water flow with proper drainage. Ensure downspouts direct water away from driveways and foundations, and consider grading your landscape to prevent pooling. When you can, opt for sand or de-icers that are less corrosive to concrete.
Explore Modern Sealing Solutions
Today’s concrete sealants are more sophisticated than ever. Instead of just sitting on the surface, many modern products are designed to penetrate deep into the concrete’s pores. These penetrating sealants create an internal shield that blocks water and de-icing salts from getting in, which is your best defense against damage from freezing and thawing. For new installations, using a combination curing and sealing product is a great move. These formulas help the concrete cure slowly and evenly, which is essential for reaching maximum strength, while also providing a protective layer from day one. Thinking about this during new construction can prevent headaches later.
How to Monitor Your Concrete’s Health
Making a habit of inspecting your concrete can help you catch problems early. A few times a year, take a walk around your property and look closely at your driveway, patio, and foundation walls. Keep an eye out for chipping, flaking, small pits, dark spots, or areas where the rocks (aggregate) are exposed. Even small hairline cracks can be an early warning sign. If you spot these issues, don’t ignore them. Unchecked spalling can lead to larger cracks and expose the internal steel rebar to moisture, causing rust and compromising the entire structure. Addressing minor crack injection or corrosion repair early is much simpler and more affordable than a major fix later on.
Related Articles
- Foundation Repair FAQs – Professional Foundation Repair
- 3 Ways To Repair a Crack in a Concrete Foundation – Professional Foundation Repair
Frequently Asked Questions
Is spalling always a sign of a major structural problem? Not necessarily, but it should always be taken seriously. Minor, shallow flaking on a patio or walkway is often a cosmetic issue caused by weather. However, if the spalling is deep, widespread, or appears on foundation walls or support columns, it could indicate a more significant problem. The biggest red flag is seeing exposed metal rebar, which means the structural integrity could be at risk and needs immediate professional attention.
Can I just paint or put a thin coating over the spalled area to hide it? This is a common impulse, but it’s only a temporary and ineffective fix. Simply covering up spalling is like putting a bandage on a wound that needs stitches. The underlying concrete is still weak and crumbling, so any paint or thin coating you apply will quickly peel and flake away as the spalling continues underneath. A proper repair involves removing all the unsound material first to create a solid base for the new patch to bond to.
My concrete is only a year or two old. Why is it already spalling? It’s incredibly frustrating to see damage on new concrete, and it almost always points back to the initial installation. This can happen if the concrete mix had too much water, which weakens the final product, or if the finishing work was done improperly. For example, finishing the surface too soon can trap water just below the top layer, leading to a weak crust that easily flakes off during the first few freeze-thaw cycles.
How can I tell if the spalling is caused by water or something more serious like rebar corrosion? You can look for a few key clues. Spalling from freeze-thaw cycles often looks like widespread pitting and shallow flaking across the surface, especially in areas where water pools. If the cause is corroding rebar, the damage is usually more localized and severe. You’ll often see cracks running parallel to where the rebar is located, along with rust-colored stains bleeding through the concrete.
If I pay for a professional repair, will the spalling just happen again? A quality professional repair is designed to be a long-term solution, not a quick patch. A true expert won’t just fill the holes; they will diagnose and address the root cause of the spalling. This could mean improving drainage, sealing the concrete against moisture, or treating corroded rebar. By fixing the underlying issue, a professional ensures the new repair material bonds correctly and is protected from the conditions that caused the original damage.