Those lines in your driveway or patio aren’t just for decoration. They’re expansion joints, and they play a crucial role in preventing your concrete from cracking under pressure. When the sealant in these joints starts to crumble and weeds begin to sprout, it’s more than just an eyesore. It’s a warning sign. These gaps become direct pathways for water to seep beneath your slabs, leading to soil erosion, uneven surfaces, and even foundation damage. This guide will walk you through everything you need to know about effective concrete expansion joint repair, from identifying the problem to a step-by-step process for a lasting fix.
Key Takeaways
- Look for the early warnings: Cracking sealant, weeds, and gaps in your expansion joints are more than just cosmetic issues. They are direct pathways for water to get under your concrete, leading to soil erosion and costly slab settlement.
- Prep work is non-negotiable for a lasting fix: A successful repair depends on more than just new sealant. You must completely remove the old material, clean the joint down to bare concrete, and install a foam backer rod to ensure the new seal is strong, flexible, and watertight.
- Recognize when a simple fix isn’t enough: If you see sinking or uneven concrete slabs, the problem is likely beneath the surface. These are signs of an unstable base that sealant alone can’t fix, making it essential to call a professional for a structural assessment.
What Are Concrete Expansion Joints?
If you’ve ever looked at a sidewalk, driveway, or patio, you’ve probably noticed the lines that divide the concrete into separate slabs. These aren’t just for looks—they’re called expansion joints. At their core, concrete expansion joints are intentional gaps filled with a flexible material. Concrete, like many materials, expands when it gets hot and contracts when it gets cold. Without a little room to breathe, this constant movement would create immense pressure, leading to ugly and often serious cracks.
These joints act as a buffer, absorbing the stress from temperature and moisture changes. They ensure that as your concrete slabs shift, they don’t push against each other and cause damage. Keeping these joints properly sealed is a small but crucial part of maintaining the health and longevity of your concrete surfaces. When the sealant fails, it leaves your concrete vulnerable to a host of problems that can be much more difficult and expensive to fix down the line.
Why Your Concrete Needs Them
Think of expansion joints as a safety valve for your concrete. They are specifically designed to give concrete slabs the space they need to move without breaking. This movement is a natural response to shifts in temperature and moisture. When these gaps are properly sealed, they prevent water, dirt, and weeds from getting underneath your concrete, which can lead to erosion and slab settlement.
Leaving these joints open or letting the sealant degrade is an invitation for trouble. Water intrusion is one of the biggest culprits, as it can freeze and thaw, widening cracks and weakening the soil base below. The primary goal of maintaining your expansion joints is to stop these issues before they start, preventing the kind of damage that requires extensive crack injection and corrosion repair. A well-sealed joint is your first line of defense against premature concrete failure.
The Different Types of Joints
When it comes to filling expansion joints, not all materials are created equal. The ideal filler is a flexible, waterproof, and durable sealant, often a type of concrete caulk designed to withstand movement and weather. The right choice depends on the specific location and size of the joint.
Generally, you’ll encounter two main types of sealants. Self-leveling caulk is a thin, pourable liquid that flows easily into the joint and smooths itself out, creating a clean finish. It’s perfect for horizontal surfaces like driveways and patios. For vertical or sloped surfaces, non-sag caulk is the better option. It has a much thicker consistency that prevents it from running, but it needs to be smoothed by hand. Choosing the right material is just as important as using advanced solutions like polyurethane geotechnical foam for other concrete issues.
Is It Time to Repair Your Expansion Joints?
Expansion joints are the unsung heroes of your concrete surfaces, quietly absorbing pressure and preventing cracks as the slabs expand and contract. But they don’t last forever. When the flexible sealant in these joints starts to fail, it leaves your concrete vulnerable to damage that can be much more serious than a simple cosmetic issue. Knowing what to look for can help you catch problems early and avoid costly repairs down the road. Pay attention to these key signs that your expansion joints need attention.
Visual Warning Signs to Look For
Take a walk around your property and look closely at the expansion joints in your driveway, patio, or walkways. The first signs of trouble are often easy to spot. You might see the existing sealant cracking, crumbling, or pulling away from the concrete, leaving visible gaps. If you notice weeds or dirt filling these gaps, it’s a clear signal that the seal is broken. These open channels are a direct invitation for water to seep beneath your concrete slabs. Over time, this moisture can lead to significant issues, so addressing these visual cues is your first line of defense in proper concrete maintenance and waterproofing.
Structural Red Flags You Can’t Ignore
Failing expansion joints can cause more than just surface-level problems. Their primary job is to absorb the stress of movement, and when they can’t, that stress transfers directly to the concrete. If you see new cracks spidering out from the joints, it means the concrete is taking on pressure it wasn’t designed to handle. Another major red flag is uneven or sinking concrete slabs. When water gets through the failed joints, it can wash away the soil underneath, causing the slab to settle or sink. This not only looks bad but can also be a sign of deeper issues that may require professional foundation repair.
Potential Safety Hazards
Beyond the structural integrity of your concrete, failing expansion joints can create real safety risks. Uneven slabs caused by soil erosion are one of the most common tripping hazards around a home or commercial property. The problem gets worse in climates with freezing temperatures. Water that seeps into the gaps and cracks will freeze, expand, and break the concrete apart from within. This freeze-thaw cycle can quickly turn a small crack into a major problem, creating a crumbling, unstable surface. Addressing failing joints promptly is a crucial step in keeping your property safe and extending the life of your concrete.
Gather Your Tools and Materials
Before you roll up your sleeves, let’s talk about what you’ll need. Showing up to the job with the right tools and materials is half the battle. It not only makes the repair process smoother but also ensures your hard work will actually last. A little preparation now saves you from scrambling for supplies mid-project and helps you achieve a professional-quality finish. Let’s get your toolkit ready.
Your Essential Tool List
You don’t need a whole workshop for this project, but a few key tools are non-negotiable. First up is a sturdy scraping tool with a sharp blade, which gives you the leverage needed to pry out old, failing sealant. Next, a wire brush is essential for clearing out any stubborn debris and roughing up the sides of the concrete for a better bond with the new material. While not strictly necessary, a simple paint scraper can also come in handy for detailed cleaning in tight spots. Having these basics ready will make the prep work much faster and more effective.
The Right Sealants and Fillers
Choosing the right sealant is critical for a durable repair. Look for a flexible, waterproof concrete caulk or a self-leveling polyurethane sealant. These materials are designed to withstand the elements and, most importantly, allow the concrete slabs to expand and contract naturally without cracking the seal. Using the right product provides a strong defense against water intrusion and weed growth. For a clean application, you’ll apply it with a standard caulk gun, working your way steadily down the joint for an even fill. For deeper or more complex issues, professional crack injection techniques might be necessary to ensure a complete seal.
A Quick Safety Gear Checklist
Don’t skip the safety gear—it’s a simple step that prevents unnecessary injuries. At a minimum, you’ll want a pair of safety goggles. When you’re scraping and brushing out old material, dust and small chunks of concrete can easily fly up toward your face, and eye protection is a must. You should also wear a pair of heavy-duty gloves. They’ll protect your hands from scrapes while you’re cleaning the joint and keep the sticky, hard-to-remove sealant off your skin during application. Taking these small precautions ensures your project is safe from start to finish.
Your Step-by-Step Repair Guide
Ready to tackle those worn-out expansion joints? Following these steps carefully will help you get a professional-quality result that protects your concrete for years to come. Let’s walk through the process together.
Step 1: Prepare the Work Area
First things first, clear the area around the expansion joint of any furniture, planters, or debris. A clean workspace is a safe and efficient one. Taking the time to prepare properly is key, because repairing expansion joints is your first line of defense to stop water from getting under your concrete slabs. This simple fix prevents much bigger problems down the road, like sinking, shifting, or cracking. Give the surface a good sweep to remove any loose dirt or leaves. This ensures you won’t be tracking grime into the clean joint later on. A little prep work now saves you a lot of headaches.
Step 2: Remove the Old Joint Material
Now it’s time to get rid of the old, failed material. Grab a sturdy putty knife or a 5-in-1 tool to start digging out the brittle sealant and any rotted wood or fiberboard. You want to remove as much of the old filler as you can. For stubborn sections, a flathead screwdriver can help pry out tough pieces. According to home improvement experts, you should “use a putty knife to dig out all the old joint material. Then, rinse out any leftover debris with a hose.” Getting all of this gunk out is crucial for ensuring the new sealant can bond directly and securely to the concrete.
Step 3: Clean and Inspect the Joint
With the old material gone, the next step is a deep clean. Use a wire brush to scrub the sides of the joint, then sweep or use a shop vac to remove all the dust and debris. For a truly pristine surface, blow the joint out with a leaf blower or compressed air. The goal is to have a completely clean and dry channel. This is a non-negotiable step, as new sealant won’t stick well to wet or dusty concrete. Any moisture or dust left behind will compromise the bond, leading to a failed repair. This is also a good time to inspect for any deeper issues, like extensive cracks that might need injection.
Step 4: Install a New Backer Rod
Before you can apply the new sealant, you need to install a backer rod. What’s a backer rod? It’s essentially a flexible foam rope that you press into the joint. Its purpose is twofold: it creates a bottom for the joint so you don’t waste sealant by filling the entire depth, and it ensures the sealant sticks to the two sides of the joint, not the bottom. This allows the sealant to stretch and compress properly as the concrete moves. Choose a backer rod that’s slightly wider than the joint for a snug fit, and press it in evenly to about a half-inch below the concrete surface.
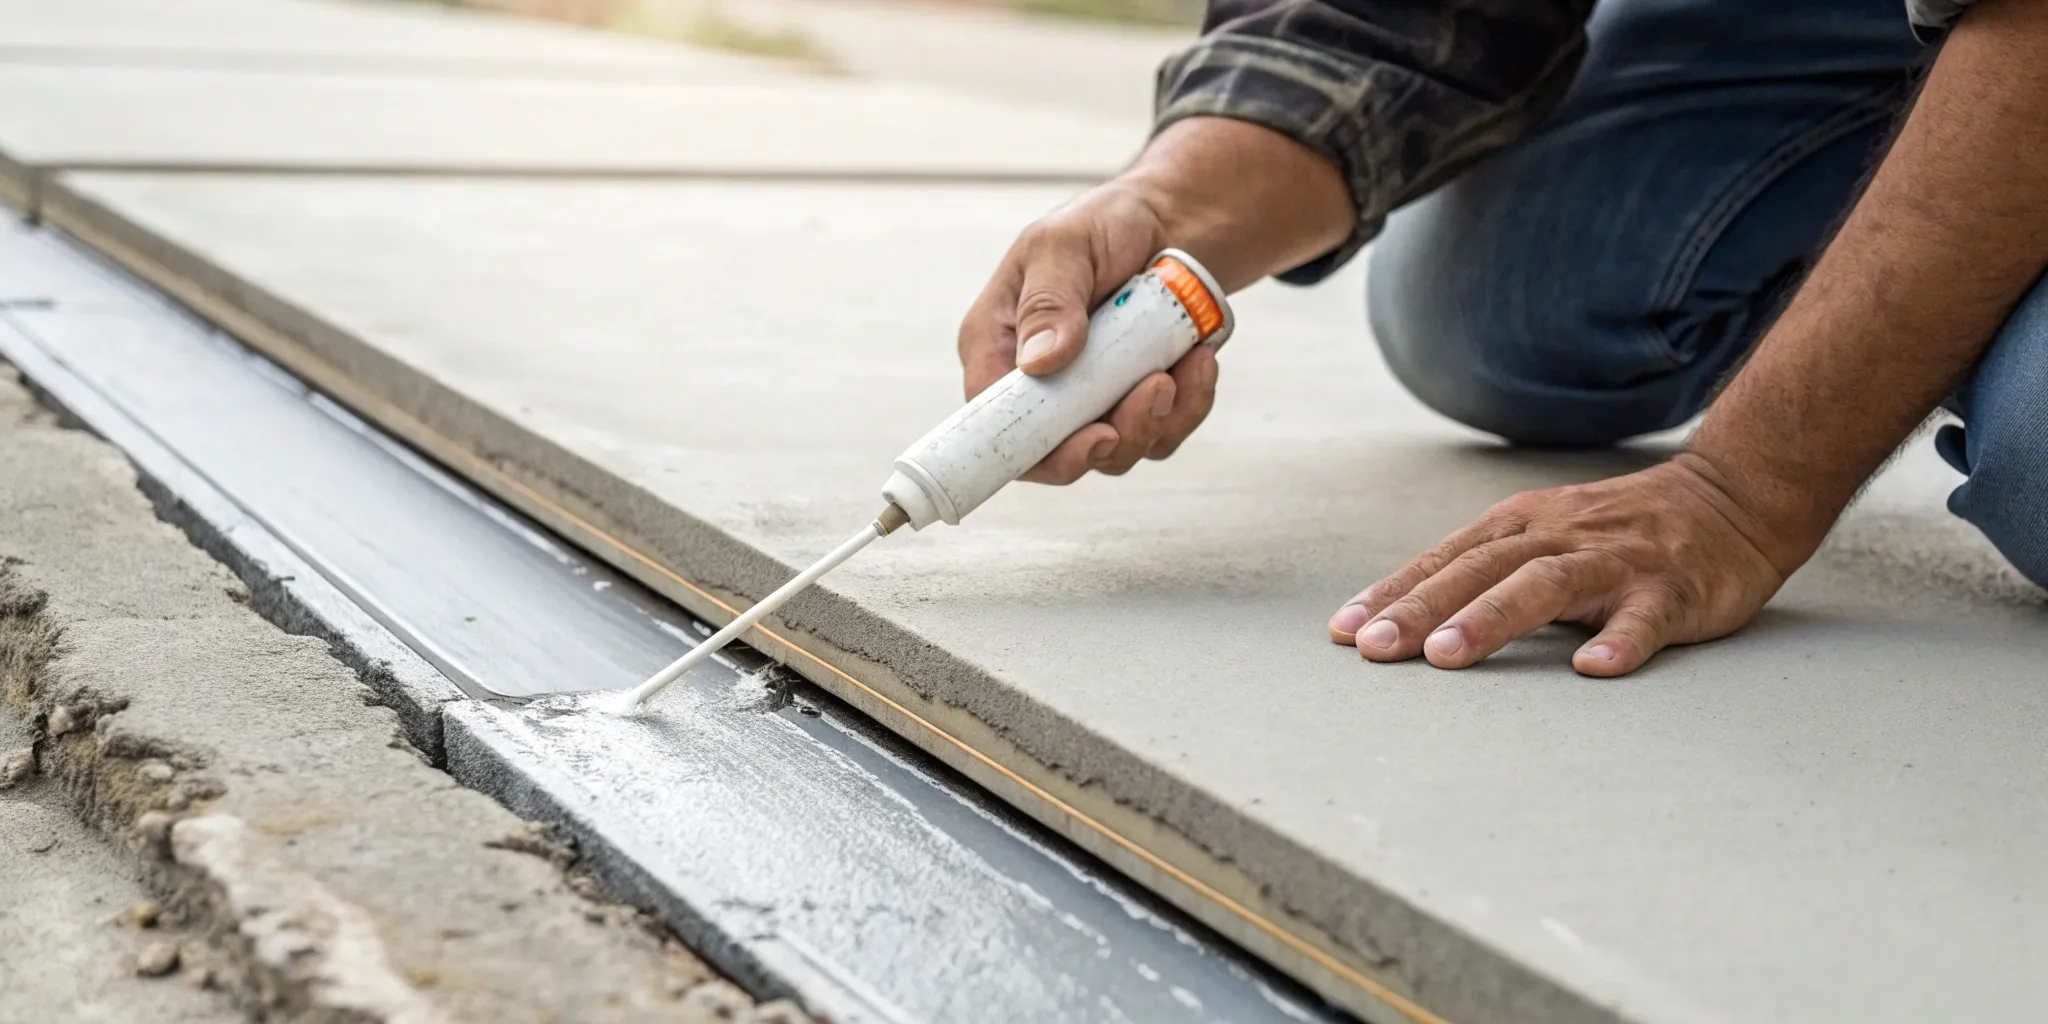
Step 5: Apply the New Sealant
Now for the main event: applying the new sealant. For driveways and sidewalks, a self-leveling polyurethane sealant is your best bet because it flows smoothly and fills the joint evenly. Cut the tip of the sealant tube and load it into a caulk gun. Start at one end of the joint and apply a steady, consistent bead of sealant over the backer rod. The goal is to slightly overfill the joint, as the sealant will settle down to be flush with the concrete surface. As you work, “apply a generous layer of self-leveling urethane sealant over the joint. Make sure to wear safety goggles and gloves,” as the material can be messy and irritating to skin.
Step 6: Give It Time to Cure
You’ve done the hard work, and now it’s time for the easiest—and most important—step: waiting. The sealant needs time to cure, which means it needs to dry and harden completely to form a durable, flexible, and watertight seal. Most manufacturers recommend you wait at least 24 hours before you walk or drive on the repaired area. Rushing this process can ruin your hard work, causing the sealant to deform or pick up dirt. Be sure to check the product’s specific instructions for exact curing times, as they can vary based on temperature and humidity. Letting the caulk fully set is the final touch for a long-lasting repair.
Get the Technical Details Right for a Lasting Repair
Getting the details right is what makes a concrete repair last. While filling an expansion joint might seem like a simple task, the difference between a fix that holds up for years and one that fails in a few months comes down to technique. It’s about more than just squeezing some caulk into a gap; it’s a precise process that ensures your concrete can continue to expand and contract without causing damage. Paying close attention to measurements, materials, and even the weather will protect your concrete from water damage, weed growth, and further cracking.
Think of it as setting your repair up for success from the very beginning. When small gaps are ignored or improperly sealed, they can allow moisture to seep underneath the slab, leading to much larger problems. This is especially true in areas with fluctuating temperatures, where the freeze-thaw cycle can turn a tiny bit of trapped water into a major crack. A proper seal acts as the first line of defense. By focusing on these technical points, you’re not just patching a gap—you’re preserving the integrity of your entire concrete surface. For more complex issues, professional crack injection might be necessary, but a solid DIY repair on your expansion joints can prevent many of those bigger headaches.
Measure Joint Width and Depth
Precision is key when it comes to your joints. Before you apply any sealant, take a moment to accurately measure the width and depth of the gap. This isn’t just busywork—it determines how you’ll prep the joint for a durable seal. For any joint wider than a quarter-inch, you’ll need to insert a backer rod. This flexible foam rod acts as a placeholder, ensuring your sealant is applied at the correct depth (typically 1/4 to 1/2 inch). This simple step prevents you from wasting material and, more importantly, allows the sealant to stretch and compress effectively as the concrete moves.
Choose the Best Sealant for the Job
Not all fillers are created equal, and your choice of sealant will make or break your repair. You need a material that can handle the job: a flexible, waterproof, and strong concrete caulk. This type of sealant is designed to move with your concrete, creating a durable barrier that keeps water, weeds, and dirt out. A self-leveling urethane sealant is often an excellent choice because it flows smoothly into the joint and creates a clean, level finish. Whichever product you choose, always remember to wear safety goggles and gloves during application. Using the right material is a core principle of professional crack injection and corrosion repair, and it’s just as important for your DIY project.
Account for Weather and Temperature
Concrete is surprisingly responsive to its environment, so you need to factor in the weather when planning your repair. Leaving expansion joints open is an invitation for trouble. Rainwater, dirt, and debris can easily get into the gaps, compromising the base beneath your slab. In colder climates, this becomes a serious problem. When trapped water freezes, it expands with incredible force, which can widen existing cracks or create new ones. By properly sealing your joints, you’re essentially adding a layer of waterproofing that protects your concrete from the damaging effects of the freeze-thaw cycle and keeps it stable through the seasons.
Common DIY Repair Mistakes to Avoid
Even with the best intentions, a few simple missteps can turn a straightforward repair into a recurring headache. Getting your expansion joints sealed correctly the first time saves you time and money down the road. Let’s walk through some of the most common DIY mistakes so you can steer clear of them and get a professional-quality result that lasts.
Using the Wrong Materials
It’s tempting to grab any old tube of caulk from the hardware store, but this is where many DIY repairs go wrong. Concrete isn’t static—it expands and contracts with temperature changes. Your joint filler needs to be flexible enough to move with it. The best material is a strong, waterproof concrete sealant designed specifically for this job. Using a rigid filler or the wrong type of caulk will cause it to crack and pull away from the concrete, leaving the joint vulnerable all over again. This allows moisture to seep in, which can lead to bigger problems that require professional waterproofing solutions.
Improper Installation
The right materials won’t do much good if they aren’t installed correctly. A common oversight is failing to use a backer rod. Think of a backer rod as a foam rope that you press into the joint before applying the sealant. It serves two key purposes: it creates a consistent depth for the sealant and prevents it from sinking too far down, ensuring a strong, two-sided bond with the concrete walls of the joint. Without it, you use more sealant than necessary, and it won’t adhere properly. This weak bond can fail quickly, forcing you to repeat the repair and potentially leading to more significant foundation repair needs.
Skipping Surface Prep
I get it—prep work is the least exciting part of any project. But when it comes to concrete repair, it’s absolutely essential. The new sealant needs a clean, dry, and solid surface to stick to. If you apply it over old, crumbling sealant, dust, or damp concrete, it simply won’t bond correctly. You have to take the time to scrape out all the old material until you see bare concrete. Then, clean out any debris with a wire brush and a shop vac. Make sure the joint is completely dry before you start applying the new sealant. A little extra effort here makes all the difference between a repair that lasts for years and one that fails in a few months.
Rushing the Curing Process
You’ve done everything right: you picked the perfect sealant, prepped the joint meticulously, and applied a perfect bead of caulk. Don’t ruin it now by being impatient. The sealant needs time to cure, which is the chemical process that allows it to harden and gain its full strength and flexibility. Most sealants need at least 24 hours before you can walk or drive on them, but you should always check the manufacturer’s instructions. Rushing this final step can deform the sealant, ruin the bond, and undo all your hard work. A little patience ensures your repair is durable and ready to handle traffic and weather for years to come.
DIY Repair or Call a Professional?
Deciding whether to tackle an expansion joint repair yourself or hire a professional comes down to the scope of the problem and your comfort level. A simple, cosmetic fix on your patio might be a great weekend project. However, if the damage is extensive or you see signs of deeper structural issues, calling in an expert is the smartest move. The main goal is to prevent future cracks and damage, so it’s important to assess the situation honestly. A professional can diagnose underlying problems that a simple sealant application won’t fix, saving you from more significant and costly repairs later on.
When You Should Call an Expert
It’s time to call an expert when you notice the problem goes beyond simple wear and tear. If the old expansion joint material is completely dried out, crumbling, or missing in large sections, it can no longer absorb the stress from the concrete expanding and contracting. This can lead to significant cracks in the slabs themselves. If you see new, sprawling cracks originating from the joints, it’s a clear signal that the joints are failing and professional foundation repair may be needed. An expert can determine if the issue is isolated to the joint or if it’s a symptom of a larger problem, like soil settlement, that requires a more robust solution to protect your property’s structural integrity.
Scenarios That Require a Pro
Certain red flags signal that a DIY fix won’t be enough. If you see weeds growing through the joints, it means water is getting underneath the slab, which can erode the soil and cause instability. Uneven or sinking concrete sections are another major warning sign. This often indicates that the ground beneath your concrete has shifted or washed away, and the slab is no longer properly supported. Attempting to just fill the joint won’t solve this underlying issue. In these cases, you need a professional assessment to see if services like polyurethane geotechnical foam injection are needed to lift and stabilize the slab before any joint repair can be effective.
Comparing the Costs
For minor jobs, a DIY approach is certainly more budget-friendly upfront. Using a self-leveling sealant is a straightforward and relatively inexpensive way to reseal a few joints in your driveway or walkway. However, it’s crucial to weigh the initial savings against potential long-term costs. If the repair is done incorrectly or if the wrong materials are used, it will likely fail quickly, and you’ll be back where you started. More importantly, if you’re simply covering up a deeper issue like water intrusion or an unstable sub-base, you risk allowing the problem to worsen, leading to much more expensive structural repairs. Professional waterproofing and repair come with expertise, commercial-grade materials, and often a warranty, providing peace of mind and lasting value.
How to Maintain Your Repaired Joints
You’ve put in the work to repair your concrete expansion joints, and they look great. But the job isn’t quite finished. Just like any other part of your property, your repaired joints need a little attention to stay in top shape. Think of it as protecting your investment. A consistent maintenance routine will extend the life of your repair, prevent small issues from becoming major headaches, and save you from repeating the repair process sooner than you’d like. The good news is that it doesn’t take much effort. With a few simple, proactive steps, you can ensure your concrete stays stable and secure for years to come.
Create a Regular Inspection Schedule
The easiest way to stay ahead of potential problems is to catch them early. That’s why setting up a regular inspection schedule is so important. You don’t need to be a concrete expert—just a quick visual check once or twice a year is usually enough. Walk along your driveway, patio, or walkway and take a close look at the repaired joints. Are you seeing any new cracks forming? Is the sealant pulling away from the concrete edges? Look for weeds or debris collecting in the joints, as this can trap moisture. If you spot something that looks off, you can address it before it escalates into a more serious foundation repair issue. A few minutes of inspection can save you a lot of time and money.
Simple Tips for Preventive Care
Preventive care is all about tackling small issues before they grow. One of the simplest things you can do is keep your expansion joints clean. Regularly sweep away dirt, leaves, and other debris that can get lodged in the joints. This prevents moisture from getting trapped against the sealant, which can cause it to break down over time. If you notice weeds starting to sprout, pull them immediately. Their roots can push through the sealant and create pathways for water to seep underneath your concrete slabs. If you see small cracks or gaps reappearing, it’s time to reseal them. Taking care of these minor touch-ups now is far easier than dealing with sinking concrete later.
Protect Joints from the Elements
Water is the number one enemy of concrete. When it seeps into and under your concrete slabs, it can wash away the soil, freeze and expand in the winter, and cause significant damage. Your repaired expansion joints are the first line of defense. A properly applied sealant acts as a barrier, keeping water out. To give your concrete an extra layer of protection, consider sealing the entire surface. This helps prevent water absorption and the cracking that comes with freeze-thaw cycles. Effective waterproofing is key to stopping erosion and keeping your concrete slabs stable and level. It’s a crucial step in protecting your property from the elements.
Make Your Repairs Last Longer
To get the most out of your repair, a few final details make all the difference. Remember that foam backer rod you installed? It’s the unsung hero, acting as a shock absorber that allows the concrete to expand and contract without stressing the new sealant. After applying the sealant, the most important step is to let it cure completely. This means keeping foot and vehicle traffic off the area for as long as the manufacturer recommends. Rushing this step can compromise the bond, leading to premature failure. Also, try to avoid using harsh de-icing salts near the joints in the winter, as they can degrade the sealant material over time.
An Introduction to Advanced Repair Solutions
While a DIY approach works wonders for minor touch-ups, some expansion joint problems are symptoms of a bigger issue. When you’re dealing with wide gaps, crumbling concrete edges, or signs of water damage, a simple tube of sealant won’t cut it. This is where advanced repair solutions come into play. These methods go beyond a surface-level fix to address the root cause of the damage, ensuring the repair is not just effective but also incredibly durable.
Think of it as the difference between putting a bandage on a cut and getting stitches for a deep wound. Advanced repairs often involve professional-grade materials and techniques that stabilize the surrounding concrete, create a truly waterproof barrier, and provide the structural support needed for high-traffic or heavy-load areas. If you suspect your joint damage is more than just cosmetic, understanding these more robust options is the first step toward a permanent solution. It’s about protecting your investment and ensuring the safety and integrity of your entire concrete structure for years to come.
Restoring Deeply Damaged Joints
When an expansion joint is deeply damaged—think crumbling edges, wide cracks spidering out from the joint, or one side of the concrete being higher than the other—it’s a clear sign of significant stress. This kind of damage often indicates that the ground beneath your concrete slabs is shifting or unstable. Simply filling the joint won’t solve the underlying problem. A professional assessment is key to figuring out what’s really going on. In many cases, a comprehensive foundation repair is needed to stabilize the slabs first. Once the concrete is secure, the joint itself can be rebuilt and properly sealed, ensuring the fix will actually last.
Integrating Waterproofing Methods
One of the biggest jobs of an expansion joint is to keep water out. When a joint fails, it becomes a direct channel for water to seep beneath your concrete, which can lead to soil erosion, freeze-thaw damage, and even foundation issues. An advanced repair focuses heavily on waterproofing. This involves more than just a good sealant. Professionals might use specialized primers to ensure the sealant bonds tightly to the concrete, creating an impermeable seal. For below-grade joints, like in a basement, the repair might be part of a larger system that includes exterior membranes and drainage to fully protect your property from moisture intrusion.
Options for Structural Support
Not all expansion joints are created equal. The one in your garden path has a much easier life than the one in your garage floor or a commercial loading dock. Joints in high-traffic or heavy-load areas need more than just a flexible filler; they need structural support to prevent the edges from chipping and breaking down under pressure. For these situations, professionals use semi-rigid fillers or epoxy mortars. These materials are strong enough to support the edges of the joint and transfer loads across the floor, yet they still offer enough flexibility to allow for concrete movement. This approach restores the joint’s function and reinforces the surrounding concrete, preventing future damage.
Related Articles
- 3 Ways To Repair a Crack in a Concrete Foundation | Bristol FX
- Foundation Repair – Professional Foundation Repair
Frequently Asked Questions
How often should I expect to reseal my expansion joints? There isn’t a single magic number, as the lifespan of your sealant depends on your climate and how much traffic the area gets. Generally, a high-quality polyurethane sealant can last anywhere from 5 to 10 years. The best approach is to inspect your joints annually. When you start to see the sealant cracking or pulling away from the concrete, it’s time to plan for a repair.
What’s the real risk of ignoring a cracked sealant? Ignoring a failing expansion joint is like leaving a window open during a rainstorm. The open gap allows water to seep directly under your concrete slabs. This can wash away the soil base, causing the slabs to sink and become uneven. In colder climates, that trapped water freezes and expands, which can break the concrete apart from the inside out. A small, easy-to-fix gap can quickly turn into a major structural problem and a serious tripping hazard.
My concrete slabs are uneven. Will sealing the joint fix this? Unfortunately, no. Sealing the expansion joint is a crucial maintenance step, but it won’t correct slabs that are already sinking or uneven. Uneven concrete is a sign that the ground underneath has already eroded or settled. While you should still seal the joint to prevent the problem from getting worse, you’ll need a professional solution like polyurethane foam injection to lift and stabilize the slab itself.
Why is a backer rod so important? Can I skip it for a small job? You should never skip the backer rod in joints that are a quarter-inch or wider. It might seem like a small detail, but it’s essential for a durable repair. The backer rod creates the proper depth for the sealant and ensures it only sticks to the two sides of the joint, not the bottom. This allows the sealant to stretch and compress as the concrete moves with temperature changes. Without it, the sealant will likely fail and tear much sooner.
Can I repair my expansion joints in the winter? It’s best to tackle this project in mild, dry weather. Most sealants have a specific temperature range for application, usually above 40°F (5°C), to ensure they cure correctly. Applying sealant in the cold can prevent it from bonding properly to the concrete. Likewise, you need the joint to be completely dry, so avoid repairing it right after it rains or if more rain is in the forecast. A dry, temperate day is your best bet for a successful, long-lasting repair.