That crack in your garage floor or basement slab is more than just an eyesore. It’s a message. Your property’s concrete is constantly under pressure from shifting soil, water intrusion, and the stress of the structure it supports. While it’s tempting to dismiss a small fissure, it’s often the first sign of a deeper issue that won’t fix itself. Understanding the root cause is the most critical part of any successful concrete slab repair. This guide will help you play detective, showing you how to identify what’s really damaging your slab, recognize the warning signs that demand action, and walk you through the steps for a durable fix.
Key Takeaways
- Look Beyond the Crack: Most concrete damage points to a deeper problem, such as unstable soil or water intrusion. Understanding the why behind the crack is essential for a permanent fix, not just a temporary patch.
- A Successful Patch Starts with Prep: The strength of your repair depends entirely on your preparation. Thoroughly cleaning, widening, and priming the damaged area ensures the new material will bond correctly and last for years.
- Know When to Call a Professional: While small surface cracks are manageable, significant issues like widening cracks, sinking slabs, or uneven floors signal a potential foundation problem that requires an expert to prevent serious structural damage.
What’s Damaging Your Concrete Slab?
When you spot a crack spreading across your patio or basement floor, it’s easy to assume it’s just a surface-level issue. But concrete damage is rarely that simple. More often than not, that crack is a symptom of a deeper problem. Think of your concrete slab as the silent partner in your property’s structure—it bears a lot of weight and endures constant pressure from the world around it. Understanding what’s causing the damage is the first and most critical step toward a repair that actually lasts.
The culprits are often working together, hidden from view. The ground beneath your home is in constant flux, the weather brings relentless cycles of moisture and temperature swings, and sometimes, the problem dates all the way back to the day the concrete was first poured. Before you can find the right solution, you have to play detective and figure out what’s really going on with your slab.
Shifting Soil and Foundation Issues
The ground under your property isn’t static. Soil expands when it absorbs water and shrinks as it dries out, putting immense stress on the rigid concrete slab sitting on top of it. Over time, this can lead to settling, where parts of the slab sink and cause cracks to appear. Poor soil compaction before construction can also create voids underneath the slab, leaving it unsupported and vulnerable. When the earth moves, your home’s foundation is the first thing to feel it, and a cracked slab is often one of the earliest warning signs of a bigger structural problem that needs professional attention.
The Toll of Weather and Water
Water is one of concrete’s biggest enemies. During freeze-thaw cycles, moisture seeps into the tiny pores of the concrete, freezes, and expands, creating internal pressure that breaks the slab apart from the inside out. This process can cause surface flaking, known as spalling. Furthermore, persistent moisture can lead to a more sinister problem: corrosion of the steel rebar inside the slab. As the rebar rusts, it expands and compromises the concrete’s structural integrity, leading to widespread cracking and weakness. Proper waterproofing is essential to protect your concrete from this slow but certain destruction.
Poor Initial Construction
Sometimes, a concrete slab is doomed from the start. If the initial concrete mix had too much water, wasn’t reinforced with enough steel, or was poured too thin, it simply won’t have the strength to withstand the pressures of time and use. Improper preparation of the ground before the pour or curing the concrete too quickly can also create weak spots that will inevitably fail. Many concrete problems are simply the result of poor workmanship. A quality new construction foundation is built on best practices that ensure your slab is prepared to last for decades, not just a few years.
Signs Your Concrete Slab Needs Repair
Your concrete slab is the literal foundation of your space, whether it’s in a basement, garage, or commercial building. And like any critical structure, it gives you warning signs when something is wrong. Ignoring these signals can lead to more extensive and costly damage down the road. The key is to pay attention to the subtle changes. A small crack or a slightly uneven spot might seem like a minor cosmetic issue, but it could be pointing to a much deeper problem with the soil beneath or the slab itself.
Understanding what to look for helps you act quickly and protect your property’s value and safety. Most issues fall into three main categories: visible surface damage like cracks, changes in the slab’s levelness, and signs of moisture problems. Each one tells a different story about what’s happening below the surface. Addressing these symptoms early with the right foundation repair methods can stop a small issue from becoming a major structural failure. Let’s walk through the specific signs that tell you it’s time to take a closer look at your concrete.
Visible Cracks and Flaking
It’s easy to dismiss a hairline crack in your concrete, as some minor cracking can occur as it cures. However, you should pay close attention to cracks that are growing, widening (larger than a quarter-inch), or have one side that is higher than the other. These are often signs that the ground beneath is shifting or that the slab is under stress. Similarly, if the surface is flaking or chipping away—a problem known as spalling—it can indicate that the original concrete mix was poor or that it’s suffering from moisture damage. Simply filling these gaps doesn’t solve the underlying cause. A professional crack injection can provide a more durable, structural solution.
Uneven or Sinking Spots
If you’ve noticed a dip in your floor or a spot where your concrete slab is visibly sinking, you’re seeing a clear sign of settlement. This happens when the soil underneath the slab can no longer support its weight, causing it to sink and create an uneven surface. This isn’t just a trip hazard; it’s a serious structural issue that indicates a lack of ground support. You might notice furniture leaning, doors sticking, or gaps appearing along walls. This problem won’t fix itself and typically worsens over time. Solutions like lifting the slab with polyurethane geotechnical foam can restore its level and stabilize the soil beneath to prevent future sinking.
Puddles and Water Damage
Water is one of concrete’s biggest enemies. If you see puddles forming on your slab after a rainstorm or notice persistent damp spots, it’s a red flag. Puddles mean the slab is no longer level, allowing water to collect instead of draining away. Dampness or a white, powdery substance called efflorescence suggests that moisture is wicking up through the concrete from the ground below. This can lead to musty smells, mold growth, and a humid environment in your basement or garage. Effective waterproofing is essential to stop moisture intrusion and protect both your slab and your property’s air quality from long-term damage.
Gathering Your Tools and Materials
Before you can get your hands dirty, you need to make sure you have everything you need within arm’s reach. A little preparation goes a long way and saves you from making a frantic, mid-project trip to the hardware store. Think of it as setting up your command center. Having the right tools and materials not only makes the job easier but also ensures your repair is strong and lasts for years. Let’s walk through exactly what you’ll need to gather for a successful concrete slab repair.
Your Concrete Repair Shopping List
First up, let’s talk materials. For most small-scale cracks and chips, a simple shopping list will do the trick. You’ll want to start by getting a stiff wire brush to clear away any loose bits of concrete and debris from the damaged area. This is a non-negotiable step for making sure your patch adheres properly. The star of the show is your patching material. Look for a quick-setting cement or a vinyl patching compound. When you’re ready, you’ll mix it with water until it reaches the consistency of smooth peanut butter. Always follow the manufacturer’s directions for the best results. For more extensive damage, a simple patch might not be enough, which is when professional foundation repair methods come into play.
The Essential Toolkit
With your materials ready, it’s time to assemble your toolkit. You don’t need a massive collection of gear, just a few key items to get the job done right. A margin trowel is perfect for pressing the patching mixture firmly into the damaged spot and creating a smooth, level finish. You’ll also want a bucket for mixing your compound and a hammer and chisel for widening any hairline cracks before you fill them. To keep your workspace tidy and ensure a clean surface for the patch, a shop vacuum is incredibly helpful for sucking up fine dust and small debris. These tools are staples for DIY repairs, but complex jobs like crawl-space repairs often require more specialized equipment.
Safety First: Your Protective Gear
This might be the last list, but it’s the most important. Working with concrete can be messy and potentially hazardous, so protecting yourself is key. Always wear safety goggles to shield your eyes from flying debris and splashes of wet concrete mix. You’ll also need a pair of heavy-duty gloves, as wet concrete can irritate your skin. Finally, don’t forget a dust mask. Concrete dust contains silica, which can be harmful if inhaled, so a mask is essential, especially if you’re grinding or cutting into the slab. Taking these simple precautions ensures your project is not only successful but also safe from start to finish.
How to Repair Your Concrete Slab: A Step-by-Step Guide
Repairing a concrete slab might seem intimidating, but with the right approach and materials, it’s a manageable project. Following these steps will help you create a durable patch that restores the integrity and appearance of your concrete surface.
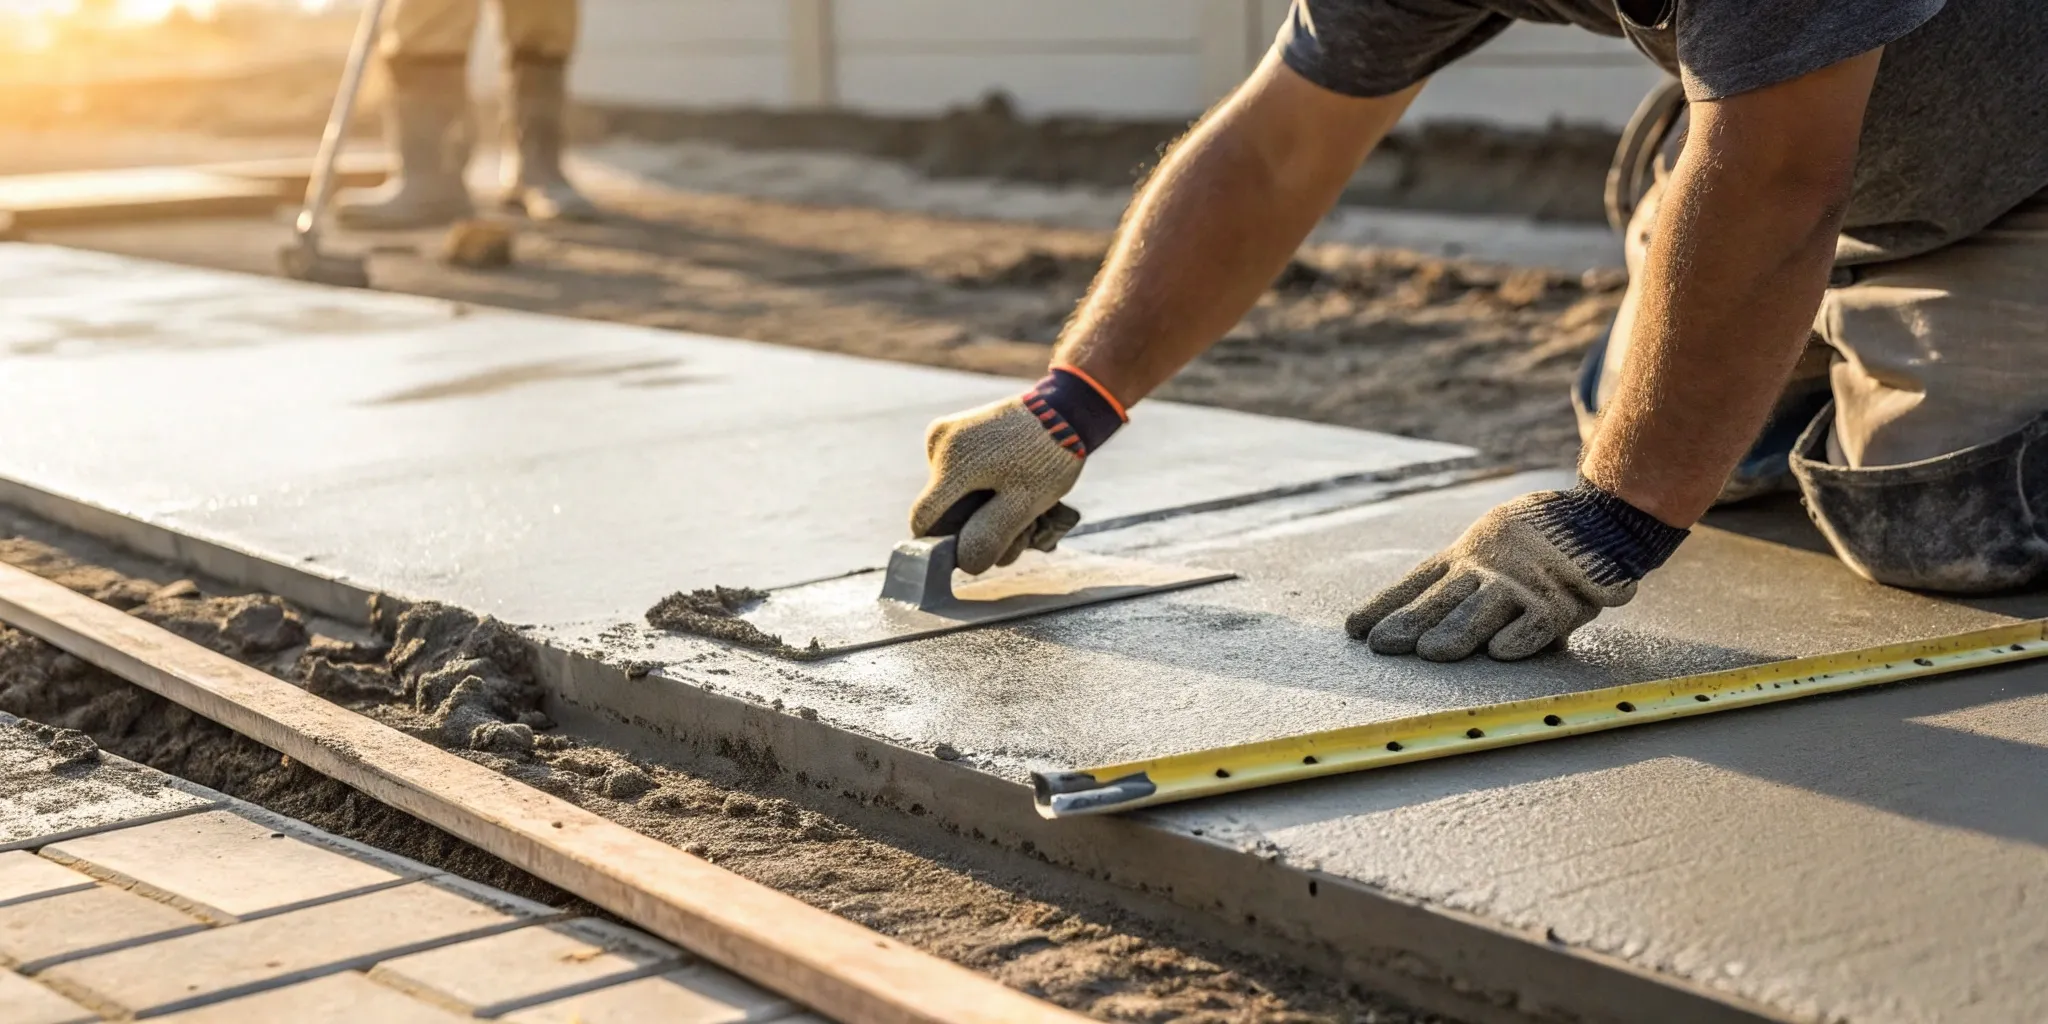
Step 1: Clean and Prepare the Surface
First things first: a clean surface is non-negotiable for a lasting repair. Any dirt, dust, or loose concrete will prevent the new patch from bonding correctly. Start by grabbing a stiff wire brush and vigorously scrubbing the damaged area to remove any crumbling bits and grime. A shop vacuum is your best friend here for sucking up all the fine dust that the brush leaves behind. Once it’s clean, lightly mist the area with water from a spray bottle. You want the concrete to be damp, not soaking wet, as this prevents the old concrete from pulling moisture out of your patch too quickly.
Step 2: Widen and Prime the Cracks
This step might feel counterintuitive, but to properly fill a crack, you often need to make it a little wider first. Using a hammer and chisel, carefully chip along the edges of the crack to create an inverted “V” shape, also known as a dovetail. This shape should be wider at the bottom than at the surface, which helps to mechanically lock the patching material in place once it cures. After widening, vacuum out any new debris. Then, apply a concrete bonding adhesive with a small paintbrush. This primer creates a powerful bond between the old and new concrete.
Step 3: Patch and Fill the Damage
Now it’s time to mix your patching compound. Whether you’re using a vinyl-reinforced patcher or a quick-setting cement, follow the manufacturer’s directions precisely to get the right consistency—something like a thick batter or smooth peanut butter usually works best. Using a margin trowel, press the mixture firmly into the prepared crack or hole. The key is to eliminate any air pockets, so don’t be shy about tamping the material down. Overfill the area slightly, as the patch may shrink a bit as it dries. Working quickly is important, so only prepare as much patching material as you can use in about 10-15 minutes.
Step 4: Smooth and Cure Your Work
With the patch in place, the final step is to create a smooth, seamless finish. Take your flat trowel and, holding it at a slight angle, sweep it across the patch to level it with the surrounding surface. Try to do this in one or two clean passes to avoid overworking the material. For damaged corners or edges, an edger tool will help you recreate a clean, rounded line. Once you’re happy with the finish, the most important part begins: curing. You must let the patch cure properly according to the product instructions. This allows it to reach its full strength and durability.
Pro Tips for a Durable, Long-Lasting Repair
Patching a concrete slab is one thing; making sure that patch lasts is another. A successful repair is all about the details—from picking the right materials to understanding when a crack is signaling a bigger problem. If you want your hard work to hold up for years to come, it pays to approach the job with a professional mindset. These tips will help you create a durable repair that stands the test of time.
Choosing the Right Repair Compound
Walking down the cement aisle at a hardware store can be overwhelming. The key is to match the product to your specific problem. For most small cracks and chips, a quick-setting cement or a vinyl patching compound is a great choice. When you mix it, aim for a consistency like smooth peanut butter, and always follow the manufacturer’s directions to the letter. For deeper or more structural cracks, you might need something more robust. Professionals often use specialized materials like polyurethane geotechnical foam that can be injected deep into cracks to form a strong, flexible, and waterproof seal.
How to Reinforce for Added Strength
For a repair that’s more than just a surface-level fix, you need to think about reinforcement. If you’re dealing with a crack that seems likely to reopen, you can add strength to your patch. A simple method is to drill angled holes along the crack and install special concrete screws, which act as anchors to hold the new patch material securely to the old slab. For more serious structural issues, professionals use advanced solutions like carbon fiber reinforcement. This method doesn’t just fill the crack; it strengthens the entire area, adding incredible tensile strength and preventing future movement. This is a core part of professional foundation repair for a reason.
Common Mistakes to Sidestep
Even with the best intentions, a few common missteps can ruin a concrete repair. The single biggest mistake is inadequate surface preparation. If you don’t thoroughly clean out all the dust, debris, and loose concrete, your new patch won’t bond properly and will likely fail. Another frequent error is ignoring the root cause of the crack. If water is seeping in and causing the damage, just patching the crack won’t solve the problem for long. You need to address the underlying issue, which might involve improving drainage or investing in professional waterproofing. Rushing the job or using the wrong material will only lead to more work down the road.
Knowing When to Call in the Experts
A DIY repair is perfect for minor, cosmetic cracks. But if you’re looking at wide, deep, or growing cracks, or if your slab is noticeably sinking or uneven, it’s time to put down the tools and call a professional. These are often signs of deeper issues with the soil or your home’s foundation. An expert can diagnose the root cause and apply the right solution, whether it’s installing push and helical piers to stabilize a sinking foundation or performing a comprehensive structural repair. Hiring a professional ensures the job is done correctly the first time, saving you from costly and frustrating repeat repairs.
Related Articles
- Slab Foundation Repair | Advanced Concrete Foundation Solutions | Bristol FX
- Concrete Foundation Crack Repair: 3 Effective Methods
Frequently Asked Questions
How can I tell if a crack is a simple DIY fix or a sign of a bigger problem? A good rule of thumb is to look at the crack’s characteristics. Hairline cracks that aren’t growing are often just cosmetic and suitable for a DIY patch. However, you should be concerned if a crack is wider than a quarter-inch, is getting longer, or if one side of the crack is higher than the other. These are strong indicators that the ground beneath the slab is shifting, which points to a more serious foundation issue that requires a professional diagnosis.
Why did my last concrete patch fail? A failed patch is almost always due to one of two things: poor preparation or an unaddressed root cause. If you didn’t thoroughly clean every bit of dust and loose debris from the crack, the new material couldn’t form a strong bond. The other common reason is that you only treated the symptom. If water is still getting in or the soil is still shifting, the pressure will simply create a new crack right next to your repair.
Is it really necessary to widen a crack before filling it? It might feel strange to make a crack bigger before you fix it, but this step is critical for a durable repair. By chiseling the edges to be wider at the bottom than at the surface, you create a dovetail shape. This mechanically locks the patching compound in place once it hardens, preventing it from popping out under pressure or with temperature changes. Simply skimming a patch over the top of a thin crack rarely lasts.
What’s the difference between patching a crack and leveling a sinking slab? Patching a crack is like filling a cavity—it addresses a specific spot of damage on the surface. Leveling a sinking slab is more like performing surgery to fix the underlying problem. When a slab sinks, it means the soil beneath it can no longer support the weight. This requires a professional solution, like injecting geotechnical foam, to lift the slab back into place and stabilize the ground underneath it.
Can I prevent my concrete from cracking in the first place? While all concrete can develop small cracks over time, you can certainly minimize the risk of serious damage. The most important factor is water management. Ensure your gutters are clean and that the ground around your property slopes away from the foundation. This prevents water from pooling and saturating the soil beneath your slab. Additionally, a high-quality initial installation with proper ground preparation and the right concrete mix makes all the difference in long-term stability.