That small gap where your concrete floor meets your foundation wall isn’t a flaw—it’s a standard part of construction called a cove joint. Unfortunately, it’s also the path of least resistance for groundwater under pressure. This is why you often see leaks after heavy rain or snowmelt. Simply sealing the inside crack often isn’t enough, as the water pressure will just find another weak spot. To truly solve the problem, you need to address the pressure itself. We’ll explore the right way to approach a cove joint seepage diy project and explain why managing exterior water is the key to keeping your basement dry for good.
Key Takeaways
- Understand the Source of the Leak: Water coming in where the wall meets the floor is a classic sign of hydrostatic pressure forcing its way through the cove joint—a natural seam in your foundation’s construction.
- Recognize the Limits of DIY Fixes: While patching the joint from the inside with hydraulic cement can stop an active leak, it’s often a temporary solution. The external water pressure will still build up and can find another way in.
- Focus on Exterior Water Management: The only permanent solution is to control water on the outside. This means ensuring your yard slopes away from the house, keeping gutters clear, and considering a professional drainage system to relieve pressure on your foundation for good.
Why Is Water Leaking Where Your Wall Meets the Floor?
Finding a puddle of water in your basement, especially where the wall meets the floor, can be incredibly stressful. Your first thought might be to panic, but understanding the cause is the first step toward a real solution. This type of leak is common, and it usually points to a specific weak spot in your basement’s construction that is being exploited by water pressure from the outside. Let’s break down exactly what’s happening behind your walls.
What Is a Cove Joint?
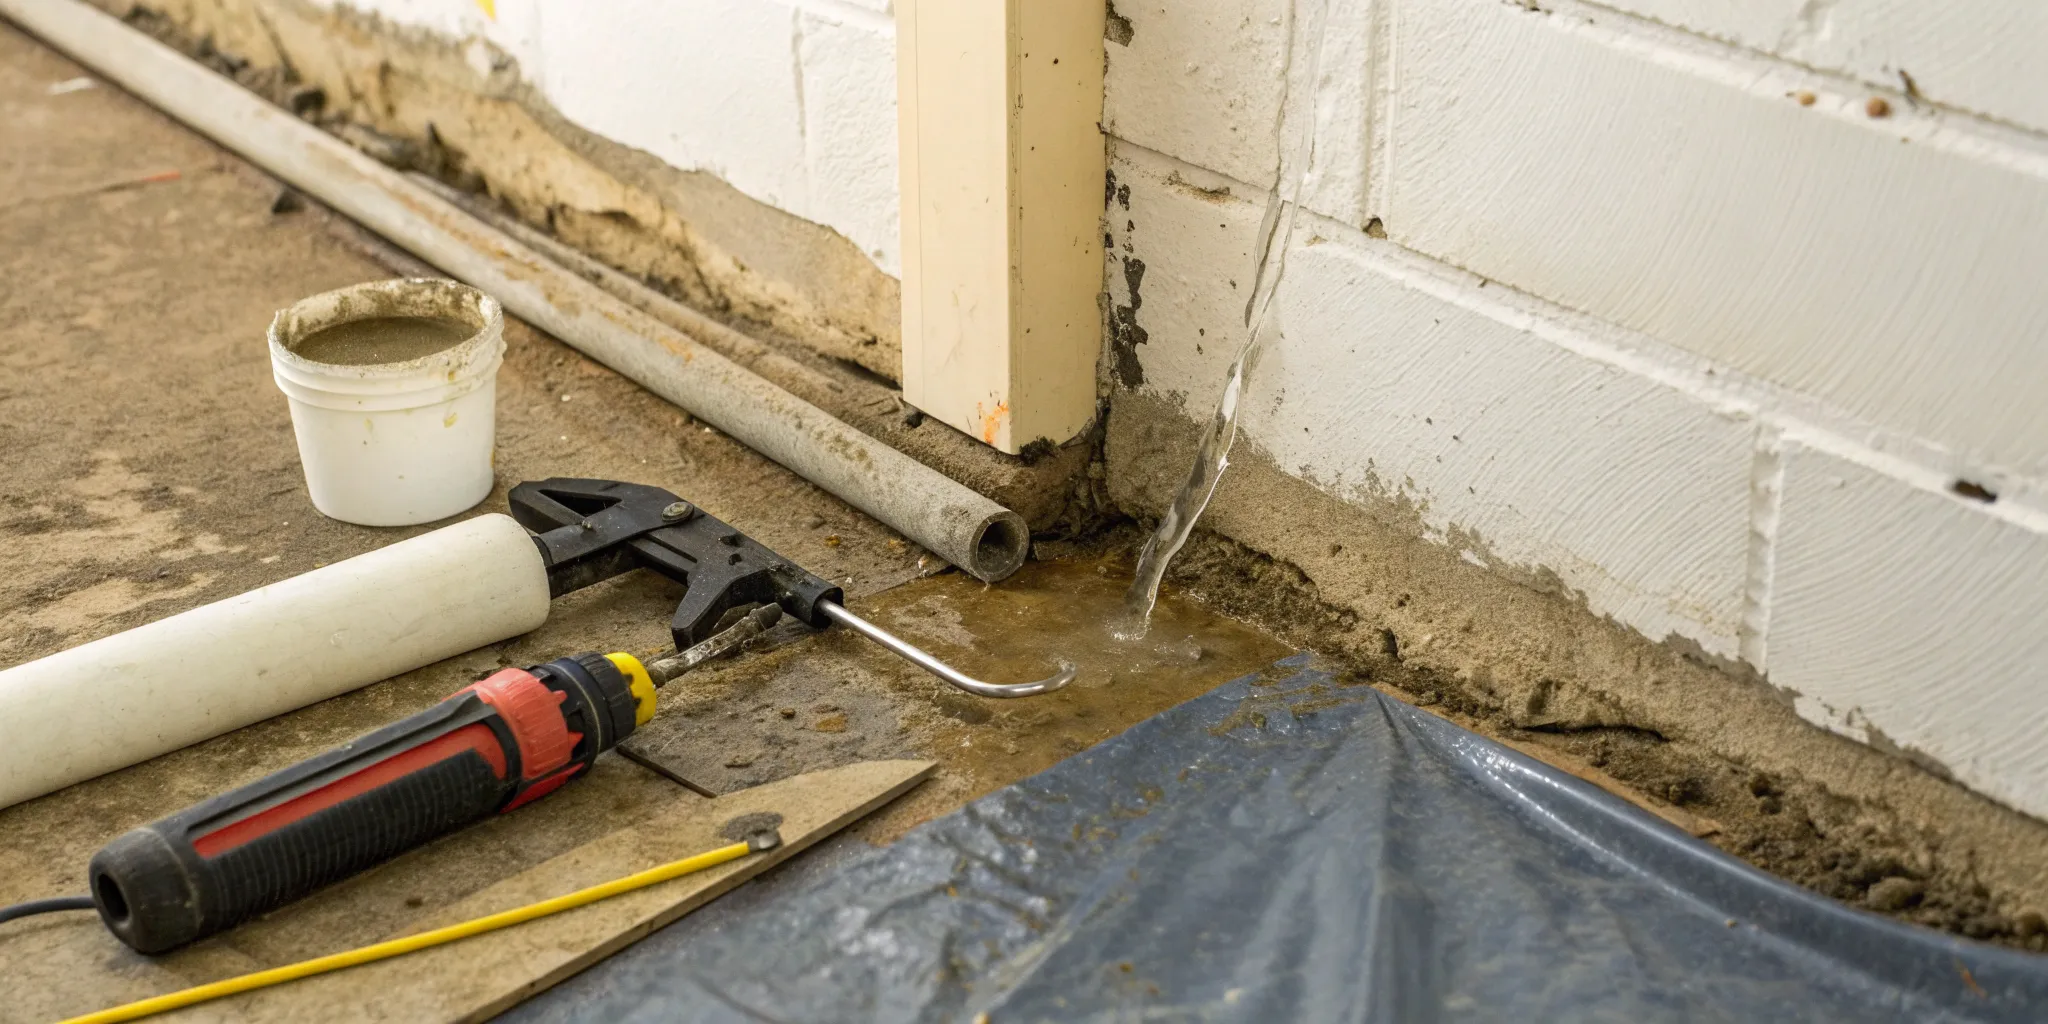
First, let’s talk about the anatomy of your basement. The small gap where your basement floor meets the foundation wall is called a cove joint. It’s not a flaw; it’s a natural result of the construction process. The foundation walls are typically poured first, and then the concrete floor is poured inside them. This creates a tiny, unsealed seam between the two separate slabs of concrete. While it’s a normal part of your home’s structure, this joint also happens to be the path of least resistance for water trying to get in from the outside, making it a very common source of basement leaks.
Common Causes of Leaks
So, why does water suddenly start coming through this joint? The problem isn’t the joint itself, but the water building up in the soil outside your home. After heavy rainfall or significant snowmelt, the ground becomes saturated. This creates immense pressure against your foundation walls. This force, known as hydrostatic pressure, pushes water against your foundation, searching for any entry point it can find. The cove joint is often the easiest way in. Effective waterproofing solutions are designed to manage this external water and relieve the pressure on your foundation, keeping your basement dry for good.
The Impact of Water Pressure and Foundation Settling
Hydrostatic pressure is the main culprit behind cove joint seepage. When groundwater accumulates around and under your foundation, it has to go somewhere. The pressure builds and pushes water up from beneath the floor slab, forcing it through the tiny gap of the cove joint. This isn’t just a minor annoyance; it’s a sign that your foundation is under constant stress. Over time, this pressure can contribute to more significant issues. If your home has experienced any natural settling, it can create or widen gaps, making it even easier for water to get in. Persistent leaks are a clear signal that you may need a professional foundation repair assessment to address the root cause.
How to Spot Cove Joint Seepage
Catching a cove joint leak early can save you a lot of headaches and money down the road. The signs are often subtle at first, but if you know what to look for, you can spot the problem before it gets out of hand. Pay attention to these key indicators in your basement or crawl space to protect your home.
Key Visual Signs to Look For
The most obvious sign is, of course, water. Look for water coming through the gap where the wall meets the floor. This might show up as active pooling after a heavy rain, or it could be more subtle, like small damp spots that come and go. You might also notice a white, chalky substance on the walls or floor near the joint—this is called efflorescence. It’s a tell-tale sign that water has been seeping through the concrete and evaporating, leaving mineral deposits behind. Any of these visual cues mean it’s time to investigate your foundation repair options.
Moisture, Mold, and Musty Smells
Sometimes, you’ll smell a problem before you see it. If your basement has a persistent damp, musty odor, that’s a major red flag. This smell is often caused by mold and mildew, which thrive in the damp conditions created by cove joint seepage. Even if you can’t see visible mold growth, that earthy smell indicates excess moisture is present somewhere. Don’t just cover it up with an air freshener; it’s your home’s way of telling you that a comprehensive waterproofing solution is needed to protect your air quality and your home’s health.
Recognizing Long-Term Damage
If a cove joint leak goes unaddressed, the damage can spread. Your belongings stored in the basement can get ruined by moisture, and you might see stubborn stains appearing on your floors and walls. Over time, the constant dampness can cause paint to peel, drywall to crumble, and wooden support beams to rot. This not only weakens your home’s structure but can also invite pests. If you notice warped floorboards or soft spots in the wood framing, it’s a sign the problem has become serious and may require professional crawl-space repairs to fix the underlying damage.
Your Guide to DIY Cove Joint Repair
When you find water seeping into your basement, your first instinct is to stop it—fast. Tackling cove joint seepage yourself can be a good first step, but it’s important to understand which methods offer a temporary patch and which provide a more lasting solution. The right approach depends on the severity of the leak and the underlying cause. For minor seepage, a DIY repair might be all you need to keep your basement dry.
Before you start any repair, make sure the area is as clean and dry as possible. Remove any peeling paint, efflorescence (that chalky white powder), and loose debris with a wire brush. A wet/dry vacuum is your best friend here for clearing out any standing water and dust. Always wear safety gear, including gloves and eye protection, especially when working with cement products. Let’s walk through a few common DIY methods, from quick fixes to more durable repairs.
Quick Fixes: Using Sealants and Caulk
Your first thought might be to grab a tube of waterproof sealant or caulk. It seems logical—just seal the gap where the water is coming in. While this can stop a small trickle for a little while, it’s rarely a permanent solution. As one expert notes, “Just sealing the crack is usually a short-term fix. The water will likely find another way in, either through the sealant or other cracks.” The hydrostatic pressure that forced the water in initially will just build up and find a new weak spot. Think of this method as a temporary bandage, not a cure. It can be useful in an emergency to slow a leak, but you’ll need a more robust approach for long-term dryness.
A Stronger Solution: Applying Hydraulic Cement
For a more effective DIY repair, hydraulic cement is a much better choice. Unlike standard cement, it’s a special fast-setting material that expands as it hardens. This expansion is key because it helps the patch “lock into place and stop water.” To use it correctly, you need to prepare the joint first. Don’t just skim a layer over the top. Instead, use a hammer and chisel to widen the crack to at least 3/4 of an inch and give it a square-edged “keyway” shape. This gives the cement more surface area to grip. Once you’ve prepped the area, you can mix and apply the cement to form a durable, waterproof plug that can stand up to water pressure far better than a simple sealant.
Managing Water Flow: Interior Drains and Sump Pumps
Patching the cove joint from the inside stops water from entering your living space, but it doesn’t stop the water from accumulating outside your foundation walls. To truly fix cove joint seepage, you need a system that manages the water and relieves the pressure. An interior drainage system is a professional solution that collects water at the base of the foundation walls and channels it to a sump pump, which then pumps the water out and away from your house. This system effectively manages water by giving it an intentional path to follow, preventing it from ever seeping through the cove joint. While not a DIY project, understanding this is key to knowing when a simple patch isn’t enough for a permanent foundation repair.
A Step-by-Step Repair Guide
If you’ve decided to use hydraulic cement, here’s how to do it right. After you’ve chiseled out the joint to at least 3/4-inch wide and cleaned it of all loose material, you’re ready to mix.
- Mix the cement: Combine about 4 to 4.5 parts hydraulic cement with 1 part clean water. Work quickly, mixing with a trowel until you have a thick, lump-free putty. Only mix as much as you can use in about three minutes, as it sets extremely fast.
- Apply the cement: Once it’s a putty, grab a handful in your gloved hand and press it firmly into the prepared crack. Start at the top of the crack and work your way down, forcing the material deep into the joint.
- Smooth the surface: Smooth the patch with your trowel so it’s flush with the surrounding wall and floor. The cement will harden within minutes, forming a solid, watertight barrier. For more complex issues, a professional crack injection may be necessary.
How to Prevent Future Cove Joint Leaks
After you’ve tackled a cove joint leak, the last thing you want is a repeat performance. The good news is that you can take several proactive steps to keep your basement dry for the long haul. Preventing future leaks is all about managing the water around your home before it has a chance to find its way inside. By focusing on the exterior of your property, you can significantly reduce the pressure on your foundation and keep that pesky cove joint sealed and secure. These preventative measures are your best defense against future water damage.
Improve Your Yard’s Grading and Drainage
One of the most effective ways to protect your foundation is to manage the landscape right outside your door. Your yard should have a proper grade, which simply means the ground should slope away from your house. This simple slope uses gravity to direct rainwater and melting snow away from your foundation walls, preventing it from pooling and building up pressure. If your yard is flat or slopes inward, you’re essentially inviting water to sit against your home. For more persistent water issues, installing an exterior drainage system, like a French drain, can offer a more robust solution by actively collecting and redirecting groundwater.
Maintain Gutters and Extend Downspouts
Your home’s gutter system is its first line of defense against water intrusion. Clogged or damaged gutters can send a cascade of water down your walls, where it saturates the soil right next to your foundation. Make it a habit to clean your gutters at least twice a year, especially in the fall. Just as important, check your downspouts. They should extend at least five to ten feet away from your house to deposit water far from the foundation. This is a simple, low-cost fix that can prevent thousands of gallons of water from threatening your basement during a heavy storm. It’s a crucial part of any foundation repair prevention plan.
Consider Professional Waterproofing and Regular Inspections
While DIY patches can offer a temporary fix, a lasting solution often requires a professional approach. To truly fix cove joint seepage, you need a proper drainage system that moves water away from your house. Experts can install comprehensive interior and exterior waterproofing systems that address the root cause of the water pressure, not just the symptoms. Think of it as a permanent solution rather than a quick patch-up. Scheduling regular inspections with a foundation specialist can also help you catch potential issues early, before a small leak becomes a major problem. It’s a smart investment in your home’s health and your peace of mind.
When to Call a Professional
Tackling a home repair project yourself can be satisfying. But when it comes to your home’s foundation, some issues are best left to the experts. A DIY patch might seem like a quick win, but it often only masks a deeper problem. Water is persistent, and if the underlying cause isn’t addressed, it will find a way back in. Recognizing when a problem is beyond a simple fix is key to protecting your property from serious damage. If you’re seeing the following signs, it’s time to put down the caulk gun and pick up the phone for an expert assessment.
If Your DIY Repair Isn’t Holding Up
You followed the instructions, applied a sealant, and the cove joint looked secure. But after the next heavy rain, that familiar dampness crept back in. This is a classic sign the problem is bigger than a simple crack. Sealing the joint from the inside is often a short-term fix, as the water pressure from outside will eventually find another way in. If your repair fails, it’s not a reflection of your skills; it’s an indication that you need a comprehensive foundation repair strategy that addresses the source of the water.
For Structural Concerns or Persistent Water
A little dampness is one thing, but constant moisture or puddles are red flags you can’t ignore. Cove joint seepage is a serious issue that can lead to significant problems, including mold growth that can affect your family’s health. Persistent water also weakens your home’s concrete foundation and damages flooring and drywall. If you see cracks widening, walls bowing, or floors becoming uneven, these are urgent signs of potential structural issues. Don’t wait; a professional waterproofing solution is necessary to protect your home’s integrity.
To Address Complex Drainage Issues
Often, water seeping into your basement is a symptom of a larger issue happening outside. The best way to stop water from getting in is to manage it at the source. This could involve poor yard grading or immense hydrostatic pressure building up in the soil around your foundation. A professional can assess your entire property to identify the root cause. A lasting solution requires a professional drainage system, not just another patch on the interior wall. An expert can design a system to redirect water away from your foundation, solving the problem for good.
Related Articles
- Waterproofing Services – Professional Foundation Repair
- Waterproofing Services | Foundation & Basement Experts | Bristol FX
- Foundation Waterproofing Solutions | Bristol FX
Frequently Asked Questions
Is a small leak where the wall meets the floor a big deal? Yes, even a minor leak is a sign you shouldn’t ignore. Think of it as a warning light. That water is coming from saturated soil outside, which is putting constant pressure on your foundation. While a small puddle might seem manageable, the persistent moisture can lead to mold growth, damage stored belongings, and eventually weaken the concrete itself. It’s always best to address the cause early before it becomes a much larger and more expensive problem.
Why did my basement suddenly start leaking after years of being dry? This is a very common question, and it usually comes down to a change in conditions outside your home. An unusually heavy season of rain or rapid snowmelt can saturate the ground in a way your foundation has never experienced before, creating immense water pressure. Sometimes, changes to your landscaping or a neighbor’s property can alter how water flows, directing more of it toward your house. The cove joint was always there, but now there’s enough pressure to force water through it.
Will sealing the crack from the inside permanently solve the problem? Sealing the joint from the inside with caulk or even hydraulic cement is often just a temporary patch. It stops the water from entering at that specific spot, but it does nothing to relieve the pressure building up outside your foundation wall. That water is persistent and will simply search for the next weakest point to enter. A permanent solution involves managing the water at its source with proper drainage systems, not just blocking its path after it has already reached your home.
Can I just run a dehumidifier to manage the dampness? A dehumidifier is a great tool for controlling indoor humidity and making your basement feel more comfortable, but it doesn’t fix the leak. It only removes moisture from the air after the water has already seeped inside. Meanwhile, that water is still coming in, saturating your concrete, and potentially causing long-term damage to your foundation, flooring, and wall framing. You need to stop the water intrusion itself, not just clean up the air.
What’s the first thing I should do if I notice this type of leak? Your first and easiest step is to check what’s happening right outside your house. Go outside during the next rainstorm and see where the water is going. Make sure your gutters are clean and that your downspouts are directing water at least five feet away from your foundation. This simple maintenance can sometimes make a huge difference. If that doesn’t solve it, the problem is likely with the groundwater, and it’s time to call a professional for an assessment.