That thin line in your basement wall is more than just an eyesore; it’s a potential pathway for water, moisture, and pests to enter your home. Left unaddressed, even a small crack can lead to bigger problems. Fortunately, you don’t always need to call in a professional for a minor leak. A reliable foundation crack repair kit can be an effective and affordable solution, allowing you to create a permanent, waterproof seal from the inside. This article is your complete resource for understanding these kits, comparing the top brands, and learning the proper techniques to ensure your DIY repair is a success.
Key Takeaways
- Assess the Crack Before You Act: DIY kits are effective for simple vertical or diagonal cracks under a half-inch wide. If you spot horizontal cracks, stair-step patterns, or bowing walls, these are signs of serious pressure that require a professional evaluation, not a patch kit.
- Match the Sealant to the Job: The two main types of sealant serve different functions. Choose a rigid epoxy kit to structurally bond concrete back together, and opt for a flexible polyurethane foam kit to create a waterproof seal in a leaking, non-structural crack.
- Proper Prep Guarantees a Lasting Repair: The success of your project hinges on the prep work. A clean, dry, and debris-free surface is essential for the sealant to bond correctly. Rushing this step is the most common reason DIY repairs fail over time.
What Are Foundation Crack Repair Kits?
If you’ve spotted a crack in your foundation, your first thought might be about the potential cost and complexity of the repair. That’s where foundation crack repair kits come in. These are essentially DIY packages designed to help homeowners tackle smaller cracks in their concrete foundations without immediately needing to call a professional. The main goal is to seal the crack, which stops moisture from seeping in and prevents the crack from getting worse over time.
Think of it as a first line of defense. For many common, non-structural cracks, these kits provide a straightforward and effective solution. They give you the tools and materials to manage the issue yourself, which can save you both time and money. However, it’s crucial to understand what these kits can and can’t do. They are perfect for certain situations, but they aren’t a cure-all for every foundation problem. Knowing the difference is key to protecting your home’s structural integrity.
What’s Inside a Standard Kit?
When you open a standard foundation crack repair kit, you’ll find specialized materials designed to fill and seal concrete. Most kits include powerful polymers like Polyurethane foam or Urethane. For example, a popular DIY foundation crack repair kit uses a special foam that you inject directly into the crack. As the foam expands, it fills the entire void and hardens to create a strong, flexible, and waterproof seal. This method allows you to perform a solid repair from inside your basement, which is much easier than excavating the outside of your foundation.
Which Cracks Can You Fix with a Kit?
These kits are surprisingly versatile and can handle a decent range of common foundation cracks. They are most effective for vertical or diagonal cracks that are relatively small—think anything from a hairline fracture up to about 1/2 inch wide. Many kits provide enough material to repair a crack that is up to 10 feet long. This makes them a great option for the typical settling cracks that many homeowners find in their basement walls or concrete slabs. Before you buy, just be sure to measure the width and length of your crack to make sure the kit can handle it.
When a DIY Kit Isn’t Enough
While DIY kits are great for minor issues, they have their limits. You should call a professional if you see a crack that is wider than 1/2 inch, is growing, or is running horizontally. Horizontal cracks, in particular, can be a sign of serious structural pressure on your foundation walls. According to experts, these significant issues often require a professional-grade crack injection or other advanced repair methods. Ignoring these warning signs can lead to much bigger problems down the road, so it’s always better to get an expert opinion when you’re dealing with more than a simple, stable crack.
The Best Foundation Crack Repair Kits
If you’ve decided a DIY approach is right for your situation, the next step is choosing a kit. The market is full of options, each with its own strengths and weaknesses. While a professional repair is always the most reliable solution for ensuring the structural integrity of your home, understanding the top DIY kits can help you appreciate what goes into a proper fix. Here’s a look at some of the most popular choices available to homeowners, so you can see how they stack up.
Bristol FX Professional Kit
While most kits on the market are designed for DIY use, we utilize professional-grade materials and techniques that go far beyond what’s available in a box. Our approach is tailored to the specific crack, using advanced polymers and injection methods to ensure a permanent, waterproof seal. For homeowners who want the peace of mind that comes with a warrantied, expert foundation repair, skipping the DIY aisle and calling a professional is the best first step. Our methods address not just the visible crack but the underlying pressure and conditions that caused it, ensuring a comprehensive and lasting solution.
RadonSeal Complete DIY Kit
For homeowners looking for a straightforward, no-fuss solution, the RadonSeal kit is a popular choice. Its main selling point is that it allows you to repair basement wall cracks without any drilling, which minimizes damage to your home’s structure and makes the process feel less intimidating for first-timers. The kit is designed to be an all-in-one package, providing the materials needed to seal typical foundation cracks and prevent water intrusion. It’s a solid entry-level option for anyone looking to address minor, non-structural cracks before they become a bigger headache.
Applied Technologies Contractor Kit
This kit steps things up a notch, using a special expanding foam called “Hydra Stop 300 Hydrophobic Polyurethane Foam.” When injected, this foam expands to completely fill the crack from the inside out, creating a durable and flexible seal through the entire thickness of the wall. This method is similar to the professional crack injection techniques used by experts. It’s a more robust solution for homeowners comfortable with a slightly more involved process, offering a thorough seal that can stop active leaks and provide a more substantial repair than surface-level patches.
Sika Professional Solutions
Sika is a well-known name in construction materials, and their crack repair kit is often praised for its performance on vertical surfaces. If you’re dealing with a crack running up a concrete wall, this is a product many DIYers have found success with. The epoxy formula is designed to bond strongly with the concrete, creating a rigid repair that restores some of the wall’s original strength. Its reliability on vertical applications makes it a go-to for basement and retaining wall cracks where other, thinner materials might sag or drip during application.
Concrete Sealers USA Solutions
Concrete Sealers USA stands out by offering a wide range of kits tailored to different problems. They have specialized products for foundation wall cracks as well as separate kits designed specifically for cracks in concrete floors and slabs. This variety allows you to choose a product that’s formulated for your exact issue, rather than relying on a one-size-fits-all solution. Whether you’re dealing with a hairline fracture in the garage floor or a leaking crack in the basement, they likely have a targeted kit for the job, which can lead to a more effective repair.
Comparing Price and Value
When you start shopping, you’ll see a wide price range. Kits like RadonSeal can cost between $150 and $280, while other brands offer options from as low as $75 to over $550. It’s tempting to go for the cheapest option, but value is about more than the price tag. Consider the length of the crack, the type of material, and the completeness of the kit. While a DIY kit can be a temporary fix, investing in professional waterproofing provides a long-term, warrantied solution that protects your property’s value and gives you true peace of mind.
Key Features to Look For
When you’re standing in the hardware aisle or browsing online, the options for foundation crack repair kits can feel overwhelming. They all promise a quick fix, but the results can vary wildly. To make the right choice, you need to look past the marketing and focus on the features that actually matter for a lasting repair. A little bit of know-how will help you pick a kit that solves your problem instead of just covering it up for a few months.
From the application method to the chemical makeup of the sealant, every detail plays a role. Think about your specific situation: Is the crack actively leaking? Is it in a tight corner? Are you comfortable with a multi-step process? Answering these questions will help you narrow down the options and find a kit that matches both the job and your skill level.
How Easy Is It to Use?
Let’s be honest—most of us aren’t foundation experts. A good DIY kit should recognize that. Look for products with clear, step-by-step instructions and ideally, online video tutorials. Many homeowners find that kits like the Dricore concrete repair kit are effective because the process is straightforward. The best kits bundle everything you need, from injection ports to the sealant, so you aren’t running back to the store mid-project. If the instructions look like they were written for a chemical engineer, it might be best to choose a simpler option to ensure you get the repair right the first time.
No-Drill Options
The idea of drilling into your foundation can be intimidating, and for good reason. It can create more dust and debris and, if done incorrectly, could cause more harm than good. That’s why no-drill injection kits are so popular. These systems typically use surface-mounted ports that you glue over the crack, allowing you to inject the repair material without drilling. This method offers a less invasive way to fix basement wall cracks with minimal disruption. For more significant structural issues, professionals may need to drill to install push and helical piers, but for minor cracks, a no-drill kit is a great, less-daunting choice.
How Long Will the Repair Last?
You’re not just looking for a patch; you’re looking for a permanent solution. The durability of a repair often comes down to the quality of the material, typically epoxy or polyurethane. A high-quality epoxy kit should create a bond that’s even stronger than the original concrete, ensuring a durable repair you can trust. Cheaper, caulk-like fillers might seal a crack temporarily, but they often shrink or peel away over time. Reading reviews and choosing a reputable brand can give you confidence that your hard work will last for years, not just until the next heavy rain. True long-term stability is the goal of any professional foundation repair.
Is It Waterproof?
If your foundation crack is letting water into your basement, this feature is non-negotiable. Not all crack fillers are designed to block moisture. You need a kit that specifically creates a waterproof barrier. Polyurethane foams are excellent for this because they expand to fill the entire depth of the crack and remain flexible, creating a watertight seal even if the foundation shifts slightly. Many homeowners agree that for leaking cracks, a polyurethane injection is the best thing on the market. For comprehensive protection, a successful crack repair is often the first step in a larger waterproofing strategy for your basement.
Can It Handle Extreme Temperatures?
Your home’s foundation is constantly under pressure from changing temperatures, which cause the concrete to expand and contract. A rigid repair material can crack again under this stress. This is where material flexibility becomes critical. Polyurethane is often the better choice in climates with dramatic temperature swings because it can move with the concrete without breaking its seal. This flexibility makes it a strong option for tackling wet foundations that are subject to the freeze-thaw cycle. Professional-grade polyurethane geotechnical foam is specifically engineered to withstand these environmental pressures for decades.
What Kind of Warranty Is Offered?
A warranty can offer peace of mind, but it’s important to read the fine print. Most DIY kits come with a limited product warranty, meaning the company will replace a defective tube of epoxy, but they won’t guarantee the success of your repair. This is a major difference between a DIY fix and a professional service. A reputable foundation repair company will offer a warranty on their workmanship, often for many years or even a lifetime. While a DIY kit can be a great solution for a small, simple crack, the lack of a service warranty is something to consider for more serious issues.
How to Choose the Right Kit
With so many options on the market, picking the right foundation crack repair kit can feel overwhelming. But it doesn’t have to be. The best choice comes down to understanding your specific situation—the type of crack you have, where it’s located, and your budget. Thinking through a few key factors before you buy will help you find a kit that not only fixes the problem but also provides a lasting solution. Let’s walk through what you need to consider to make a confident choice.
Assess Your Crack Type
First things first, take a close look at the crack itself. Is it a thin, hairline fracture, or is it wider than a credit card? Is the wall bulging or shifting around it? Simple, non-structural cracks are often great candidates for a DIY kit. However, if you see horizontal cracks, stair-step patterns in your brick or block wall, or any signs that the foundation is actively moving, it’s time to pause. These are often signs of a deeper issue that a sealant kit can’t solve. For these more complex problems, a professional foundation repair is the safest and most effective route.
Consider Indoor vs. Outdoor Use
Where is the crack located? A crack in your basement wall requires a different approach than one on your exterior foundation. For indoor cracks, especially in basements or crawl spaces, your main goal is likely to stop water, moisture, and even pests from getting in. Many kits are specifically designed for this, creating a strong barrier. For outdoor cracks, you’ll need a product that can withstand the elements. Look for kits that offer UV stability to prevent the material from breaking down in the sunlight and that can handle temperature fluctuations without failing. Proper waterproofing is key for any below-grade repairs.
Factor in Your Climate
Your local weather plays a big role in how a repair holds up over time. If you live in an area with harsh winters, you’ll need a flexible sealant that can handle the freeze-thaw cycle, which causes concrete to expand and contract. A rigid material might crack again under that pressure. Similarly, in hot, sunny climates, a UV-resistant sealant is essential to prevent the repair from degrading. Always check the product specifications to see if it’s rated for the temperature extremes in your region. Choosing a material suited to your climate ensures a more durable, long-lasting fix.
Calculate the Coverage Area You Need
Before you add a kit to your cart, grab a tape measure. You need to know the length and width of the crack you’re repairing to make sure you buy enough material. Repair kits are typically sold with enough product to cover a specific length, such as 10 feet or 30 feet of a standard-width crack. Measure your crack and then buy a kit that offers a little more coverage than you think you’ll need—it’s always better to have extra than to run out mid-job. This simple step saves you from a second trip to the store and ensures you can complete the repair in one go.
Decide Between Professional and DIY Kits
This choice often comes down to balancing cost, time, and confidence. A DIY kit is a great way to save money if you’re dealing with a minor, straightforward crack and you’re comfortable with hands-on projects. However, if the crack is large, shows signs of structural issues, or if you’re just not sure how to proceed, calling a professional is a smart investment. A professional crack injection ensures the job is done correctly with commercial-grade materials and often comes with a warranty, giving you peace of mind that the repair will last.
Set Your Budget
Foundation crack repair kits come in a wide range of prices, from under a hundred dollars to several hundred. While it’s tempting to just grab the cheapest option, remember that price often reflects the quality and quantity of the materials. A more expensive kit might include higher-grade epoxy or polyurethane and more robust application tools. Set a realistic budget, but also consider the long-term value. Spending a bit more on a high-quality kit now could save you from having to redo the repair—or from paying for a more expensive professional fix—down the road.
How to Apply Your Kit (and What to Watch Out For)
You’ve chosen your kit and you’re ready to tackle that crack. Taking the time to apply it correctly is just as important as picking the right product. A proper application ensures a strong, lasting repair that protects your home’s foundation. The process isn’t overly complicated, but it does require attention to detail. From prepping the surface to understanding how the materials cure, each step plays a role in the final result. Think of it less like a quick fix and more like a small, important project. We’ll walk through the key steps and point out what to keep an eye on to make sure your repair is successful and safe.
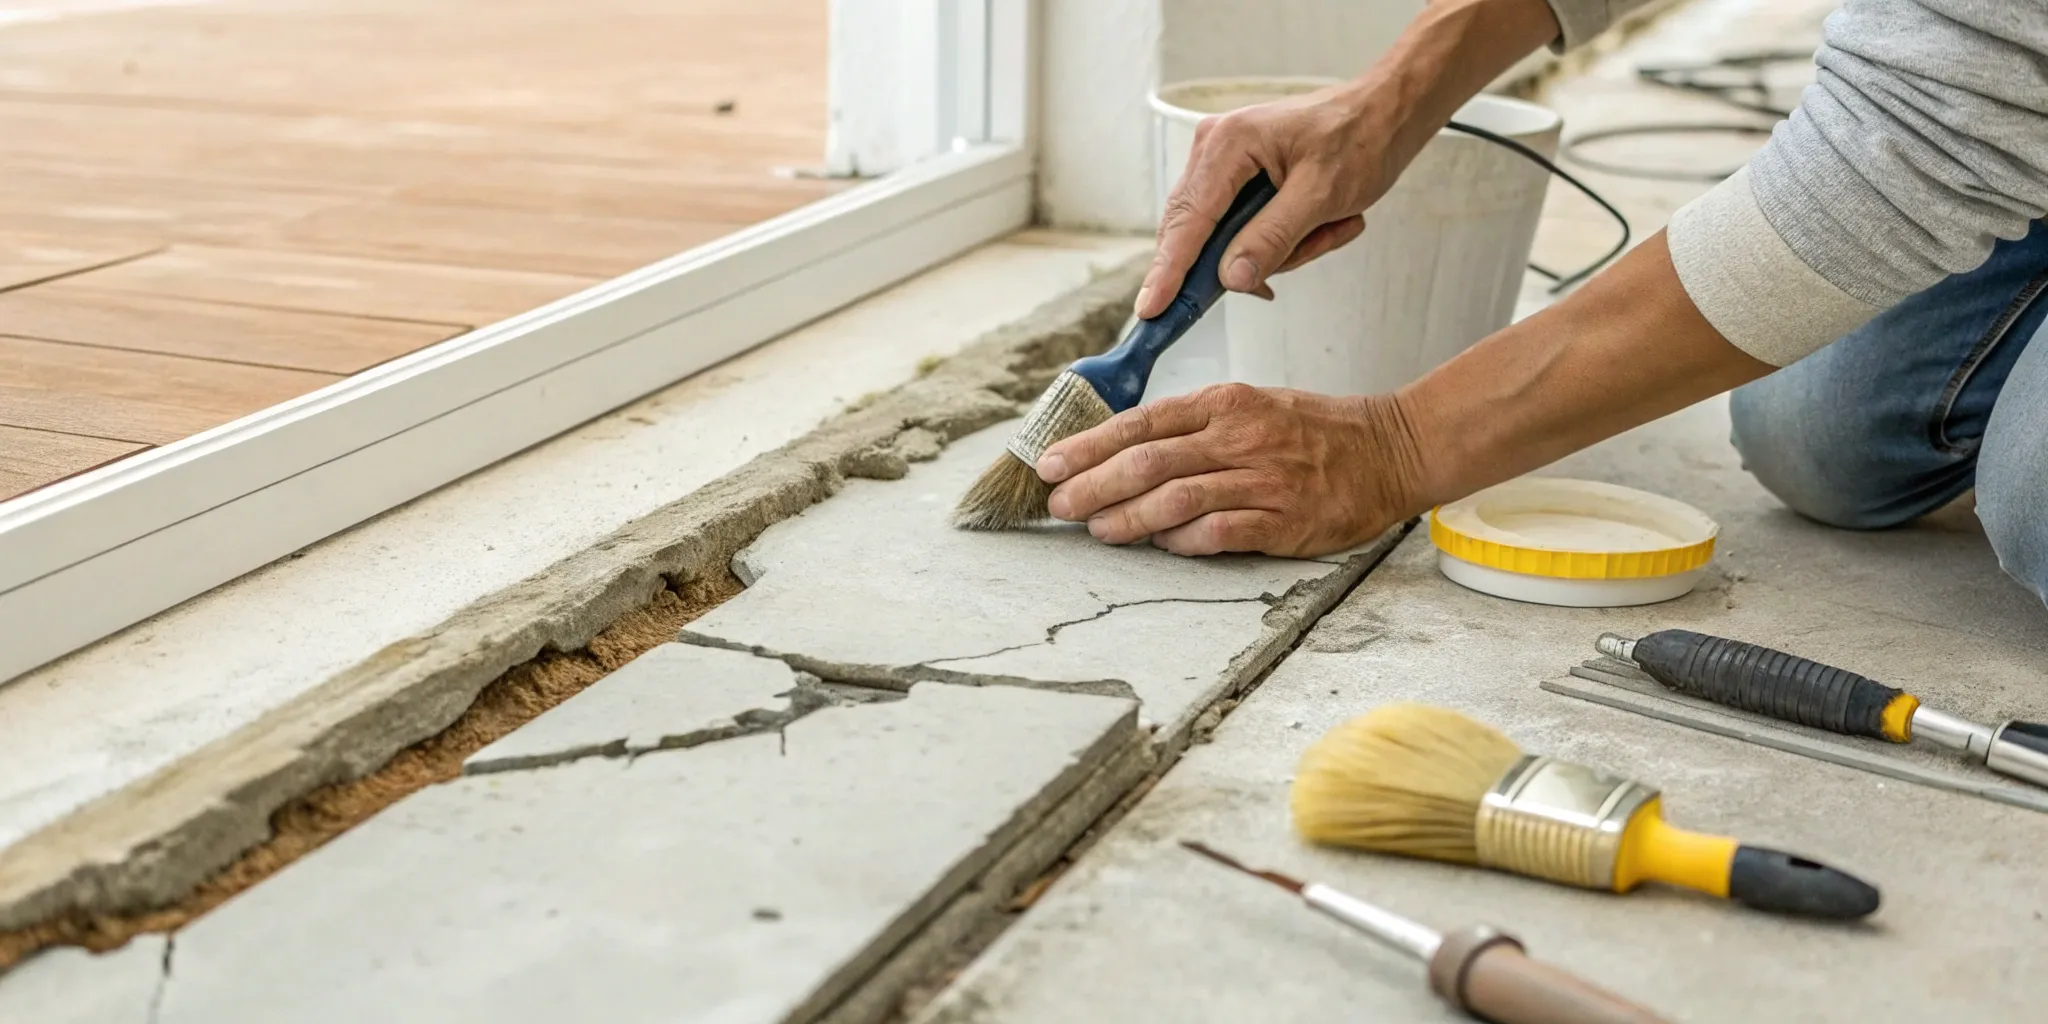
Gather Your Tools and Prep the Area
Before you even open the kit, get your workspace and tools in order. A clean, prepped surface is the key to a successful repair. Start by thoroughly cleaning the crack and the area around it with a wire brush to remove any loose concrete, dirt, or old paint. Then, wipe it down with a damp cloth and let it dry completely. Most kits come with the essentials, but you’ll likely need your own safety glasses, gloves, and a caulk gun. Many homeowners find that kits with clear instructions make the process much smoother, so read the manual from start to finish before you begin.
Follow These Steps for Application
While every kit is slightly different, the general process for injection is similar. You’ll start by applying a surface sealant or epoxy paste over the crack, leaving small gaps to place injection ports every few inches. This sealant acts as a barrier, ensuring the repair material fills the crack from the inside out. Once the sealant is tacky, you’ll inject the polyurethane or epoxy into the lowest port until it begins to seep out of the port above it. You’ll then cap the first port and repeat the process, working your way up the crack. Some modern kits offer a drill-free injection method, which simplifies the process and minimizes any disruption to your wall.
Stay Safe During Application
Working with chemical compounds like epoxy and polyurethane requires a few safety precautions. Always wear waterproof gloves and safety glasses to protect your skin and eyes from accidental contact. Ensure the area is well-ventilated, especially if you’re working in a basement or crawl space. Open windows and use a fan to keep fresh air circulating. These kits are designed to be strong, and the chemicals can be potent. Following these simple safety measures will help you complete the job without any issues, whether you’re repairing a floor or a vertical wall surface.
How to Handle Wide Cracks
Not all cracks are created equal. Most DIY kits are designed for hairline cracks up to about 1/4-inch wide. If you’re dealing with a larger gap, you’ll need a low-viscosity epoxy resin that can properly fill the void and bond with the concrete. Using a standard kit on a wide crack may result in a weak, incomplete repair that fails over time. For a strong and durable repair on a significant crack, you may need a specialized kit. If a crack is wider than a half-inch, it often signals a deeper structural issue that a surface-level fix can’t solve. In these cases, it’s best to get a professional opinion.
Understand the Curing Process
Once you’ve injected the material, the job isn’t quite done. The epoxy or polyurethane needs time to cure, which is the chemical process where it hardens and bonds with the concrete to form a permanent seal. Curing times can vary from a few hours to a full day, depending on the product, temperature, and humidity. Check your kit’s instructions for the specific curing time and avoid touching or putting any pressure on the repaired area until it’s fully set. A proper cure is what makes the repair strong and effective against future leaks in poured foundations.
Know When to Call a Professional
A DIY kit is a great solution for minor, non-structural cracks. However, some situations require an expert. If you see horizontal cracks, cracks that are actively growing, or cracks accompanied by bowing walls or sticking doors, it’s time to call for a professional assessment. These are signs of significant hydrostatic pressure or foundation settlement that a kit cannot address. A professional can determine the root cause and provide a permanent solution, like our crack injection and corrosion repair services. Professionals are often quick and efficient, explaining the process clearly and giving you peace of mind that the job is done right.
A Closer Look at Materials and Features
When you’re staring at a foundation crack repair kit, the list of materials and features can feel a bit overwhelming. What’s the difference between epoxy and polyurethane? Do you really need an injection system? Understanding these key components will help you move past the marketing jargon and choose a kit that’s actually right for your specific repair job. Getting familiar with the basics ensures you’re not just buying a product, but a real solution for your home’s foundation.
Epoxy vs. Polyurethane: What’s the Difference?
Think of epoxy and polyurethane as two different tools for two different jobs. Epoxy is the powerhouse. It’s a two-part resin that creates an incredibly strong, rigid, and waterproof bond. If you’re dealing with a structural crack that could compromise your foundation’s integrity, epoxy is usually the way to go because it essentially glues the concrete back together.
Polyurethane, on the other hand, is more flexible. It’s a foam that expands to fill the crack from the inside out, creating a watertight but pliable seal. This is perfect for non-structural cracks that are leaking water, as the foam can accommodate the natural, subtle movements of the concrete. Professional crack injection services use both, selecting the right material based on a thorough assessment of the crack.
How Injection Systems Work
Most effective foundation crack repair kits use an injection system to get the sealant deep into the crack. This isn’t just about smearing something over the surface; it’s about filling the crack through its entire thickness. The process typically involves placing injection ports along the crack and then using a cartridge gun to force the epoxy or polyurethane foam into the ports. The material flows into every nook and cranny, expanding to create a complete, permanent seal from the inside out. This method ensures water has no path to get through, which is why it’s the same technique professionals use for applying polyurethane geotechnical foam for more significant repairs.
The Benefits of a Surface Sealant
A surface sealant is the finishing touch that makes an injection repair so effective. After injecting the epoxy or polyurethane, you need something to hold it in place while it cures and to provide a clean, finished look. That’s where a surface sealant comes in. It’s usually an epoxy paste that you apply over the crack before injecting the filler. This paste creates a temporary cap, preventing the liquid filler from oozing out. Once the injection is complete and the material has cured, the surface seal provides an additional barrier against moisture and air, contributing to a comprehensive waterproofing strategy for your basement or foundation.
Consider the Environmental Impact
When you’re bringing chemicals into your home, it’s smart to think about their environmental and health impact. Some sealants, particularly certain types of foams, can release volatile organic compounds (VOCs) during application. If you’re sensitive to chemical smells or concerned about air quality, look for kits that are specifically labeled as low-VOC or no-VOC. It’s also why proper ventilation is non-negotiable during any DIY repair. For larger jobs, hiring a professional is often the safest bet, as they are trained in the correct handling and disposal of these materials, ensuring the job is done safely and with minimal environmental impact.
How to Store Your Kit
Once you buy your kit, you might not use it right away. Proper storage is key to making sure the materials are still effective when you’re ready to tackle the repair. Most foundation crack repair kits need to be stored in a cool, dry place, away from direct sunlight and extreme temperatures. Freezing can ruin the chemical compounds, and excessive heat can cause them to degrade. Always check the manufacturer’s instructions on the packaging for specific storage guidelines. Keeping the kit in its original box in a temperature-controlled garage or basement closet is usually a safe bet.
Check the Shelf Life
Just like the food in your pantry, foundation repair materials have a shelf life. The chemical components in epoxy and polyurethane can lose their effectiveness over time, which means your repair might not be as strong or durable as it should be. Before you buy a kit, check for a manufacturing or expiration date. Most products have a shelf life of about one year from the date of purchase. If you’ve had a kit sitting in your garage for a few years, it’s probably best to buy a new one. Using fresh materials is a simple step that ensures you get the best possible results for your repair.
What to Look for in Quality and Support
When you’re dealing with your home’s foundation, the quality of the repair materials and the support you receive are just as important as the application process itself. A cheap kit that fails in a year isn’t a bargain, and a complicated process without customer support can turn a weekend project into a major headache. Here’s how to make sure you’re choosing a product that’s reliable, effective, and backed by a solid company.
Look for High-Quality Materials
The foundation of a good repair is, quite literally, the material you use. Look for kits that use professional-grade epoxy or polyurethane. These compounds are designed to be strong, durable, and flexible enough to handle the minor shifts and movements of a concrete foundation. Customer reviews can be a great resource here. For example, users of one popular kit noted it was “generally easy to use and effective for sealing cracks,” which points to reliable material quality. A lasting crack injection repair depends entirely on the chemical compounds creating the seal, so don’t compromise on quality.
Check for Reliable Customer Support
Even the most straightforward DIY projects can have unexpected challenges. That’s where good customer support comes in. Before you buy, check the manufacturer’s website for contact information, tutorials, and FAQs. See what other users have to say about their support experience. One homeowner praised a kit’s manufacturer, sharing, “First off, the customer service was excellent.” This kind of responsive help can be invaluable if you run into a problem mid-repair. It’s the difference between a finished project and a frantic, half-finished mess in your basement.
Verify Professional Certifications
While you might not be a professional contractor, you can still use products that meet professional standards. Look for kits that mention compliance with industry standards, like those from ASTM International. Certifications can give you peace of mind that the product has been tested for effectiveness and safety. For instance, users of a certified DIY kit found that “the process is straightforward and easy to use.” This suggests that products designed to meet certain standards are often more user-friendly and reliable, taking some of the guesswork out of your repair.
Research Long-Term Performance
A foundation crack repair should be a long-term solution, not a temporary patch. You want a fix that will hold up for years to come. Dig into reviews and product descriptions to find information about durability. Kits known for “reliable and effective results” give you confidence that the repair will be strong and lasting. The goal is to fix it once and not have to worry about it again. For true, permanent solutions, especially for recurring or structural issues, a professional foundation repair service can provide a guaranteed, long-term fix.
Investigate the Manufacturer’s Reputation
A company’s reputation is built on the quality and reliability of its products over time. Choose kits from manufacturers that have a long history of positive feedback and are well-regarded in the industry. When customers say a product “is the absolute best thing on the market for repairing leaking cracks in poured foundations,” it’s a strong indicator of a trustworthy brand. A reputable company stands behind its products, and you can generally expect better quality control and more dependable results than you would from an unknown or generic brand.
Read the Fine Print on the Warranty
A warranty can offer great protection, but only if you understand what it covers. Before purchasing, read the warranty details carefully. Does it cover product defects only, or does it guarantee the performance of the repair? How long does it last? One customer noted the importance of the fine print when they realized a specific kit “was the only product I could find that seemed to support vertical services.” Make sure the warranty aligns with your specific needs. This is one area where professional services often have an edge, as they can offer extensive warranties on both the materials and the labor.
Related Articles
- 3 Ways To Repair a Crack in a Concrete Foundation – Professional Foundation Repair
- Crack Injection Repair – Professional Foundation Repair
Frequently Asked Questions
Is a DIY kit a permanent solution? For a simple, non-structural crack, a high-quality kit can provide a very long-lasting, waterproof seal. Think of it as a permanent fix for that specific, minor issue. However, it doesn’t address the underlying cause of the crack, such as soil pressure or settlement. If your foundation continues to move, new cracks could form. A professional repair looks at the bigger picture to ensure the root cause is managed.
How do I choose between an epoxy and a polyurethane kit? It’s simpler than it sounds. Choose epoxy if you need strength. It acts like a super-strong glue that bonds the concrete together, which is great for restoring some structural integrity to a crack. Choose polyurethane if you need to stop a leak. It’s a flexible foam that expands to create a watertight seal, and it can move slightly with the concrete, which is ideal for active leaks or areas with temperature swings.
What’s the biggest mistake people make when using these kits? The most common mistake is skipping the prep work. People get excited to fix the problem and just start injecting the material into a dirty crack. You have to thoroughly clean out any dust, loose concrete, or debris first. If you don’t, the sealant won’t bond properly to the concrete, and the repair is much more likely to fail down the road.
Can I use a kit on a crack that’s actively leaking water? Yes, you can, but you need to choose the right kit. This is a job for polyurethane foam. The foam reacts with water and expands rapidly to fill the crack and stop the flow, creating a waterproof barrier from the inside out. An epoxy kit won’t work as well on an actively wet crack, as the water can interfere with its ability to cure and bond correctly.
When should I absolutely skip the DIY kit and call a professional? You should put the kit down and call an expert if you see any major red flags. This includes horizontal cracks, cracks wider than a half-inch, stair-step cracks in a block wall, or any wall that appears to be bowing or bulging inward. These are signs of serious structural pressure that a simple injection can’t fix. A professional can diagnose the real problem and save you from a much bigger, more expensive issue later on.