That space under your home is more than just a place for pipes and wiring; it’s a critical part of your home’s overall health system. Much of the air you breathe upstairs first circulates through your crawl space. If you have an unfinished dirt floor, that air is likely picking up moisture, mold spores, and allergens before it ever reaches your living areas. This is why insulating a crawl space with a dirt floor is one of the most effective projects you can undertake. It’s not just about temperature control. It’s about improving your indoor air quality, protecting your home’s wooden structure from rot, and creating a cleaner environment for your family.
Key Takeaways
- A Vapor Barrier is Non-Negotiable: For a dirt-floor crawl space, your first and most important step is installing a heavy-duty vapor barrier. This is what stops ground moisture from creating the damp conditions that lead to mold, wood rot, and poor air quality throughout your home.
- Preparation Prevents Future Problems: Don’t insulate over existing issues. Before you start, you must fix any water leaks or drainage problems, clear out all debris, and seal air gaps around the foundation to ensure your work lasts.
- Insulate the Walls, Not the Floor Joists: For better energy efficiency, insulate the crawl space walls with a moisture-resistant material like rigid foam board. This method, combined with sealing outside vents, helps create a dry, conditioned space that protects your home’s structure and comfort.
Why Insulate Your Crawl Space?
It’s easy to forget about the space under your house, but your crawl space has a huge impact on your home’s health, comfort, and energy costs. If you have a dirt floor down there, you’re likely dealing with issues you can’t even see. Insulating this often-neglected area isn’t just an upgrade; it’s a fundamental step toward a healthier, more efficient home. Here’s why it’s so important to give your crawl space the attention it deserves.
How Moisture and Air Quality Affect Your Home
Much of the air you breathe inside your home first passes through your crawl space. This is due to a phenomenon called the “stack effect,” where air naturally flows from the bottom of your house to the top. If your crawl space has a dirt floor, it’s constantly releasing moisture into the air. This damp environment is a perfect breeding ground for mold, mildew, and pests. That musty smell and humid air can then travel upstairs, affecting your home’s air quality and overall comfort. Proper crawl-space repairs and insulation help stop this cycle, creating a cleaner, healthier environment for you and your family to enjoy.
Lower Your Energy Bills
An uninsulated crawl space can be a major source of energy loss. During winter, cold air from the crawl space makes your floors frigid and forces your heating system to work overtime. In the summer, hot, humid air can enter, making your air conditioner run constantly. Crawl space insulation helps maintain your home’s energy efficiency by preventing the loss of warm and cool air through your flooring. By properly insulating, you create a thermal barrier that keeps your home’s temperature stable, leading to noticeable savings on your monthly energy bills. Using modern materials like polyurethane geotechnical foam can be an especially effective way to seal and insulate the space.
Protect Your Health and Your Home’s Structure
The moisture that originates in your crawl space doesn’t just affect air quality; it can also cause serious structural damage. Persistent dampness leads to wood rot in your floor joists, beams, and subfloor, which can compromise the structural integrity of your entire home. Furthermore, less moisture means less mold and mildew, which can trigger allergies and respiratory issues for your family. By controlling the moisture at its source, you’re not only protecting your investment but also creating a healthier living space. If you already see signs of sagging floors or cracks in your walls, a professional foundation repair assessment is a critical first step to ensure your home is safe and sound.
The Problem with Dirt Floors
An exposed dirt floor is the primary culprit behind most crawl space problems. Even if the ground looks and feels dry, it is constantly wicking moisture from the earth into the air. This process, called evaporation, significantly increases the humidity level in your crawl space. High humidity creates the perfect conditions for mold growth and wood rot. Simply putting down insulation isn’t enough; you have to address the source of the moisture first. That’s why a crucial part of any crawl space project is installing a durable vapor barrier as part of a complete waterproofing strategy, which effectively seals out ground moisture for good.
Gather Your Materials and Tools
Before you even think about crawling under your house, you need to get organized. Having the right materials and tools on hand makes the entire insulation process smoother and safer. Think of this as your project’s shopping list. Getting everything you need in one go will save you from making multiple trips to the hardware store and will help you get the job done right the first time. Proper preparation is the foundation of a successful DIY project, and this step is all about setting yourself up for success.
When you’re dealing with a critical part of your home like the crawl space, cutting corners on materials isn’t an option. The goal is to create a dry, conditioned space that protects your home’s structure and improves your indoor air quality. This means choosing products specifically designed for the damp, unique environment of a crawl space. From the vapor barrier that will cover the dirt floor to the type of insulation you attach to the walls, each component plays a vital role in the system. Let’s walk through exactly what you’ll need to gather.
Choose the Right Vapor Barrier
The first and most important material for a dirt-floor crawl space is a quality vapor barrier. This is essentially a thick sheet of plastic that you’ll lay directly over the ground. Its job is to stop moisture from the soil from evaporating up into your crawl space and, eventually, into your home. A damp crawl space can lead to mold, wood rot, and poor air quality, so this barrier is your first line of defense. For reliable crawl-space repairs, you can’t skip this step. Look for a polyethylene sheeting that is at least 6-mil thick, though 10-mil or 12-mil options offer even better durability and protection against tears.
Select the Best Insulation
Not all insulation is created equal, especially when it comes to crawl spaces. You’ll want to avoid traditional fiberglass batts, which act like a sponge and absorb moisture, leading to mold and sagging. Instead, opt for moisture-resistant insulation. Rigid foam boards are an excellent choice for DIYers because they are easy to cut and install on the crawl space walls. Another highly effective option is spray polyurethane foam, which creates a seamless air and moisture barrier. While spray foam often requires professional installation, it provides superior coverage. Both of these materials are much better suited to handle the potential humidity in a crawl space than older insulation types.
Get the Right Tools and Safety Gear
Working in a crawl space requires more than just the right materials—it requires the right gear to keep you safe and make the job easier. Start with personal protective equipment (PPE): a respirator or high-quality dust mask, safety glasses, durable gloves, and coveralls will protect you from dust, debris, and potential pests. You’ll also need a good headlamp or work light, as you can’t rely on daylight. For tools, gather a heavy-duty utility knife for cutting the vapor barrier and insulation boards, a measuring tape, and a caulk gun with plenty of construction adhesive and sealant for securing materials and sealing gaps.
Compare Material Costs
Budgeting is a key part of any home improvement project. While fiberglass insulation is the cheapest option, often costing less than $1.00 per square foot, its poor performance in damp environments makes it a bad investment for a crawl space. Expect to pay more for materials that will actually last. A quality 6-mil vapor barrier typically costs around $0.50 per square foot. Rigid foam insulation boards can range from $1.50 to $3.00 per square foot, depending on the thickness and R-value. While the upfront cost is higher, investing in the right materials for waterproofing and insulating your crawl space will save you money on energy bills and future repairs.
Prep Your Crawl Space for Insulation
Before you even think about rolling out insulation, you have to get your crawl space ready. Skipping the prep work is like building a house on a shaky foundation—it just won’t hold up. Taking the time to clean, dry, and seal the area is the single most important thing you can do to ensure your insulation project is a success. This groundwork makes the installation process smoother and guarantees your insulation can perform effectively for years to come.
Start with a Safety Check and a Plan
Your first step is to grab a good flashlight and give the entire crawl space a thorough inspection. You’re looking for any red flags that need to be addressed before you seal everything up. Keep an eye out for standing water, active leaks, wood rot, mold, or signs of pests like termites and rodents. Also, look closely at the foundation walls for any large cracks or bowing. If you find significant structural problems, it’s time to pause. Insulation can’t fix a failing foundation, so it’s crucial to handle any necessary crawl-space repairs first. A professional can spot subtle issues you might miss and give you a clear path forward.
Fix Water and Drainage Problems First
Insulating a damp crawl space is a recipe for disaster. It traps moisture against your home’s structure, which can lead to mold, mildew, and wood rot, completely undermining your efforts. Before you proceed, make sure water is being directed far away from your foundation. This means cleaning your gutters, adding extenders to your downspouts so they discharge several feet from the house, and ensuring the ground outside slopes away from your walls. If you see persistent dampness, white chalky residue on the concrete, or a musty smell, you likely have an ongoing moisture issue that requires a professional waterproofing solution. A dry environment is non-negotiable for effective insulation.
Clean and Prepare the Area
Once you’ve handled any moisture issues, it’s time to clear everything out. Remove any old, failing insulation, construction debris, wood scraps, and anything else stored in the space. Organic materials can decay and attract pests, so you want the area to be completely empty. After it’s cleared, take a heavy-duty rake and level the dirt floor as much as possible. A relatively smooth and even surface is important because it allows the vapor barrier to lie flat without being stretched or punctured. This simple step makes the installation much easier and helps create a more effective seal against ground moisture.
Seal Air Leaks Before You Insulate
To get the most out of your new insulation, you need to stop air from leaking in and out of your home through the crawl space. The most common culprit is the rim joist—the wooden header that rests on top of your foundation walls. You can seal the gaps between floor joists using pieces of rigid foam board and then use a spray foam sealant around the edges to create an airtight barrier. Don’t forget to seal any openings where pipes, wires, and ducts enter the crawl space. Taking the time to address every small crack and gap will make a huge difference in your home’s comfort and energy efficiency.
How to Insulate Your Crawl Space: A Step-by-Step Guide
Once you’ve prepped your crawl space, you’re ready to start the insulation process. Following these steps in order is key to creating a sealed, dry, and energy-efficient space under your home. Let’s walk through the process together.
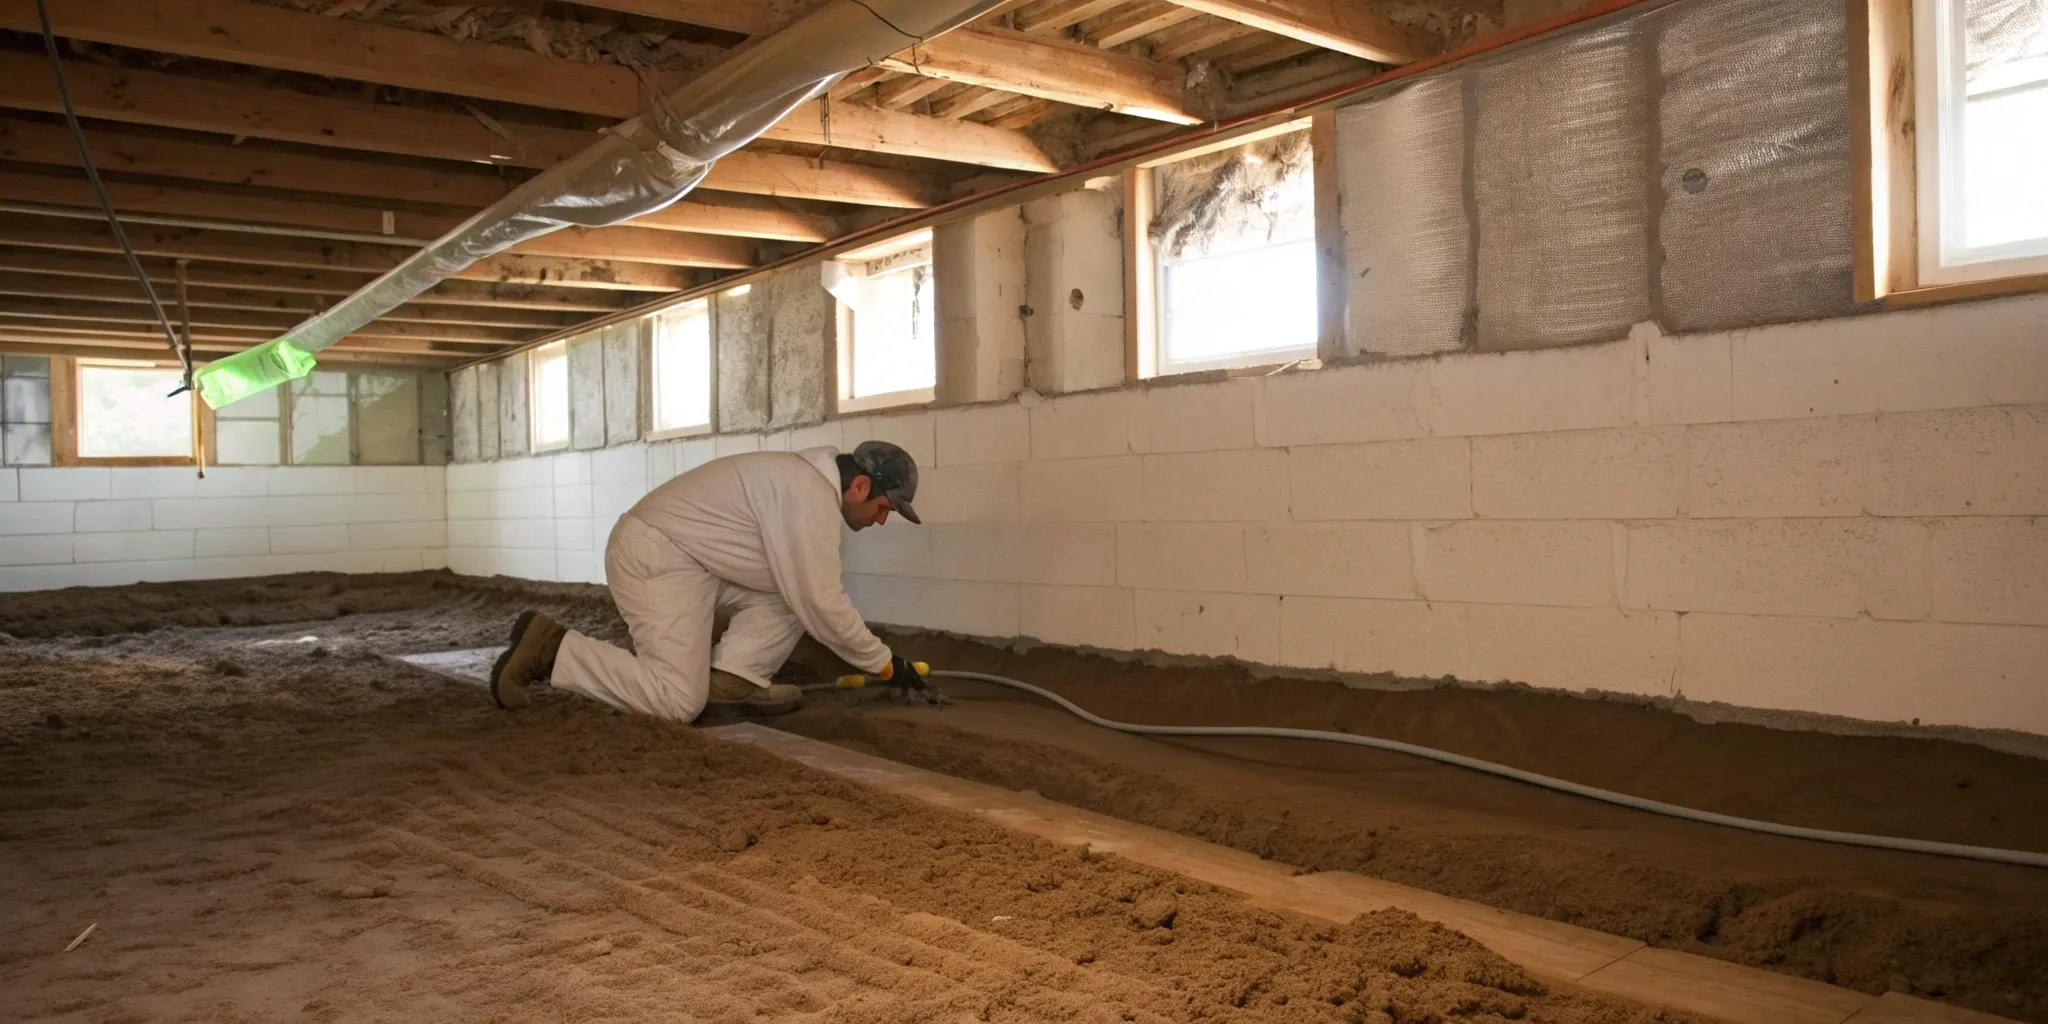
Step 1: Install the Vapor Barrier
The first and most critical step is to completely isolate your crawl space from the damp earth below. Start by laying down a heavy-duty, puncture-resistant vapor barrier across the entire dirt floor. Think of it as a durable liner for the space. Make sure to overlap the seams by at least a foot and seal them with specialty waterproof tape. The barrier should also extend up the foundation walls and around any support piers, securing it firmly. This process, often called encapsulation, is a cornerstone of professional crawl-space repairs because it effectively stops ground moisture from seeping into the air and causing problems.
Step 2: Add Wall and Foundation Insulation
With the floor sealed, your next focus is the walls. Modern building science shows that insulating the crawl space walls, rather than the floor joists above, is far more effective for energy efficiency. Use rigid foam board insulation, which is waterproof and won’t support mold growth. Cut the boards to fit snugly against the foundation walls, from the top of the vapor barrier up to the sill plate. You can attach them with a special adhesive designed for foam board. Avoid using fiberglass batts here; they can absorb moisture like a sponge, lose their insulating value, and become a breeding ground for mold.
Step 3: Seal All Entry Points
Air leaks can undo all your hard work, so this step is all about creating an airtight seal. Carefully inspect the rim joists—the wooden frame that sits on top of your foundation walls—and seal any gaps with spray foam or custom-cut pieces of rigid foam. You should also seal around any pipes, wires, or ducts that pass through the foundation walls. Don’t forget the crawl space access door or hatch; it needs to be airtight as well. If your current one is warped or flimsy, consider replacing it with a modern, insulated, and weather-stripped model. Thoroughly sealing these gaps is a fundamental part of any comprehensive foundation repair strategy.
Step 4: Set Up Proper Ventilation
This might sound counterintuitive, but you need to seal your crawl space vents. For decades, building codes required vents to let outside air circulate, but we now know this practice often does more harm than good. In humid climates, open vents pull in damp air, leading to condensation, wood rot, and mold. In colder climates, they just make your floors cold and your heating system work harder. The best approach is to permanently seal the vents from the inside with airtight covers and foam insulation. This is a key part of a modern waterproofing system that turns your crawl space into a conditioned part of your home.
Step 5: Install a Dehumidifier
The final step to guarantee a dry, healthy crawl space is to manage the air’s moisture content. Even with a perfect seal, some humidity can find its way in. Installing a high-efficiency, self-draining dehumidifier is the best way to keep the relative humidity at an ideal level (typically below 50%). Unlike a cheap portable unit, a professional-grade crawl space dehumidifier is powerful enough to handle the entire space, operates efficiently, and drains automatically so you don’t have to empty a bucket. This final touch protects your insulation, prevents mold growth, and ensures the air circulating into your home is clean and dry.
DIY vs. Hiring a Pro: What’s Right for You?
Tackling a home improvement project yourself can be incredibly rewarding, and insulating your crawl space is no exception. It seems straightforward enough: lay down a barrier, put up some insulation, and you’re done. While a DIY approach can save you money on labor, this is one job where a small mistake can lead to big problems, like trapped moisture, mold growth, or even damage to your home’s structure. The dark, tight quarters of a crawl space can also present unexpected challenges.
Deciding between going it alone and calling in a professional comes down to your budget, your skills, and the current condition of your crawl space. If the area is dry, level, and free of any major issues, a DIY installation might be manageable. However, if you’re dealing with existing moisture, signs of pests, or foundation concerns, bringing in an expert is the safest bet. This guide will walk you through the key factors to consider so you can make the right call for your home.
Know When to Call an Expert
A successful crawl space insulation project does more than just lower your energy bills; it protects your home from moisture, mold, and pests. This isn’t a one-and-done job; it requires ongoing attention to ensure it’s performing correctly. If you spot standing water, significant mold, or large cracks in your foundation walls, it’s time to pause the DIY plans and call a professional. These are often signs of deeper issues that insulation alone won’t fix. An expert can diagnose the root cause, whether it’s a drainage problem or a structural issue, and provide a lasting solution. A professional team can handle comprehensive crawl-space repairs that address the source of the problem, ensuring your insulation investment is protected for years to come.
Calculate the Total Cost
At first glance, the DIY route looks like a clear winner for your wallet. Material costs for basic insulation like fiberglass batts can be as low as $0.30 per square foot. However, it’s important to budget for the entire project. You’ll also need to buy or rent tools, purchase safety gear like respirators and coveralls, and factor in waste disposal. Higher-performance materials like spray foam offer superior sealing but require specialized equipment that isn’t practical for a one-time project. Before you start, get a detailed quote from a professional. You might find that once you add up all the hidden costs and the value of your time, hiring an experienced crew for a guaranteed, high-quality installation is more cost-effective than you think.
Check Local Building Codes and Permits
Many homeowners are surprised to learn that work done in their crawl space may be subject to local building codes. These regulations exist to ensure that insulation, vapor barriers, and ventilation are installed safely and effectively. For example, codes often specify the type and placement of vapor barriers and require proper waterproofing and drainage systems to prevent water from pooling against the foundation. Navigating these requirements can be tricky, and a mistake could cause you to fail a future home inspection. Professionals are well-versed in local codes and will handle any necessary permits, giving you peace of mind that the job is done right and to standard.
Avoid These Common DIY Mistakes
The internet is full of DIY tutorials, but they don’t always cover the critical details that prevent long-term problems. One of the most common DIY mistakes is improperly sealing the vapor barrier seams, which allows ground moisture to seep into the crawl space, defeating the purpose of the barrier. Another frequent error is blocking ventilation points, which can trap humid air and encourage mold growth. Perhaps the biggest mistake is covering up an existing issue. Insulating over a damp wall or a cracked foundation only hides the problem, allowing it to worsen over time. A professional will perform a thorough inspection first, ensuring a clean, dry, and stable environment before any insulation is installed.
Maintain Your Insulated Crawl Space
Once your crawl space is insulated, the job isn’t quite finished. Think of it like a garden—it needs regular attention to stay healthy and effective. Consistent maintenance ensures your vapor barrier and insulation continue to protect your home from moisture, pests, and high energy bills. A little bit of upkeep goes a long way in preventing small issues from turning into major, costly repairs. By staying on top of it, you protect your investment and the structural integrity of your home for years to come.
Create a Regular Inspection Schedule
Setting up a regular inspection schedule is the best way to catch problems early. Plan to check your crawl space at least once a year, or even twice if you live in an area with heavy rainfall or extreme seasons. A good time to do this is in the spring and fall. During your inspection, bring a good flashlight and look for any signs of trouble. Check for tears or holes in the vapor barrier, displaced insulation, signs of pests like droppings or nests, and any evidence of moisture. This proactive approach helps you address potential issues before they escalate into serious damage requiring extensive crawl-space repairs.
How to Monitor for Moisture
Moisture is the number one enemy of a healthy crawl space. When excess moisture is present, it can compromise your home’s air quality, lead to wood rot, and encourage mold growth. The easiest way to monitor for moisture is to perform regular visual checks for condensation on pipes, damp spots on the walls, or standing water on the vapor barrier. Pay attention to any musty or earthy smells, as they often indicate hidden moisture or mold. For a more precise measurement, you can place a hygrometer in the crawl space to track humidity levels, which should ideally stay between 30% and 50%. If you consistently find moisture, it’s a sign you may need professional waterproofing solutions.
Your Seasonal Maintenance Checklist
Keeping your insulated crawl space in top shape doesn’t have to be complicated. A simple seasonal checklist can help you stay on track. Each time you inspect the area, run through these key points:
- Check the vapor barrier: Look for any rips, punctures, or separated seams and patch them immediately with vapor barrier tape.
- Inspect for leaks: Check around pipes and foundation walls for any signs of water intrusion.
- Look for pests: Search for evidence of insects or rodents that may have found their way in.
- Confirm ventilation: If you have foundation vents, make sure they are clear of debris and functioning correctly.
- Check your dehumidifier: If you have one, ensure it’s running properly and the drain line is clear.
Watch for These Insulation Problem Signs
Sometimes, problems with your crawl space insulation will make themselves known inside your home. Be on the lookout for warning signs like a sudden, unexplained increase in your energy bills, as this could mean the insulation is no longer effective. Other red flags include floors that feel unusually cold or damp, or a musty smell that seems to permeate your living space. It’s also critical to ensure rainwater is directed away from your foundation’s perimeter. Poor drainage can lead to water accumulation that compromises the insulation and the foundation itself. If you notice cracks in your foundation walls during an inspection, it’s important to address them quickly with crack injection to prevent water from getting in and causing further damage.
Related Articles
- Crawl-space Repairs – Professional Foundation Repair
- Crawl Space Repairs That Prevent Foundation Failure
- Waterproofing Services – Professional Foundation Repair
Frequently Asked Questions
Why is it better to insulate the crawl space walls instead of the floor above? Insulating the walls brings the entire crawl space into the conditioned envelope of your home. This approach is much more effective because it stops cold air at the perimeter, preventing it from cooling the ground and the air under your floors. When you only insulate the floor joists, the pipes and ductwork in your crawl space are left in a cold, unconditioned zone, which can lead to frozen pipes and energy loss. Wall insulation creates a more stable and energy-efficient environment overall.
Do I really have to seal my crawl space vents? I thought they were supposed to let air in. This is a great question because it goes against older building practices. For decades, the thinking was that vents allowed moisture to escape. We now know they often do the opposite, especially in humid climates, by pulling damp outside air into the cooler crawl space where it condenses on surfaces. Sealing the vents and creating a closed system is the modern, correct approach. It allows you to control the environment with a vapor barrier and a dehumidifier, which is far more effective at preventing moisture problems.
What specific signs indicate I have a moisture problem that needs a professional before I start insulating? Look for a few key red flags before you begin. If you see standing water, dark stains on the foundation walls, or a white, chalky powder called efflorescence, you have an active water issue. Another major sign is visible mold or wood that feels soft and spongy to the touch, which indicates wood rot. While a musty smell is a general indicator, these more serious signs mean you need a professional to address the source of the water before any insulation is installed.
Can I just use standard fiberglass insulation to save money? While it might seem like a cost-effective shortcut, using standard fiberglass batts in a crawl space is a mistake that will cost you more in the long run. Fiberglass acts like a sponge, absorbing any moisture in the air. Once it’s damp, it loses its insulating properties, sags, and becomes a perfect breeding ground for mold. You should always use moisture-resistant materials like rigid foam board, which won’t absorb water and will continue to perform for years.
Is a vapor barrier necessary even if the dirt in my crawl space feels dry? Yes, absolutely. Even if the ground feels dry to the touch, it is constantly releasing water vapor into the air through evaporation. This invisible moisture is the primary source of high humidity in a crawl space, which leads to mold, rot, and poor air quality. A durable vapor barrier is the only way to completely stop this process at its source, making it the most critical step in creating a healthy, dry space under your home.