Let’s clear up a common misconception: not all insulation is created equal, and the right material for your attic isn’t necessarily the right one for your basement. Many homeowners believe that insulating rim joist with batt insulation is the standard, effective way to seal up their foundation. However, this approach often ignores the most important factors in this specific area—air leakage and moisture control. Using only air-permeable insulation like fiberglass in a damp-prone space is a recipe for condensation, mold, and rotted wood. We’re here to bust that myth and show you how to create a high-performance seal using modern materials and techniques that will keep your home comfortable, dry, and structurally sound for years to come.
Key Takeaways
- Batt Insulation Alone Invites Moisture Problems: Standard fiberglass batts don’t stop air leaks, allowing warm, humid air to hit the cold rim joist. This creates condensation, leading directly to the mold and wood rot that can damage your home’s structure.
- Seal First, Then Insulate for Best Results: The key to effective rim joist insulation is creating an airtight seal before adding any insulating material. Use rigid foam board or spray foam to block air leaks, which stops drafts and prevents moisture from getting trapped against the wood.
- Address Existing Dampness Before You Begin: Never insulate a damp area. Sealing over existing water issues traps moisture and makes rot and mold problems worse. Always resolve any leaks or dampness with proper waterproofing before starting your insulation project.
What Is a Rim Joist (and Why Does It Need Insulation)?
If you’ve ever spent time in your basement or crawl space, you’ve probably seen your rim joists without even realizing it. Think of them as the wooden frame that sits directly on top of your home’s foundation, forming the outer edge of your floor system. As Fine Homebuilding puts it, rim joists are the “wood pieces that form the outer edge of your home’s floor system. They sit vertically on top of your foundation.”
Because they sit right at the intersection of your comfortable living space and the unconditioned outdoors, they are a major weak point for air leaks and heat loss. Without proper insulation, this small area can cause big problems, from high energy bills to moisture damage that can affect your home’s structural integrity. Protecting this part of your home is a critical step in maintaining a healthy and efficient foundation system, which is essential for preventing the need for future foundation repair.
Where to Find It and What It Does
To find your rim joist, head down to your basement or crawl space and look at the top of the concrete or block foundation wall. You’ll see a series of wooden boards running horizontally along the perimeter of your house—that’s the rim joist. It’s the component that connects the floor joists together and provides lateral support to the entire floor frame.
The problem is its location. Rim joists are directly exposed to the outside, often with nothing more than a thin layer of siding and sheathing to protect them. This makes them a prime spot for heat to escape in the winter and enter in the summer. Air leaks are also incredibly common here, leading to uncomfortable drafts and forcing your HVAC system to work overtime just to keep your home comfortable.
The Importance of Proper Insulation
Insulating your rim joists is about more than just saving money on your energy bills—it’s about protecting your home from moisture damage. Many older homes use traditional fiberglass batt insulation in this area, which can actually create problems. As one expert from Fine Homebuilding explains, this type of insulation allows warm, moist indoor air to pass through and hit the cold rim joist. In the winter, this creates condensation, which can lead to serious wood rot in just a few years.
This constant moisture creates the perfect environment for mold and mildew to grow, which can compromise your indoor air quality and the structural wood of your floor system. Over time, rotted rim joists and sill plates can lead to sagging floors and other issues that require extensive crawl-space repairs.
Signs Your Rim Joist Insulation Isn’t Working
How can you tell if your rim joist insulation is failing? The signs are often subtle but become obvious once you know what to look for. Start by visually inspecting the area. If you see damp, discolored, or compressed fiberglass batts, that’s a major red flag. Moisture often gets trapped behind this type of insulation, leading to rot and mold.
Other signs include a musty smell in your basement, cold drafts along the floor near exterior walls, or even peeling paint on the foundation wall just below the rim joist. According to Green Building Advisor, significant temperature differences along your basement walls can also point to hidden moisture issues. If you notice any of these warning signs, it’s a good idea to investigate further before the problem gets worse.
What to Know About Batt Insulation
When you picture insulation, you probably think of the fluffy, cotton-candy-like rolls known as batt insulation. It’s one of the most common and affordable options on the market, which is why it’s often the first thing people consider for projects like insulating rim joists. It comes in pre-cut sheets or rolls designed to fit snugly between standard framing studs, joists, and rafters, making it seem like a straightforward DIY solution.
While it’s a familiar choice for walls and attics, its performance in a damp, air-leak-prone area like the rim joist is a different story. The material itself has properties that can create more problems than they solve if not handled correctly. Understanding the material—its types, thermal properties, and installation quirks—is the first step in figuring out why it might not be the best standalone solution for your foundation. Before you buy a single roll, let’s walk through what you need to know about this popular material.
Common Types of Batt Insulation
The two most common types of batt insulation you’ll find at the hardware store are fiberglass and mineral wool. Fiberglass, typically pink or yellow, is made from fine glass fibers, while mineral wool is made from rock or slag. Both are known for their fire resistance and thermal properties. However, a key characteristic they share is that they are air-permeable, meaning air can pass right through them. When warm, moist indoor air travels through the batt and hits the cold surface of the rim joist, it creates condensation. Over time, this moisture can lead to serious wood rot and mold growth.
What R-Value Do You Need?
R-value measures how well insulation can resist heat flow—the higher the number, the better it insulates. Building codes now require rim joists to be insulated to the same level as the surrounding walls. For most homes, this means you should aim for at least an R-13 in warmer climates and R-20 or higher in colder regions. While achieving a high R-value is important, it’s only one piece of the puzzle. If cold air can still leak in around the insulation, you won’t get the full benefit of that R-value, and your energy bills will show it.
Key Installation Considerations
Proper installation is everything, especially with batt insulation. The single most important step is to air seal the rim joist area before you add any insulation. Use caulk or foam to fill every crack, gap, and seam where air could get through. Without this step, cold air will bypass the insulation, making it largely ineffective. It’s also critical to avoid placing fiberglass batts directly against concrete or wood that is prone to moisture. Trapped moisture behind the insulation is a recipe for mold and rot, which can compromise your home’s structure and require professional crawl-space repairs.
A Look at the Costs
One of the biggest draws of batt insulation is its low cost. It’s significantly cheaper upfront than other options like spray foam or rigid foam board, making it a tempting choice for budget-conscious homeowners. However, the initial savings can be misleading. If it’s not installed with meticulous air sealing, its performance drops dramatically, and you’ll lose money through higher energy bills. Furthermore, if moisture issues develop because the batt insulation trapped condensation, the cost of remediation and repairs will far outweigh what you saved on materials. It’s a classic case of “you get what you pay for.”
The Problem with Using Only Batt Insulation
Batt insulation is a common choice for DIY projects, but when it comes to rim joists, it can create more problems than it solves. Relying on it alone is a recipe for moisture, structural damage, and wasted energy. Here’s a closer look at why this popular material falls short in this critical area of your home.
Why It Can Lead to Moisture and Mold
The biggest issue with using only batt insulation is its tendency to trap moisture. Materials like fiberglass are air-permeable, so they don’t stop humid indoor air from reaching the cold rim joist. When this warm air meets the cold surface, condensation forms, and the insulation acts like a sponge, holding water directly against the wood. This creates the perfect environment for mold and rot. Before you even consider insulating, it’s critical to address any underlying dampness with a solid waterproofing strategy. Otherwise, you’re just sealing in a problem that will only get worse.
Where Batt Insulation Fails at Air Sealing
Think of batt insulation as a wool sweater—it slows heat loss but does nothing to stop the wind. The rim joist area is full of small gaps where the foundation meets the sill plate and subfloor. Air moves freely through these cracks, passing right through the fibrous insulation. This means you’re still dealing with drafts and losing heated or cooled air, which undermines the whole point of insulating. An effective thermal barrier requires a complete air seal, and that’s a job batt insulation simply can’t do on its own.
How It Affects Your Home’s Structure
When moisture gets trapped behind batt insulation, it can cause serious damage. The constant dampness leads to wood rot in the rim joist and the ends of your floor joists, compromising the structural support for the entire floor above. Over time, this decay can lead to sagging floors and other major issues that demand professional crawl-space repairs. Insulating over an existing moisture problem is a critical mistake, as it traps water against the wood and accelerates the deterioration of these essential structural components.
The Truth About Energy Efficiency
The R-value printed on batt insulation is measured in a lab with no air movement. In your home, where air is constantly leaking around the rim joist, its real-world performance drops significantly. All that air leakage allows your expensive conditioned air to escape right outside, effectively bypassing the insulation. To get real energy savings, you have to stop the air leaks first. Without a proper air seal, you’re simply not getting the energy efficiency or the comfort you expect from your insulation investment.
Better Ways to Insulate Your Rim Joists
If you’ve realized that batt insulation alone isn’t cutting it for your rim joists, don’t worry—you have much better options. The goal is to choose a material that not only insulates but also stops air from leaking through. This one-two punch is what truly protects your home from moisture damage and energy loss. The best materials for the job are rigid foam boards and spray foam because they excel at both tasks. Let’s walk through how each one works and how you can even combine methods for maximum effect.
Using Rigid Foam Board
Rigid foam board is a fantastic choice for insulating rim joists because it serves as an effective air barrier. Unlike fluffy batt insulation that air can pass through, rigid foam creates a solid, sealed surface. The process is straightforward: you cut pieces of foam board to fit snugly into each joist bay, right up against the rim joist.
The key to success here is the seal. Once the foam board is in place, you need to seal all four edges with caulk or canned spray foam. This step is crucial because it prevents any warm, moist indoor air from getting behind the board and condensing on the cold wood. Properly sealed, rigid foam helps keep your crawl space dry and your home’s structure protected from moisture.
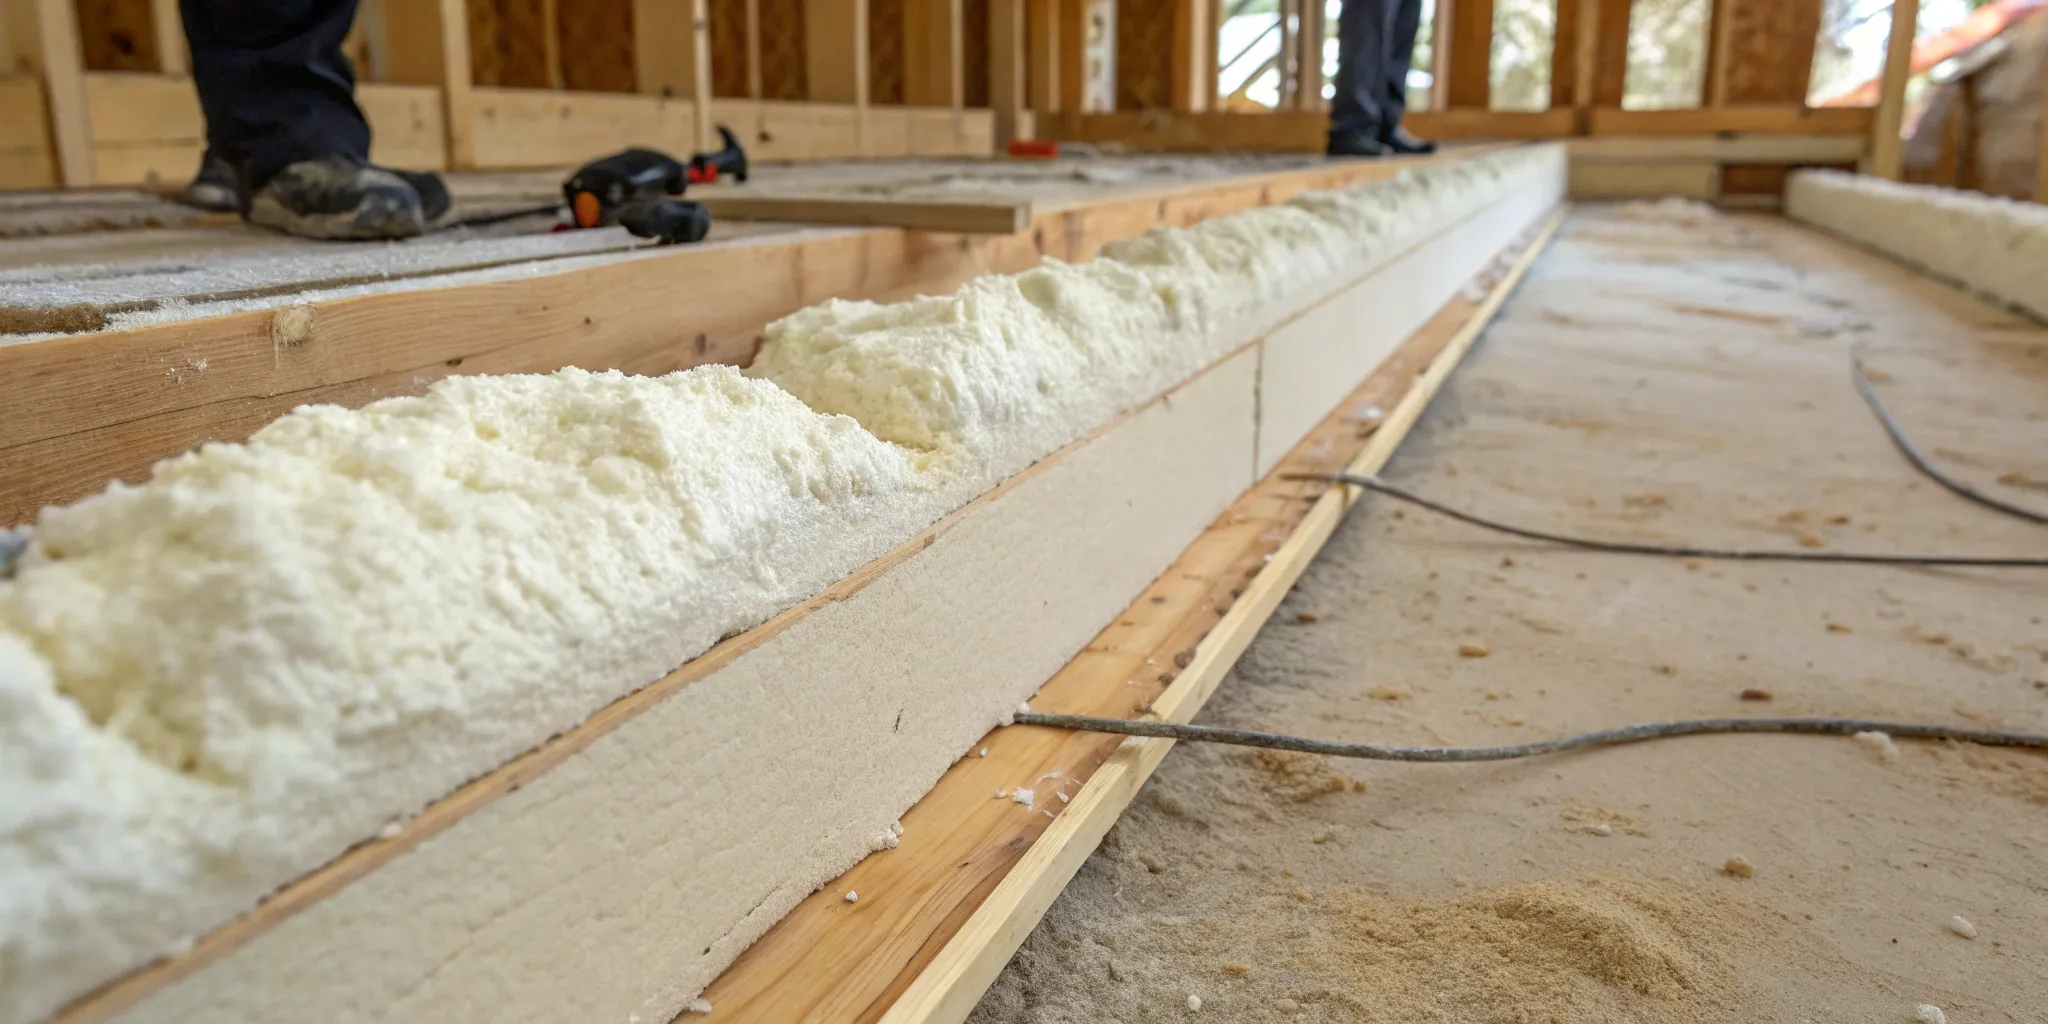
Applying Spray Foam
For a seamless solution, spray foam is tough to beat. It’s an all-in-one insulator and air sealant that expands to fill every crack and crevice, creating a perfect airtight seal. This makes it incredibly effective at stopping both air leaks and heat transfer. You can find two-component spray foam kits at most home improvement stores if you’re considering a DIY approach.
However, applying it correctly requires a bit of practice, and for larger jobs, professional application ensures a consistent and effective barrier. At Bristol FX, we often use specialized polyurethane geotechnical foam for structural repairs, so we know firsthand how powerful and versatile foam products can be when applied with expertise. It’s a highly effective way to get the job done right the first time.
The Hybrid Approach: Combining Methods
If you want to achieve a higher R-value, you can use a hybrid approach that combines the best of both worlds. This method involves installing rigid foam first and then adding batt insulation. Start by placing at least two inches of rigid foam board against the rim joist and sealing it completely around the edges. This creates the essential air and vapor barrier that protects the wood.
Once the foam is sealed, you can install fiberglass or mineral wool insulation on the interior side of the foam board. This adds extra insulating power without the risk of moisture damage, since the foam board is already protecting the rim joist. It’s a smart, layered strategy that gives you robust insulation and total peace of mind.
How to Manage Moisture Effectively
Before you add any insulation, you have to address existing moisture problems. If your basement or crawl space has water issues, sealing up the rim joists can trap that moisture and make things much worse, leading to rot and mold. Always start with a thorough inspection for any signs of leaks, condensation, or dampness.
If you find any issues, they need to be resolved first. This might mean fixing grading issues outside, repairing foundation cracks, or installing a proper drainage system. Investing in professional waterproofing is often the most important first step you can take. Only when you’re certain the area is dry should you proceed with insulating your rim joists.
How to Install Rim Joist Insulation Correctly
Getting your rim joist insulation right is about more than just stuffing some material into a gap. It’s a systematic process that, when done correctly, protects your home from moisture, pests, and energy loss. The key is to think of it as a complete system: first, you prepare the area, then you air seal, and only then do you insulate. Following these steps ensures your insulation will perform effectively for years, preventing the moisture and mold problems that can come from a rushed job. It’s about creating a durable barrier that truly protects your home’s structure and comfort.
Start with a Thorough Inspection
Before you even think about adding insulation, you need to play detective. Carefully inspect the entire rim joist area for any signs of trouble. Look for water stains, dampness, mold, mildew, or rotted wood. These are red flags that you have an existing moisture problem that insulation will only hide and make worse. It’s also critical to check the exterior of your home. As experts at GreenBuildingAdvisor note, you must “fix any outdoor water issues” before insulating. This means ensuring your gutters are clear and that the ground slopes away from your foundation to prevent water from seeping in. If you find significant moisture, you may need professional waterproofing before proceeding.
Seal All Air Leaks First
Insulation is great at slowing heat transfer, but it doesn’t stop air leaks. That’s why air sealing is a non-negotiable first step. Cold winter air can easily find its way through tiny cracks and gaps, making your home drafty and driving up your energy bills. Use a quality caulk or canned spray foam to seal every possible entry point. Pay close attention to the gap between the sill plate and the top of the foundation wall, as well as any openings where pipes, vents, or wiring pass through the rim joist. Creating an airtight seal is what makes your insulation truly effective, preventing cold drafts and stopping moisture-laden air from getting inside your walls.
Install a Vapor Barrier
A vapor barrier is essential for preventing condensation, which leads to rot and mold. In the winter, warm, moist air from inside your home can travel through permeable insulation and hit the cold surface of the rim joist, where it condenses into water droplets. A proper vapor barrier stops this from happening. The good news is that some of the best insulation materials for this job, like rigid foam board and closed-cell spray foam, are vapor-impermeable and act as their own vapor barrier. This step is crucial for protecting the wooden structure of your home from long-term moisture damage, a common issue we see in crawl-space repairs.
Follow a Step-by-Step Process
Once the area is clean, dry, and air-sealed, you can install the insulation. If you’re using rigid foam board, the process is straightforward but requires precision. Measure each joist bay carefully and cut the foam board so it fits snugly inside. As recommended by the pros at Fine Homebuilding, you should then “seal all edges of the foam boards” with caulk or canned spray foam. This final seal is what creates a continuous, airtight barrier. The goal is to leave no gaps where air or moisture can penetrate. Taking your time here will pay off in energy savings and a healthier, more comfortable home.
Check Your Work for Quality
After the installation is complete, do a final quality check. Run your hand along the seams to feel for any drafts you might have missed. Look closely at all the edges to ensure they are completely sealed. If you removed old fiberglass batts during your prep, you should have already checked the wood for dampness or rot. If you find any soft spots or signs of decay now, the problem is more than just an insulation issue. These are indicators of a deeper problem that could compromise your home’s structure. In that case, it’s best to pause the project and get a professional foundation repair assessment.
Avoid These Common Insulation Mistakes
Insulating your rim joists seems like a simple weekend project, but a few common missteps can quickly turn good intentions into a costly headache. Getting this job right is about more than just stuffing some insulation into a gap; it’s about creating a complete system that manages both temperature and moisture. Many homeowners accidentally choose the wrong materials for the job or, even worse, seal existing water issues inside their walls, creating a perfect storm for mold and rot. These aren’t just minor oopsies; they can lead to significant problems that are much harder and more expensive to fix later on.
These mistakes don’t just undo your hard work—they can compromise your home’s structural integrity and indoor air quality. Think of it this way: your foundation is the literal base of your home, and the rim joist area is a critical connection point. If it’s compromised by moisture or decay, the effects can ripple throughout the entire structure. Understanding these pitfalls from the start is the key to protecting your investment and ensuring your home stays comfortable, dry, and energy-efficient for years to come. Let’s walk through exactly what to watch out for so you can approach this project with confidence and get it done right the first time.
Choose the Right Materials
The type of insulation you choose for your rim joists matters—a lot. While fiberglass batts are a go-to for walls, they aren’t the best fit here. Rim joists need materials that stop air leaks, which is why rigid foam boards or spray foam are the top contenders. These options create an effective air seal that batt insulation just can’t match. Using fiberglass or mineral wool can actually cause problems, as they allow warm, moist indoor air to hit the cold rim joist. This often leads to condensation, frost, and eventually, moisture damage. Proper material selection is your first line of defense against these issues.
Don’t Forget About Ventilation
Before you seal anything up, you have to address any existing moisture problems. Insulating and air-sealing your rim joists without fixing a damp basement is a recipe for disaster. When you trap moisture behind new insulation, you create the perfect environment for mold growth and wood rot, which can seriously damage your home’s structure. The sealed areas can’t dry out, making a small water issue much worse. That’s why a thorough inspection and professional waterproofing are essential first steps. You need to ensure the area is completely dry before you even think about adding insulation.
Follow Critical Safety Precautions
Safety should always be a priority, especially when working with building materials. Certain types of insulation, like spray foam and some rigid foam boards, are flammable. Because of this, building codes often require them to be covered by a thermal barrier, such as a half-inch of drywall, to prevent fire from spreading. Skipping this step not only puts your home at risk but can also cause you to fail a home inspection. Always read the manufacturer’s safety guidelines for the products you’re using and understand your local building codes to keep your project safe and compliant.
Know When to Call a Professional
A DIY project can be rewarding, but it’s important to know your limits. If you pull back old fiberglass insulation from your rim joists and find the wood is damp, discolored, or feels soft, put the brakes on your project. These are clear signs of moisture damage or rot that need an expert eye. This is especially common on the north side of a house, which gets less sun. Ignoring these red flags can lead to significant structural problems. Getting a professional foundation repair assessment will give you a clear picture of the damage and a solid plan to fix it right.
How to Maintain Your Rim Joist Insulation
Once your rim joist insulation is installed, it’s tempting to check it off your list and forget about it. But like any part of your home, it needs a little attention to make sure it’s doing its job correctly. A quick inspection every so often can help you catch small issues before they turn into major headaches like mold, rot, or structural damage. Think of it as preventative care for your home’s foundation. By staying on top of maintenance, you ensure your insulation continues to save you money on energy bills and protects the structural integrity of your house for years to come. It’s a simple habit that offers significant peace of mind and can save you from costly foundation repair down the road.
Create a Regular Inspection Schedule
Setting a consistent schedule is the easiest way to stay on top of your rim joist insulation’s condition. I recommend checking it twice a year—once in the spring and again in the fall, as changing seasons can introduce new moisture challenges. During your inspection, grab a good flashlight and look for any visible changes. Is the insulation sagging, stained, or damp to the touch? Check for drafts or visible light peeking through, which indicates an air leak. You should also keep an eye out for signs of pests, like droppings or chewed material, as they love to nest in compromised insulation. Adding this simple task to your regular home maintenance calendar makes it a manageable part of your routine.
How to Spot Moisture Early
Catching moisture early is critical because it can get trapped behind insulation and silently cause rot and mold. One of the first signs you might notice is a musty, damp smell in your basement or crawl space. Don’t ignore it. When you inspect the area, look for damp spots on the insulation itself or on the surrounding wood. You might also see efflorescence—a white, chalky residue on the concrete foundation walls near the rim joist. This is a tell-tale sign that water is seeping in from the outside. If you spot any of these indicators, it’s a clear signal that you need to address the source of the moisture, which may require professional waterproofing solutions.
Warning Signs to Watch For
Beyond the early, subtle signs of moisture, there are more serious red flags that demand immediate attention. Visibly rotting wood is a major one; if the wood feels soft, spongy, or crumbles when you poke it with a screwdriver, you have a significant problem. Obvious mold growth, which can appear as black, green, or white fuzzy patches, is another urgent issue that can affect both your home’s structure and your family’s health. Damp, heavy, or compressed insulation is also a bad sign, as it has lost its insulating properties and is likely harboring moisture. These issues often point to a larger problem that may require professional crawl-space repairs to fix correctly.
Simple Steps for Prevention
The best way to maintain your rim joist insulation is to prevent problems from starting in the first place. Prevention starts on the outside of your home. Make sure your gutters are clean and that downspouts direct water at least six feet away from your foundation. The ground around your house should also slope away from the walls. Inside, the key is proper air sealing. Before you even install insulation, every crack and gap in the rim joist area should be sealed with caulk or foam. Using moisture-resistant insulation like rigid foam board or closed-cell spray foam provides a much better defense against water intrusion than fiberglass batts alone.
Stay Compliant with Building Codes
When you’re focused on improving your home’s energy efficiency and comfort, building codes might feel like an afterthought. However, they are a critical part of any home improvement project, especially one involving your home’s structure. Building codes exist to ensure safety, structural integrity, and energy efficiency. Following them isn’t just about passing an inspection; it’s about protecting your investment and your family. An insulation project that doesn’t meet local requirements can lead to fines, issues when you try to sell your home, or even unsafe conditions like an increased fire risk.
Moreover, proper compliance ensures that the materials you use will perform as expected. Codes often specify the type of insulation, its R-value, and how it must be installed to prevent moisture issues and air leaks. Think of it as a set of expert guidelines designed to get you the best possible result. Getting it right from the start saves you from having to tear out and redo the work later. A professional contractor will be well-versed in these regulations, but if you’re considering a DIY approach, it’s your responsibility to understand and follow the rules for your area.
Check for Local Code Variations
It’s a common mistake to assume that building codes are the same everywhere. In reality, they can vary significantly from one state, county, or even city to another. These local amendments are often based on regional climate conditions. For example, building codes now require rim joists to be insulated to the same R-value as your walls. According to Fine Homebuilding, this generally means at least R-13 in warmer areas and R-20 in colder climates. Before you buy any materials, your first step should always be to check with your local building department to understand the specific requirements for your home.
Meet Material and Safety Standards
Building codes also dictate which materials are acceptable and how they must be installed to meet safety standards, particularly for fire resistance. For instance, while rigid foam board is an excellent insulator, most building codes require it to be covered with a thermal barrier, like a ½-inch layer of drywall, to prevent it from igniting quickly in a fire. This is a crucial detail that’s easy to miss but essential for safety. These standards ensure that your insulation solution doesn’t introduce new hazards into your home, giving you peace of mind that the job is done safely and correctly.
Why Professional Certification Matters
This is where working with a certified professional really pays off. An experienced contractor not only understands the local codes but also knows the manufacturer’s specifications for each product. They can recommend the best insulation and vapor barrier combination for your specific situation, ensuring the entire system works together to control moisture and air flow. Professionals who specialize in crawl-space repairs and foundation work are experts at creating a sealed, conditioned environment that complies with all regulations. Their knowledge helps you avoid costly mistakes and ensures your insulation project is effective for years to come.
How to Pass Your Inspection
Passing your final inspection is the official confirmation that your project is safe and up to code. An inspector will check that the right materials were used, the installation is correct, and all safety measures are in place. Knowing the nuances of the code can make this process much smoother. For example, some codes allow spray foam insulation of a certain thickness (typically 3¼ inches or less) to be left exposed without a drywall covering. A knowledgeable contractor can make strategic choices like this that save you time and money while still meeting every requirement for a successful inspection.
Related Articles
- How Proper Water Drainage Can Protect Your Home’s Foundation
- What You Should Know About Polyurethane Foam Foundation Leveling
Frequently Asked Questions
Can I just put new insulation over my old fiberglass batts? It’s tempting to take that shortcut, but you really shouldn’t. Old fiberglass insulation can hide serious issues like moisture, mold, and even wood rot. The best approach is to remove the old batts completely so you can get a clear look at the condition of the wood. This also gives you the clean slate you need to properly air seal all the cracks and gaps, which is the most critical step for getting real results.
What’s the single most important step in this whole process? If I had to pick just one, it would be addressing moisture first. Before you seal anything up, you have to be absolutely certain the area is dry and that you’ve fixed any water issues coming from the outside. Insulating a damp rim joist will only trap moisture against the wood, accelerating rot and creating a much bigger problem. Air sealing is a very close second, as insulation without an air barrier is largely ineffective.
I found some dampness and soft wood near my rim joist. What should I do now? Stop your insulation project immediately. Dampness and soft wood are clear signs of a bigger issue that insulation can’t fix—and will likely make worse. This points to a water intrusion or structural problem that needs a professional diagnosis. Your best next step is to have a foundation specialist assess the area to find the source of the moisture and determine the extent of the damage before you move forward.
Is spray foam or rigid foam board the better choice for my rim joists? Both are excellent options because they act as an air barrier, which is exactly what you need. Spray foam creates a perfect, seamless seal that fills every tiny crevice, but it can be messy and requires more skill to apply correctly. Rigid foam board is very DIY-friendly and effective, but it relies on you cutting each piece precisely and meticulously sealing all the edges with caulk or canned foam to get an airtight fit. The right choice often comes down to your budget and comfort level with the installation process.
My basement is already finished with drywall. Is it too late to insulate my rim joists? It’s definitely not too late, but it is more complicated. To access the rim joists, you’ll need to carefully cut away a section of drywall at the very top of the wall where it meets the ceiling. After you’ve sealed and insulated the space, you’ll have to patch, tape, and paint the drywall to finish the job. Because it involves more steps and some finish carpentry skills, many homeowners with finished basements choose to hire a professional for this project.