If you’ve ever wondered why your floors are freezing in the winter or why your energy bills seem stubbornly high, the answer might be hiding in plain sight in your basement or crawl space. The rim joist—that wooden perimeter where your home’s frame rests on its foundation—is a notorious source of energy loss. Because it’s a thin barrier between your cozy interior and the outside elements, it lets cold air seep in and warm air escape. Proper rim joist insulation is one of the most effective home improvements you can make, offering a big return in comfort and savings. This guide will walk you through everything you need to know, from choosing the best materials to understanding when to call a professional.
Key Takeaways
- Your Rim Joist is a Hidden Energy Drain: This small, often overlooked part of your home’s frame is a major source of drafts, high energy bills, and moisture problems. Sealing and insulating it is a foundational step toward a more comfortable and efficient home.
- Choose an Insulation That Blocks Air: The goal is to stop air movement, which is why spray foam or rigid foam board are the best solutions for this area. Avoid using fiberglass batts alone, as they don’t stop drafts and can trap moisture against the wood, leading to mold and rot.
- Seal First, Then Insulate and Inspect: The most critical part of the process is sealing all air leaks with caulk or canned foam before installing the insulation. Once the job is done, perform a quick visual check once a year to look for gaps or moisture, ensuring your home stays protected.
What Is a Rim Joist and Why Does It Matter?
If you’ve ever been in an unfinished basement or crawl space and looked up at the ceiling, you’ve seen your home’s floor structure. The rim joist, also called a band joist, is the wooden board that runs along the outer perimeter of your floor framing, sitting directly on top of the foundation wall. Think of it as the outer frame that caps off the ends of all the floor joists, holding everything together in a neat, sturdy box.
While it might seem like a minor component, the rim joist is a critical structural element. It provides lateral support to the floor joists, preventing them from twisting or warping, and helps transfer the weight of your walls and roof down to the foundation. But its importance goes beyond structural integrity. Because it’s a thin barrier between your conditioned indoor space and the unconditioned outdoors, an uninsulated rim joist is a major source of energy loss. It’s essentially a thermal bridge, allowing cold air to seep in during the winter and hot, humid air to enter in the summer. This not only makes your home less comfortable but also drives up your energy bills and can introduce moisture problems that compromise your home’s health.
The role of a rim joist in your home’s structure
The rim joist is a key player in your home’s structural system. Its primary job is to connect the ends of the floor joists, creating a solid, stable platform for the floor above. This connection is vital because it keeps the joists properly spaced and prevents them from twisting under load. Beyond that, the rim joist helps distribute the weight from the walls above it evenly across the foundation. This weight distribution is critical for the health of your foundation and any underlying structures, like your crawl space. Proper support prevents sagging floors and other issues that might require professional crawl-space repairs. In short, this simple board is essential for keeping your floors level and your home standing strong.
Signs your rim joists need insulation
How can you tell if your rim joists are letting you down? The signs are often subtle but noticeable if you know what to look for. One of the most common clues is having cold floors, especially near the exterior walls of your home during colder months. You might also feel persistent drafts coming from the baseboards. If you have an older home, there’s a good chance the rim joists were never insulated in the first place. Another major red flag is consistently high energy bills, as unsealed rim joists can be responsible for significant heat loss. Finally, check for any signs of moisture, condensation, or mold in your basement or crawl space near the top of the foundation wall. This can indicate that humid air is infiltrating and may require a waterproofing solution.
Why You Should Insulate Your Rim Joists
Think of your home’s insulation as a cozy blanket. If there’s a hole in it, you’ll feel the chill. Uninsulated rim joists are a surprisingly large hole in that blanket, located where your home’s wooden frame rests on the foundation. Sealing and insulating this small area offers some big benefits that you’ll feel in your home and see in your wallet. It’s a foundational step toward a more efficient, comfortable, and healthy living space. By addressing this often-overlooked part of your home, you can solve issues ranging from high energy bills to musty smells in your basement or crawl space.
Improve your home’s energy efficiency
Uninsulated rim joists are a major source of air leakage. Cold air seeps in during the winter, and hot, humid air finds its way inside during the summer. This constant air exchange creates drafts, causes uncomfortable temperature swings, and forces your heating and cooling systems to work overtime. By properly insulating your rim joists, you create a continuous thermal barrier that stops these leaks. This simple fix makes your entire home more energy-efficient, especially when combined with other improvements like professional crawl-space repairs. A well-sealed home envelope means your HVAC system can maintain a consistent temperature without running constantly, which is the first step toward lower energy consumption.
Prevent moisture and mold growth
Moisture is the enemy of a healthy home, and cold rim joists can be a magnet for it. When warm, moist indoor air hits the cold surface of an uninsulated rim joist, condensation forms—just like on a cold glass of water. This persistent dampness creates the perfect environment for mold and mildew to grow, which can damage your home’s wooden structure and impact your indoor air quality. A properly insulated rim joist acts as a thermal barrier, keeping the surface temperature above the dew point. This prevents condensation and is a key part of a comprehensive waterproofing strategy for your basement or crawl space, protecting your foundation from rot and decay.
Keep your home comfortable year-round
Do you have floors that feel icy cold in the winter? Or rooms that just won’t cool down in the summer? Your rim joists could be the culprit. Because they allow for significant heat transfer, uninsulated rim joists can make it difficult to keep your home comfortable. In the winter, they pull heat out of your home, contributing to cold spots and drafty floors. In the summer, they radiate heat from the outside into your basement or crawl space, which then rises into your living areas. Insulating them helps stabilize your indoor temperatures, making your home feel more consistently comfortable no matter the season.
Save money on energy bills
One of the most compelling reasons to insulate your rim joists is the financial benefit. When your home is leaky and inefficient, a significant portion of the money you spend on heating and cooling is essentially wasted. By sealing one of the biggest sources of air leaks, you immediately reduce that waste. Your HVAC system won’t have to work as hard to maintain the temperature you set, leading to a noticeable drop in your monthly energy bills. While it’s a home improvement project, think of it as an investment. Rim joist insulation is a cost-effective upgrade that starts paying you back from the very first utility bill.
Choose the Best Insulation for Your Rim Joists
Selecting the right insulation for your rim joists is about more than just picking a material—it’s about creating a complete barrier against air leaks, moisture, and pests. The three most common options are spray foam, rigid foam board, and fiberglass batts. While each can be used, they offer vastly different levels of performance in this critical area. Understanding the pros and cons of each will help you protect your home’s structure and improve its energy efficiency.
Why spray foam is the premium choice
If you’re looking for the most effective solution, spray foam is the clear winner. It expands to fill every gap, creating a powerful air seal that stops drafts completely. This is ideal for the irregular surfaces of a rim joist. Closed-cell spray foam is also waterproof, so it won’t promote mold growth, which is essential for protecting the wood structure. Plus, pests don’t eat it, and it adds a bit of structural integrity. While it requires a professional, the comprehensive protection it offers is unmatched.
When to use rigid foam board
Rigid foam board is a great alternative that offers excellent performance when installed correctly. The method involves cutting foam board to fit snugly against the rim joist, then using canned spray foam to seal the edges. This “cut-and-seal” approach creates a durable, air-impermeable barrier against drafts and moisture. It’s a more hands-on process, but for homeowners balancing performance and budget, combining rigid foam with a quality sealant is a fantastic option for waterproofing your foundation’s edge.
The limitations of fiberglass
Fiberglass insulation is a common sight in homes, but it’s a poor choice for rim joists because it doesn’t stop air movement. Drafts pass right through it, defeating a primary goal of insulating. Worse, fiberglass can absorb and trap moisture against the wood, creating the perfect environment for mold and rot. Over time, this can lead to significant damage and the need for extensive crawl-space repairs. It’s best to avoid fiberglass here and choose an air-sealing material instead.
Compare material costs
Your budget will play a role in your decision. Fiberglass is the cheapest material, and some homeowners install it themselves. Rigid foam board is a mid-range option, factoring in the cost of canned foam for sealing. Professional spray foam has the highest initial cost due to specialized equipment and labor. However, consider the long-term value. The superior performance of foam can lead to greater energy savings and help you avoid costly repairs, making it a smart investment in your home’s health.
Select the Right R-Value for Your Home
Choosing the right insulation isn’t just about picking a material; it’s about selecting the right thermal performance for your specific home. This is where R-value comes in. R-value measures an insulation’s ability to resist heat flow—the higher the number, the better it insulates. Getting this right means you’ll have an effective thermal barrier that keeps your home comfortable and your energy bills in check.
However, the ideal R-value for your rim joists isn’t a universal number. It depends heavily on your local climate, building codes, and even the specific conditions within your foundation. A home in a mild climate has very different needs from one that endures harsh winters. Taking the time to understand these factors ensures your investment in insulation pays off for years to come.
What R-value means for insulation
Think of R-value as the thermal rating for your insulation. A higher R-value indicates greater resistance to heat transfer, meaning it does a better job of keeping heat inside during the winter and outside during the summer. Different materials offer different R-values per inch of thickness. For example, closed-cell spray foam is a top performer, with an R-value of around R-7 per inch. In contrast, traditional fiberglass batt insulation typically provides about R-3 per inch. This means you would need more than double the thickness of fiberglass to achieve the same insulating power as spray foam, which is a critical factor in the tight space around a rim joist.
Factor in your climate zone
Where you live plays a huge role in determining the right R-value for your home. The U.S. is divided into different climate zones, and each has a recommended insulation level. Since rim joists are above ground, they should be insulated to the same standard as your home’s exterior walls. For homes in warmer areas (climate zones 1 through 4), a minimum of R-13 is generally recommended. For those in colder regions (climate zones 5 through 8), you’ll want to aim for at least R-20 to effectively combat heat loss. Properly matching the R-value to your climate ensures you get the performance you need without overspending.
Check local building codes
While climate zone maps provide excellent guidelines, your local building codes are the official requirement. These codes are in place to ensure homes are safe, durable, and energy-efficient. Before starting any insulation project, it’s always a smart move to check with your local building department for specific requirements in your area. They can tell you the minimum R-value needed for rim joists to be compliant. Following these codes not only keeps you on the right side of regulations but also ensures your home meets the standard for energy performance in your community.
Consider your home’s moisture levels
Insulation and moisture have a complicated relationship. While insulation can prevent condensation by keeping surfaces warm, it can also trap moisture if a problem already exists. This is especially true in older homes with fieldstone or brick foundations, which can allow moisture to seep through. Sealing the rim joist area without addressing underlying dampness can lead to wood rot and mold. If you’ve noticed musty smells, dampness, or water stains in your basement or crawl space, it’s crucial to address these issues first. Professional waterproofing can solve moisture problems at the source, creating a dry environment that’s ready for insulation.
How Professionals Install Rim Joist Insulation
Watching a professional insulate a rim joist is a lesson in precision. It’s not just about stuffing insulation into a space; it’s a systematic process that ensures every gap is sealed and the material performs exactly as it should. Professionals have the right tools, materials, and experience to tackle the job efficiently, avoiding the common mistakes that can lead to moisture damage or energy loss. They follow a clear, multi-step approach to guarantee a durable and effective result.
Prepare the space and seal air leaks
The first thing a professional does is prepare the area. This involves clearing out any obstructions and removing old, ineffective insulation. Even if your rim joist already has fiberglass batts, it’s likely not doing much good. Warm air can easily leak out through small, unsealed gaps around the wood, making that insulation almost useless. A pro will thoroughly inspect the rim joist and sill plate, identifying every crack and seam where air can get through. They then use high-quality caulk or a targeted spray foam to seal these air leaks completely before any new insulation is installed. This step is non-negotiable for an airtight finish.
Install a proper vapor barrier
Moisture is the enemy of your home’s foundation. When insulating, it’s critical to manage moisture correctly to prevent condensation, mold, and wood rot. This is especially true in older homes with stone foundations, where trapping moisture can cause serious structural damage. A professional will assess your basement or crawl space to determine the right approach. Some insulation materials, like closed-cell spray foam, act as an all-in-one air and vapor barrier. If using rigid foam boards, a pro will meticulously tape the seams to create a continuous barrier. Proper waterproofing and moisture control are essential for the long-term health of your home.
Use material-specific installation techniques
The type of insulation chosen dictates the installation method. For rim joists, experts recommend materials that completely block airflow, making spray foam or rigid foam boards the top choices. When applying spray foam, a technician uses specialized equipment to ensure the foam expands to fill every single nook and cranny, creating a perfect, monolithic seal. If installing rigid foam board, a pro will custom-cut each piece for a friction-tight fit, then seal the edges with foam or caulk. This precision prevents the air gaps that plague poorly installed fiberglass and ensures the insulation delivers its full R-value. This expertise with advanced materials like polyurethane geotechnical foam is what sets a professional job apart.
Follow key safety measures
Handling insulation materials requires care and the right safety gear. Old fiberglass, for example, can release tiny particles into the air when disturbed, which can irritate your skin, eyes, and respiratory system. Professionals always wear personal protective equipment (PPE), including masks, safety glasses, and gloves. The chemicals in two-part spray foam insulation also require specific safety protocols, such as proper ventilation and respiratory protection, to handle safely during application. By hiring a professional for your crawl-space repairs and insulation, you can be confident the job is done not only correctly but also safely, without putting your family’s health at risk.
Insulate Your Rim Joists: A DIY Guide
Ready to tackle your rim joists? This is one of those home improvement projects that delivers a big impact without a massive undertaking. With the right materials and a clear plan, you can make your home more comfortable and energy-efficient over a weekend. It’s all about being prepared, working carefully, and knowing which common mistakes to sidestep. Let’s walk through how you can get this done right.
Gather your tools and materials
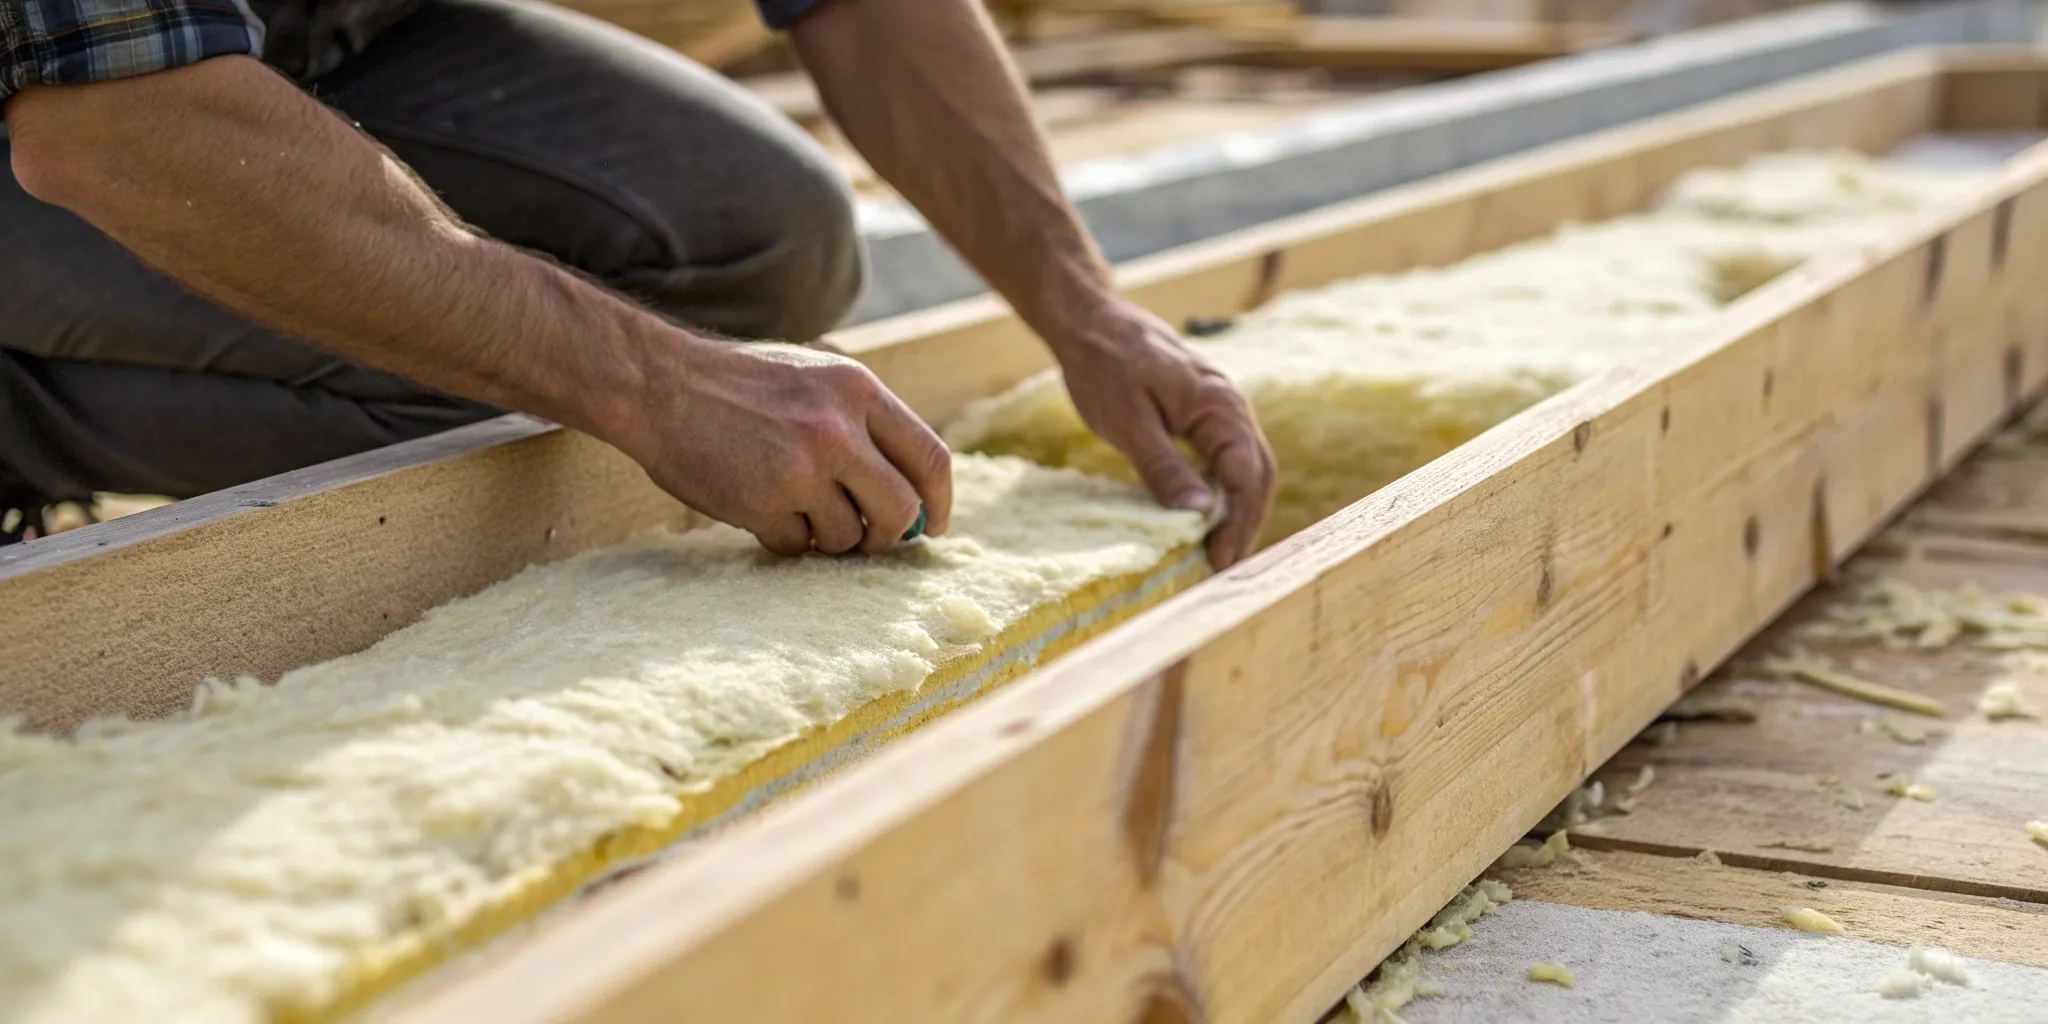
First things first, let’s get your supplies in order. You won’t need a workshop full of tools for this project. Grab a tape measure, a utility knife with plenty of sharp blades, a caulk gun, and some safety gear like gloves and glasses. For the insulation itself, homeowners typically choose between rigid foam board, fiberglass, and spray foam. For a DIY approach, the most effective method is using rigid foam board combined with a can of spray foam sealant. This combination creates a solid air and vapor barrier. Aim for a 1.5- to 2-inch thick foam board to get a good R-value.
Follow the step-by-step process
With your materials ready, it’s time to get to work. The process is straightforward, but precision is key.
- Measure and Cut: Carefully measure the height and width of each joist cavity. Transfer those measurements to your rigid foam board and cut it to size with a utility knife. It’s better to cut the board slightly smaller (about a half-inch on all sides) to leave room for the sealant.
- Install the Board: Press the cut foam board into the cavity, pushing it flush against the rim joist.
- Seal the Gaps: Use canned spray foam to seal the gap around the entire perimeter of the foam board. This is the most important step, as it blocks air leaks and creates a tight seal. Properly insulating your rim joists this way can significantly reduce your heating costs.
Avoid these common DIY mistakes
A frequent misstep is using only fiberglass insulation. While it seems easy to stuff into the cavities, fiberglass batts alone won’t stop air from moving through them. Without an air seal, you’ll still lose warm air in the winter and gain hot, humid air in the summer. The key is to create a vapor barrier. Sealing the rim joist with foam board and spray foam stops warm, moist air from leaking out and condensing on the cold wood, which can lead to mold and rot. If your home struggles with dampness, proper waterproofing in your basement or crawl space is essential before you even begin insulating.
Know when to call a pro
While the foam board method is very DIY-friendly, some situations are best left to professionals. If you’re considering two-part spray foam insulation, it’s wise to hire an expert. This material requires special equipment and training to apply safely and effectively. More importantly, if you notice any signs of trouble while preparing your rim joists—like rotting wood, insect damage, or foundation cracks—stop what you’re doing. These are symptoms of a larger issue that insulation can’t fix. In these cases, it’s time to call in a specialist to assess the situation and recommend the right crawl-space repairs to protect your home’s structural integrity.
Maintain Your Rim Joist Insulation
Once your rim joist insulation is installed, it’s easy to adopt an “out of sight, out of mind” attitude. But like any critical component of your home, it needs a little attention to keep doing its job effectively. Think of it as a regular health check-up for your home’s thermal barrier. Proper maintenance ensures your insulation continues to save you money on energy bills, prevent moisture issues, and keep your living spaces comfortable year-round. It’s not about adding another major task to your to-do list; it’s about simple, periodic checks that protect your investment.
A few simple inspections a couple of times a year can make all the difference. Catching a small problem, like a minor gap or a bit of moisture, before it escalates can save you from the headache and expense of major foundation repair. When insulation fails, it can lead to bigger issues like wood rot, mold growth, and pest infestations that compromise your home’s structure. Maintaining your insulation is a straightforward process that helps you stay ahead of these potential problems, ensuring your home remains healthy, efficient, and secure for years to come.
How to perform regular inspections
Regular inspections are the best way to ensure your rim joist insulation remains in top shape. You don’t need to be an expert to do a quick visual check. Once or twice a year, grab a good flashlight and head down to your basement or crawl space. Carefully look over the insulated areas. You’re checking to see that the insulation is still snug against the rim joist and subfloor, with no sagging or gaps. Gently press on the material to feel for any damp spots. Also, take a moment to notice if you feel any drafts, as this can signal an air leak that needs to be sealed. These simple regular inspections are your first line of defense against bigger problems.
Watch for these warning signs
Knowing what to look for makes your inspections much more effective. Keep an eye out for a few key warning signs that something is amiss. The most obvious is any sign of moisture, like water stains, condensation, or visible dampness on the insulation or surrounding wood. You should also look for any gaps or misalignment, as even small openings can let in cold air and moisture, reducing energy efficiency. Other red flags include discoloration that could indicate mold growth, a persistent musty smell, or evidence of pests like droppings or chewed material. If you spot any of these issues, it’s a clear signal that your insulation and possibly your foundation need attention.
Take preventive measures
The best way to deal with insulation problems is to prevent them from happening in the first place. Start by using high-quality, moisture-resistant materials like closed-cell spray foam or rigid foam board. Ensuring the insulation is installed correctly is just as important, as a proper fit prevents air leaks and moisture intrusion. Beyond the insulation itself, manage the moisture levels around your foundation. Make sure your gutters and downspouts direct water away from your home and that the ground slopes away from the foundation walls. For an even higher level of protection, professional waterproofing can keep your basement or crawl space dry, safeguarding your insulation and structure.
Monitor your insulation’s performance
Aside from visual checks, you can monitor how well your insulation is performing by paying attention to your home’s comfort and energy use. Have your heating or cooling bills started to creep up without explanation? Do the floors above your basement or crawl space feel noticeably colder in the winter? These can be signs that your insulation is no longer as effective as it once was. Some materials can settle, shrink, or degrade over time, losing their insulating R-value. If you suspect a drop in performance, it might be time to check your insulation periodically and address underlying issues with crawl-space repairs to restore your home’s energy efficiency.
Breaking Down the Costs and Return on Investment
Thinking about insulating your rim joists means looking at both the initial expense and the long-term benefits. While there’s an upfront cost, this project is an investment in your home’s comfort, structural health, and energy efficiency. The return isn’t just about money saved on utility bills; it’s also about creating a more comfortable and durable living space. By understanding the costs and potential savings, you can make an informed decision that pays off for years to come.
Estimate your material costs
The price tag for your project will largely depend on the type of insulation you choose. Materials like spray foam, a top-tier option for its air-sealing properties, can cost between $1,200 and $3,000 for an average-sized home, depending on your location and the specifics of the job. While rigid foam boards might be slightly less expensive, it’s important to weigh the material’s performance against its cost. Choosing a high-quality material is a key part of effective crawl-space repairs and preventing future issues with moisture and pests.
Factor in professional installation expenses
While a DIY approach might seem like a way to save money, professional installation ensures the job is done correctly and safely. A pro will properly seal air leaks, install vapor barriers where needed, and handle the materials according to best practices. This expertise is crucial for maximizing energy efficiency and preventing moisture problems down the road. The average investment for professional installation typically falls between $1,200 and $1,500. Think of it as an investment in getting the full benefits of the insulation from day one.
Calculate your potential energy savings
Here’s where the return on investment really shines. Properly insulated rim joists can significantly reduce air leakage, which means your heating and cooling systems don’t have to work as hard to maintain a comfortable temperature. Over time, this translates into noticeable savings on your monthly energy bills. While the exact amount varies based on your climate and home, the consistent savings help offset the initial cost of the project. This improvement in energy efficiency is a major benefit of comprehensive home waterproofing and insulation strategies.
Find available rebates and incentives
Before you start your project, take a moment to look for financial perks. Many local utility companies and state governments offer rebates or tax credits for energy-efficient home upgrades, including insulation. A quick search on your utility provider’s website or your state’s energy office page can uncover programs that help lower the overall cost. These incentives can make the project even more affordable and improve your return on investment, making it an easier decision to move forward with confidence.
Related Articles
- How Proper Water Drainage Can Protect Your Home’s Foundation
- What You Should Know About Polyurethane Foam Foundation Leveling
Frequently Asked Questions
How do I know if my uninsulated rim joists are causing problems? The signs are often things you already notice but might not have connected to your foundation. If you have floors that feel chilly in the winter, especially around the perimeter of your home, that’s a major clue. You might also feel subtle drafts near your baseboards or find that certain rooms are just harder to keep warm. Consistently high energy bills are another red flag, as unsealed rim joists are a significant source of heat loss.
Is it okay to use fiberglass insulation for my rim joists? While it might seem like an easy fix, using fiberglass insulation in this area is a mistake. The main problem is that fiberglass doesn’t stop air from moving through it, so you’ll still have drafts and energy loss. Even worse, it can act like a sponge, trapping moisture against the wooden structure of your home. This creates the perfect conditions for mold and rot, which can lead to much bigger problems than a high energy bill.
What’s more important: the type of insulation or the R-value? They’re both important, but the type of material you choose is arguably more critical for rim joists. The primary goal here is to create an airtight seal, which materials like spray foam or rigid foam board do exceptionally well. A high R-value won’t mean much if cold air can still flow freely around the insulation. The best solution is a material that both stops air leaks and provides a good R-value for your climate zone.
Can I really do this project myself? Absolutely, insulating your rim joists with rigid foam board and canned spray foam is a very manageable weekend project for a handy homeowner. The key is to be meticulous about cutting the boards to fit and sealing every single edge to create a complete air barrier. However, if you’re considering two-part spray foam or if you’re just not comfortable with the work, calling a professional ensures the job is done safely and to the highest standard.
What should I do if I find moisture or damaged wood when I inspect my rim joists? If you discover signs of moisture, rot, or insect damage, you should stop the insulation project immediately. These are symptoms of a larger problem that insulation will only hide, not fix. Trapping moisture against a damaged foundation can make the situation much worse. At this point, it’s best to have a foundation or crawl space specialist take a look to diagnose the root cause and recommend the proper repairs.